Retaining wall drainage pipe is essential for preventing wall failure and extending the life of your hardscape investment. Without proper drainage, water pressure can build up behind your wall and lead to expensive damage.
“Water is the major cause of retaining wall failures.” – Professional hardscape installer
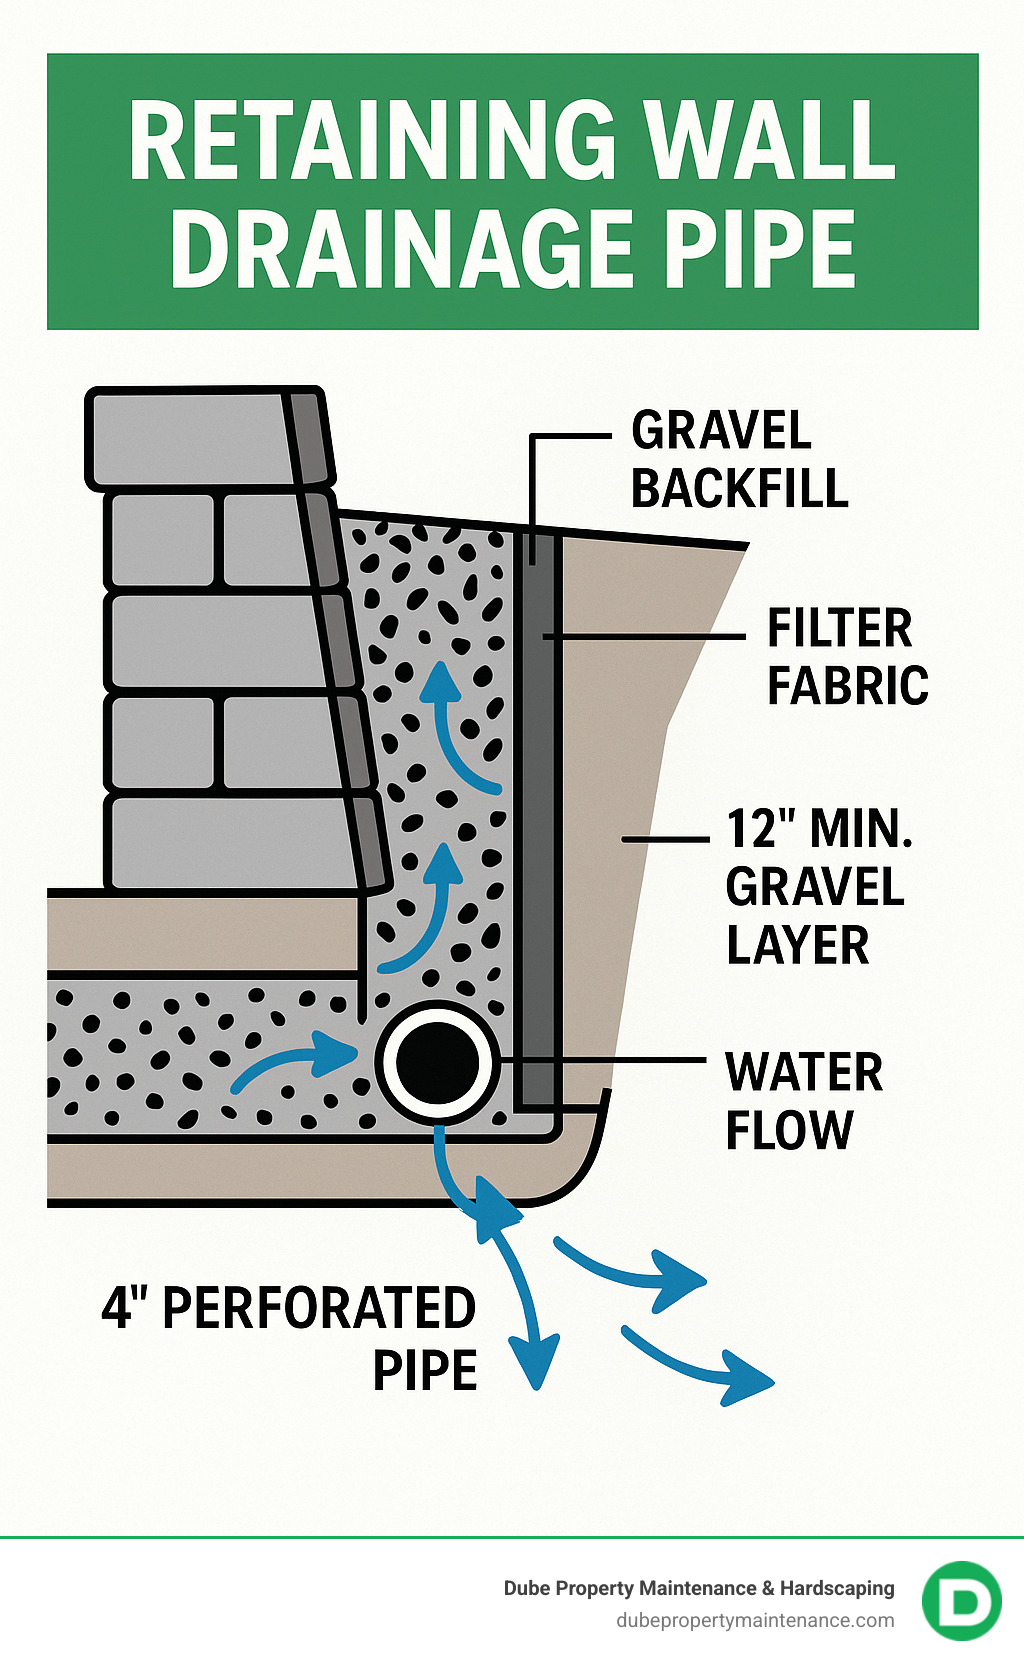
Quick Answer: Retaining Wall Drainage Pipe Essentials
Think of your retaining wall as a dam. It’s holding back not just soil, but potentially hundreds of gallons of water after heavy rain. This creates hydrostatic pressure that can literally push your wall over or cause it to crack and bow.
Most homeowners don’t realize that up to 80% of retaining wall failures stem from poor drainage. When water can’t escape, it adds tremendous weight and pressure behind the wall. In winter climates like Methuen, MA, this trapped water can freeze and expand, causing even more damage.
A properly installed drainage pipe system creates a path of least resistance, allowing water to flow away from your wall instead of pushing against it. This simple addition can mean the difference between a wall that lasts for decades and one that fails within a few seasons.
Common Retaining wall drainage pipe vocab:
– Concrete retaining wall blocks
– DIY retaining wall blocks
– Retaining wall block calculator
When we build retaining walls for our clients across Methuen and surrounding areas, we always emphasize one critical factor: proper drainage. It’s not just an add-on feature—it’s the difference between a wall that stands strong for decades and one that fails within a few seasons.
Water is surprisingly powerful. When it saturates the soil behind a retaining wall, it creates what engineers call hydrostatic pressure. This invisible force pushes horizontally against your wall, and the pressure increases with depth—just like when you’re swimming in the deep end of a pool and feel more pressure on your ears the deeper you go.
“At Dube Property Maintenance & Hardscaping, we’ve seen walls that were perfectly built structurally but failed because they lacked proper drainage. The hydrostatic pressure simply became too much.”
In Massachusetts and New Hampshire, where we experience significant rainfall and snowmelt, this pressure can build quickly. Just one inch of rain on a 50-foot section of wall can translate to hundreds of gallons of water seeking the path of least resistance—and that path is often through or under your wall.
For our New England clients, frost heave presents another serious concern. When trapped water behind a wall freezes, it expands by approximately 9%. This expansion can exert tremendous force, literally lifting and cracking even well-built walls.
We’ve seen frost heave damage in towns like North Andover and Haverhill where temperature fluctuations cause repeated freeze-thaw cycles throughout winter. It’s like nature’s jackhammer slowly working away at your investment.
Without proper retaining wall drainage pipe systems, a cascade of problems often occurs:
Soil saturation weakens the earth behind the wall, creating a heavy, unstable mass. This increased weight puts additional stress on the structure—sometimes doubling the force your wall needs to withstand. Over time, erosion undermines the foundation, leading to structural failure that manifests as leaning, bulging, or complete collapse.

The consequences don’t stop at the wall itself. Property damage often extends to surrounding landscaping and structures. Water that can’t drain properly doesn’t just disappear—it finds new paths, potentially damaging your home’s foundation or your neighbor’s property. This can lead to increased insurance costs as claims pile up and repairs become more extensive.
We’ve seen simple drainage issues turn into $5,000-$15,000 rebuilds that could have been prevented with proper installation from the start. In severe cases involving property damage or when larger engineered walls fail, costs can easily exceed $25,000.
Proper drainage isn’t just a technical recommendation—it’s protection for your investment and your property. That’s why at Dube Property Maintenance & Hardscaping, we never cut corners when it comes to installing the right drainage solutions for your specific site conditions.
Not every retaining wall requires a drainage pipe, but many do. After building hundreds of walls across Methuen and the Merrimack Valley, we’ve developed a clear sense of when drainage becomes essential.
The industry standard is clear: walls 4 feet or taller absolutely require drainage pipe systems. At this height, the potential water pressure becomes significant enough to threaten wall integrity.
For walls under 4 feet, drainage pipes are still recommended as inexpensive insurance against failure. I often tell homeowners, “At 2′ height drainage probably isn’t necessary but is cheap insurance.” It’s that peace of mind that makes the small additional investment worthwhile.
Clay soils are notorious for retaining water and becoming unstable when wet. Throughout much of Massachusetts, particularly in areas like Chelmsford and Dracut, clay-heavy soils are common.
If your property has clay soil, poorly draining soil, or compacted soil from previous construction, then retaining wall drainage pipe installation is essential regardless of wall height. We’ve seen even small garden walls fail in clay-heavy areas after particularly wet seasons.
Different wall materials handle water differently. Segmental block walls have joints that allow some natural drainage, while poured concrete or cinder block walls have no natural joints and absolutely require drainage systems. Natural stone walls may have some natural drainage but still benefit from proper pipe systems.
When we install concrete or block walls for our clients, we always include drainage because we know these solid structures need help managing water pressure.
Your property’s unique characteristics play a huge role in determining drainage needs. If ground slopes toward your wall, you’re essentially creating a water collection point. Similarly, the presence of groundwater within 50 feet, tiered or terraced walls where upper tiers affect lower ones, proximity to downspouts or other water sources, and areas with heavy seasonal rainfall all point toward needing proper drainage.
In New England’s climate, these factors become even more important due to our significant precipitation throughout the year.
Many municipalities in Massachusetts and New Hampshire require drainage systems for retaining walls as part of their building codes. Before starting your project, check with local building departments in towns like Methuen, Lawrence, or Salem, NH to ensure compliance.
We’re familiar with the various local codes and can help steer these requirements to ensure your wall is both effective and legal.
The cost of adding a retaining wall drainage pipe is minimal compared to rebuilding a failed wall. Typically, drainage components add only about 5-10% to the total project cost but can prevent thousands in repair expenses.
I remember one client who decided to skip drainage to save a few hundred dollars. Two years later, we were back rebuilding the entire wall after spring rains caused a complete failure. The repair cost was nearly triple the original project.
As we often tell our clients: “It’s not whether you can afford to add drainage—it’s whether you can afford not to.”
Selecting the correct materials for your drainage system is crucial for long-term performance. At Dube Property Maintenance & Hardscaping, we’ve installed countless drainage systems throughout Methuen, Andover, and surrounding communities, and we’ve learned what works best in New England conditions.
Perforated PVC and HDPE (High-Density Polyethylene) are the industry standards for retaining wall drainage pipe. Both materials offer excellent durability and resistance to crushing under soil pressure.
When we’re selecting pipes for our clients’ projects, we consider several key factors. Rigid PVC pipes provide consistent slope and are less likely to sag over time, making them perfect for straight wall applications. Meanwhile, corrugated pipes give you that flexibility needed for curved walls or uneven terrain. For most residential walls, a 4-inch diameter pipe does the job beautifully, though larger walls or areas with heavy rainfall might need a 6-inch pipe to handle the water volume.
The perforation pattern makes a huge difference too. We strongly recommend all-around perforated pipes rather than pipes with only two slots. Our experience matches the research showing all-around perforations provide 85% open core versus just 70% for two-slot designs. Those extra entry points significantly reduce the risk of clogging, which is the last thing you want after investing in your beautiful wall.
There’s been some confusion about whether drainage pipe holes should face up, down, or all around. Here’s the definitive answer:
“Perforated pipes should have holes facing down so water from beneath is forced into the pipe. Pipes with only top-facing holes risk floating and will not carry away water until fully submerged.”
All-around perforated pipes eliminate this concern entirely, allowing water entry from any direction while preventing the pipe from floating. This is especially important during those spring thaws we get here in Massachusetts when water volume can increase dramatically.
Filter sock-wrapped pipes have a geotextile sleeve that helps prevent soil particles from entering and clogging the pipe. We often recommend these for properties with fine-grained soils, areas without additional filter fabric, or situations where maintenance access might be challenging.
That said, the sock itself can sometimes clog over time. This is why we frequently suggest using non-sock pipe combined with proper aggregate and separate filter fabric for the best long-term performance. It’s a small detail that makes a big difference in how your system performs five or ten years down the road.
For most standard residential walls we build in Methuen and surrounding areas, a single “toe drain” at the base of the wall works perfectly. However, for larger walls with geogrid reinforcement, we recommend a dual-pipe system:
This dual system provides redundancy and handles water from different sources, giving you extra protection against failure.
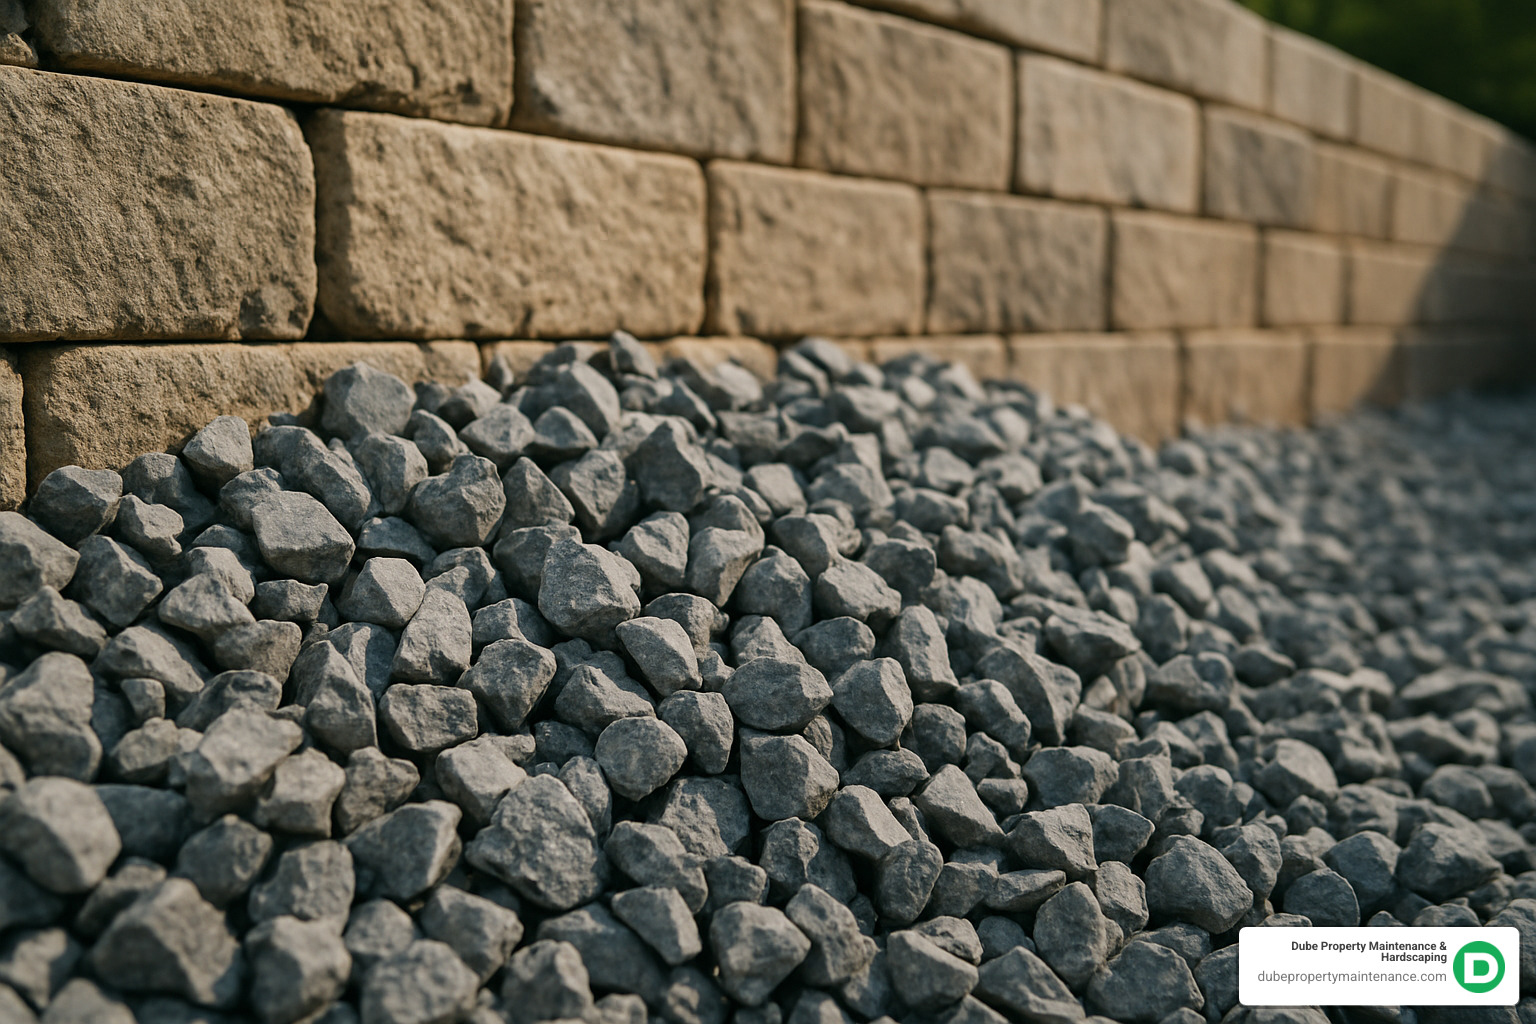
The aggregate surrounding your retaining wall drainage pipe is just as important as the pipe itself. We always use clean, angular 3/4-inch crushed stone (commonly called #57 stone) with a minimum layer thickness of 12 inches behind the wall.
We strongly advise against using round pea gravel – it might look pretty in the bag, but it rolls and doesn’t compact properly, creating unstable conditions. And we never use stone with fines, sand, or soil mixed in, as these materials defeat the purpose of your drainage system by clogging it over time.
Not all filter fabrics are created equal, and choosing the right one makes a world of difference. We always use non-woven geotextile that allows water to pass while blocking soil particles. For proper installation, we ensure a minimum width of 3 feet with a 6-inch overhang, overlap seams by at least 4 inches, and attach to the wall face using construction adhesive.
Think of geotextile as the bouncer at your wall’s exclusive club – it lets the water in but keeps the dirt and debris out!
| Pipe Type | Pros | Cons | Best For |
|---|---|---|---|
| Rigid PVC with all-around holes | Maintains consistent slope, durable | Less flexible for curves | Straight walls, heavy soil loads |
| Corrugated with all-around holes | Flexible, easy to work with | May sag if not properly supported | Curved walls, DIY installation |
| Sock-wrapped pipe | Built-in filtration, less aggregate needed | Can clog in fine soils | Clay soils, minimal maintenance |
| Smooth-wall HDPE | High crush resistance, smooth interior | More expensive | Commercial projects, high load applications |
When we’re designing your drainage system, we consider all these factors to create a solution that will protect your wall for decades to come. It might seem like a lot of detail, but getting these fundamentals right is what separates a wall that lasts from one that fails.
Scientific research on pipe performance
Installing a proper drainage system isn’t just recommended—it’s essential for the longevity of your retaining wall. At Dube Property Maintenance & Hardscaping, we’ve perfected our installation process through hundreds of projects across Methuen and the surrounding communities.
We often tell our clients that the drainage pipe is like the heart of your retaining wall system—if it’s not working properly, everything else will eventually fail. Let me walk you through our proven installation method that keeps walls standing strong through harsh New England seasons.
Before any pipe goes in, you need a solid foundation. After completing your wall foundation and laying the first course of blocks, make sure everything is level and properly compacted. We always place at least 6 inches of compacted DOT ¾”-0 gravel under that first course to create a stable base.
Next, we excavate a trench along the base of the wall. This isn’t just a quick dig—it needs to be about 12 inches wide and deep enough to maintain the proper slope throughout. We shape the trench with a slight ramp toward the wall base, which helps direct water flow exactly where we want it.
This step is often rushed by inexperienced installers, but it’s crucial. We carefully place 2-3 inches of clean, angular ¾-inch gravel in the trench and level it carefully. This creates a stable bed for the pipe and prevents it from sitting directly on soil where it could get clogged or damaged.
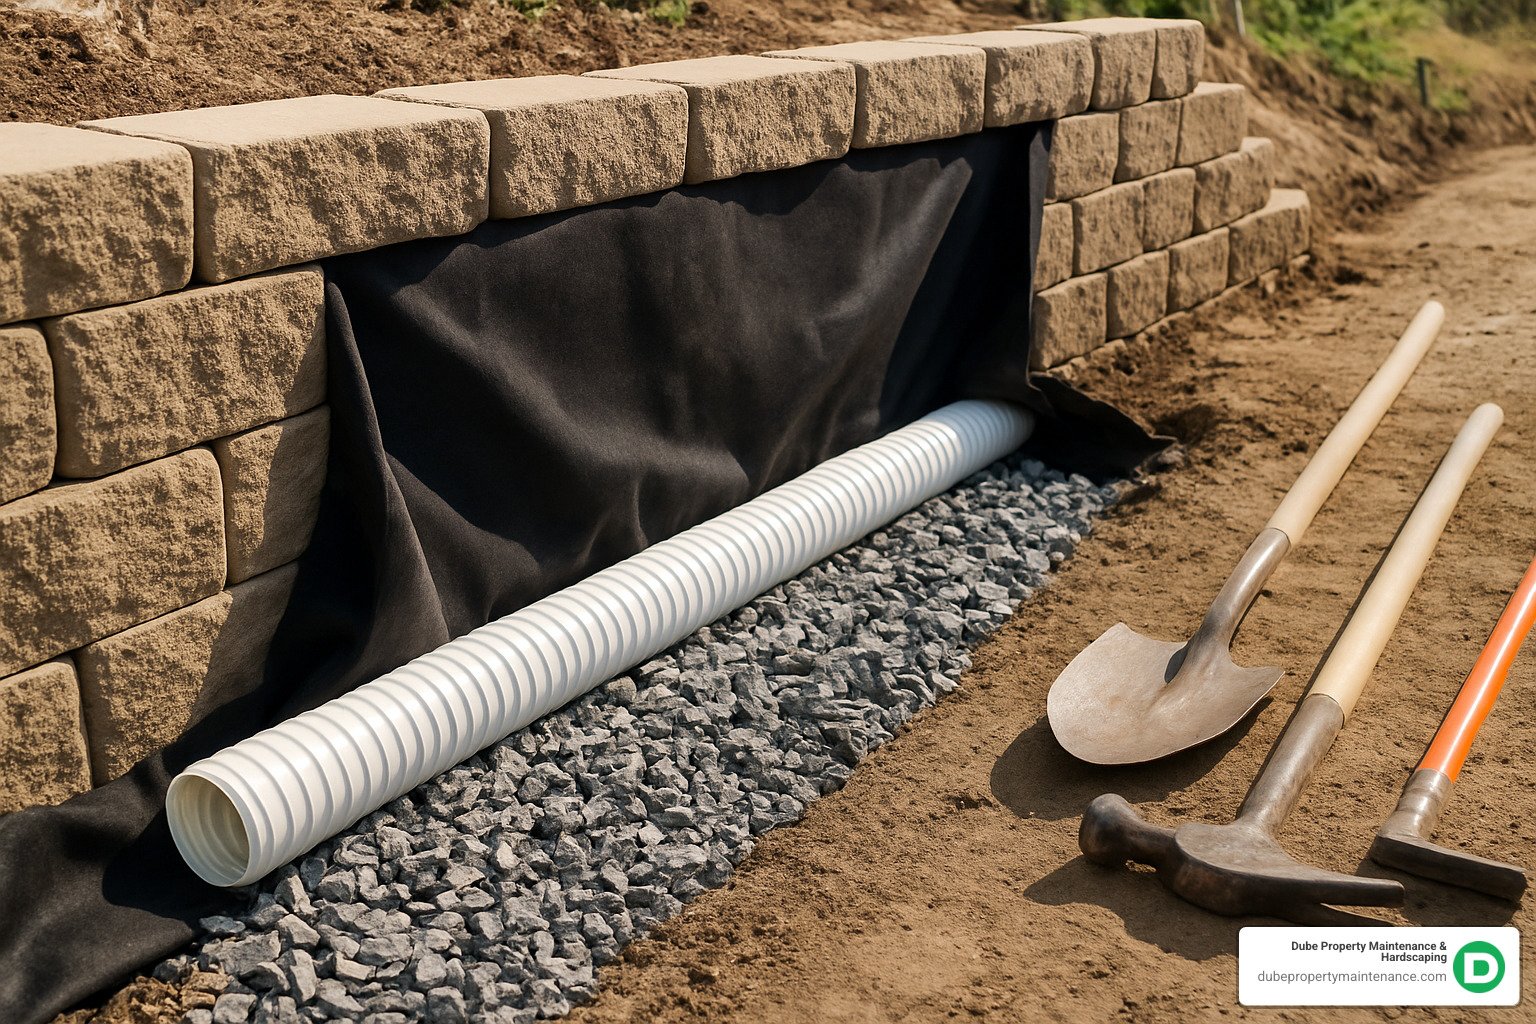
The unsung hero of any drainage system is quality filter fabric. We roll out non-woven geotextile along the excavated area, leaving at least 6 inches of extra fabric on each side. This extra will later wrap over the drainage stone, creating a complete envelope. For extra security, we often secure the fabric to the wall face with construction adhesive.
Now comes the star of the show—the retaining wall drainage pipe itself. We typically use 4-inch perforated pipe, laying it carefully along the trench on top of that initial gravel layer. The key here is ensuring a consistent downward slope of 1-2% toward the outlet points. For perspective, a 50-foot wall needs a minimum drop of 6-12 inches from one end to the other.
Water needs somewhere to go, so we determine outlet locations every 30-50 feet along the wall. For walls with a low point in the middle, we install a T-fitting at that point. Depending on the site, outlets can daylight through the wall face, go under the wall, or connect to existing storm drains.
With the pipe in place, we cover it with additional clean angular gravel, extending at least 12 inches behind the wall. This drainage zone typically fills to within 6 inches of the top of the wall, creating a substantial path for water to flow away from your structure.
Extra fabric from step 4? Now we fold it over the top of the gravel layer, overlapping sections by at least 4 inches. This creates a complete envelope around the drainage aggregate, preventing soil from migrating into the system and clogging it over time.
The final layers consist of native soil or additional material placed above the wrapped drainage stone. We’re careful to compact this in 6-inch lifts to prevent future settling. The surface is graded to direct water away from the wall, adding another layer of protection.
Those outlet points need protection too. We install covers, grates, or erosion protection at discharge points and make one final check to ensure outlets are clear of obstructions. Small animal screens are often added to prevent critters from building nests in your drainage system.
For a professional installation, you’ll need proper equipment. A transit or laser level ensures accurate slope measurement, while basic tools like shovels, picks, tape measures, and utility knives handle the grunt work. Don’t forget safety gear—glasses, gloves, and proper footwear protect against the hazards of construction work.
Before we consider any drainage installation complete, we run through a thorough quality control check. We verify the pipe has a consistent downward slope of at least 1-2%, all connections are secure, filter fabric completely surrounds the drainage stone, outlets are clear and protected, and no soil has contaminated the clean stone backfill.
The exact placement of your retaining wall drainage pipe can make or break your system’s effectiveness. This isn’t something to eyeball—precision matters here.
The ideal position for your drainage pipe is at the “toe” of the wall—right where the wall meets its foundation. This strategic location intercepts water before it can pool and build pressure against your structure.
For walls with a concrete footing, we place the pipe just behind the footing on the soil side. For segmental block walls, we position it directly behind the first course of blocks. This placement has proven most effective in our decades of experience building walls throughout New England.
“Measure twice, cut once” applies to drainage too. We use professional-grade laser levels to ensure precise slope:
This attention to detail ensures water flows properly through the system rather than pooling in low spots where it can cause damage.
For walls over 6 feet tall or those using geogrid reinforcement, a single pipe often isn’t enough. We implement a dual-pipe system with a toe drain at the front bottom (primary pipe) and a heel drain at the back edge of the reinforced zone. These work together to manage water from different sources and provide redundancy if one pipe becomes compromised.
Water needs motivation to flow, and that comes from slope. A minimum slope of 1% is essential—that’s a 1-inch drop for every 100 inches of pipe. We typically aim for 2% when possible for better flow. For example, a 30-foot wall needs a minimum 3.6-inch drop at 1%, while a 100-foot wall needs a minimum 12-inch drop.

It might sound strange, but pipes with water flowing through them can actually float in saturated soil conditions. To prevent this, we use all-around perforated pipe rather than top-only perforations, surround the pipe completely with angular gravel, and ensure proper compaction of materials above the drainage zone.
The material surrounding your drainage pipe is just as important as the pipe itself. Proper backfilling ensures long-term drainage performance and wall stability.
At Dube Property Maintenance & Hardscaping, we’re picky about our materials. For drainage backfill, we exclusively use clean, angular ¾-inch crushed stone (commonly called #57 stone). The angular edges lock together when compacted, creating about 40% void space for excellent water flow while maintaining structural integrity.
We steer clear of rounded stones like pea gravel. They might look nice, but they roll against each other and don’t compact properly, leading to settlement issues down the road. I’ve seen too many walls fail because someone tried to save a few dollars using the wrong backfill material.
Even drainage stone requires proper compaction. We place stone in 6-inch “lifts” or layers, lightly compacting each before adding the next. We’re careful not to damage or displace the drainage pipe during this process. For the soil placed above the drainage zone, we compact in 4-6 inch lifts to prevent future settlement that could direct water toward the wall.
Based on industry standards and our experience in Massachusetts and New Hampshire conditions, we recommend:
For perspective, a typical 4-foot residential wall requires approximately 1 cubic yard of drainage stone per 10 linear feet of wall. It’s an investment that pays dividends in wall longevity.
One of the biggest mistakes we see is allowing native soil to mix with drainage stone. This defeats the entire purpose of your drainage system by clogging it over time. We use complete wraps with geotextile fabric, careful placement of backfill materials, and clear demarcation between the drainage zone and native soil to prevent this problem.
More info about installing fabric
While the retaining wall drainage pipe gets all the glory, the filter fabric surrounding it is equally crucial for long-term success. This humble material prevents your entire drainage system from failing prematurely.
For retaining wall drainage, non-woven geotextile is the clear winner. Made of randomly oriented fibers, it allows water to pass through while blocking soil particles. Woven fabric, with its more uniform weave pattern, is better for separation and stabilization, not filtration.
We specifically recommend non-woven filter fabric with a minimum weight of 4 oz/square yard for most residential applications in our Massachusetts and New Hampshire service areas. The small additional cost pays off many times over in system longevity.
The primary purpose of filter fabric is to prevent fine soil particles from infiltrating and clogging your drainage aggregate and pipe. Without it, even the best-designed systems will eventually fail as soil migrates into the voids between stones.
As one contractor in our research noted: “It’s easy to focus on specifications and overlook incidental details,” but fabric is one detail that should never be skipped. I’ve torn out enough failed walls to know this is absolutely true.
For maximum effectiveness, we wrap the fabric completely from behind the wall, under the drainage stone, and fold it back over the top. We overlap seams by at least 4-6 inches and secure fabric to the wall face with construction adhesive. During backfilling, we handle the fabric carefully to prevent tears that could compromise the system.
New England winters can be brutal on drainage systems. Proper filter fabric installation provides critical protection by preventing soil fines from entering the drainage zone, maintaining void spaces for water movement even after years of service, and reducing the risk of frost heave by keeping drainage aggregate clean.
In the 20+ years we’ve been building retaining walls across Methuen, Lawrence, and surrounding areas, we’ve never regretted using high-quality filter fabric. But we’ve certainly seen the consequences when others have skipped this step.
The final component of a well-designed retaining wall drainage pipe system is proper outlet planning. This ensures water can exit efficiently while maintaining your wall’s appearance.
Weep holes are the traditional method for water to exit a retaining wall—small openings in the face of the wall, typically 2-4 inches in diameter, that allow water to drain from behind. While functional, they can be unsightly and prone to clogging. Today, we have better options.
Getting the spacing right is crucial. Industry standards recommend outlets every 30-50 feet along the wall length, but we adjust based on conditions. For clay soils, we use closer spacing (every 30 feet), while sandy soils might allow wider spacing (up to 50 feet). We always add additional outlets at all low points and at both ends of the wall.
Proper spacing ensures water can exit efficiently without building up pressure behind any section of the wall. It’s better to have too many outlets than too few.
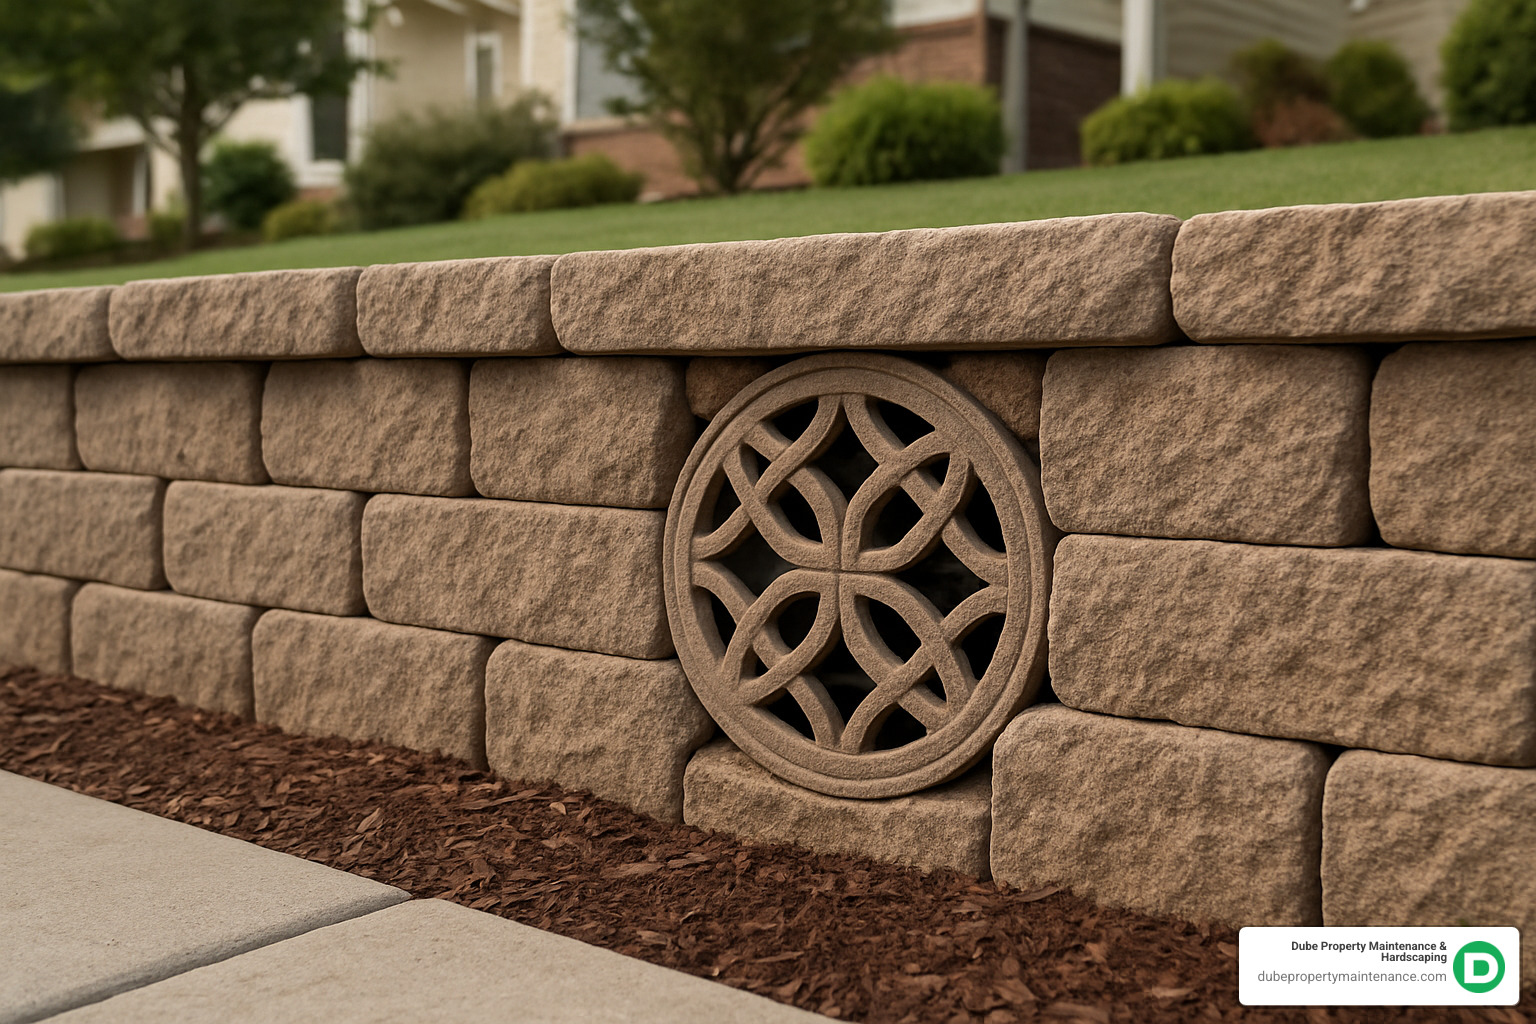
Nobody wants ugly pipe ends protruding from their beautiful retaining wall. At Dube Property Maintenance & Hardscaping, we offer several attractive solutions:
Square decorative grates come in multiple colors to match wall blocks and maintain block bond lines for a cleaner look. They back-connect to standard 4-inch pipe and blend seamlessly with your wall.
Universal Wall Drains are designed specifically for retaining walls and blend with block patterns. They include built-in animal guards and come in various sizes and colors to match your wall perfectly.
For complete concealment, we can create under-wall exits that direct water beneath the wall or use concealed outlet routing to run pipe underground to a less visible location, daylighting in planting beds or connecting to existing drainage systems.
In many Massachusetts and New Hampshire municipalities, connecting to stormwater systems may be required or preferred. We can create direct connections that tie into existing storm drains (with proper adapters, seals, and permits), indirect connections that daylight near stormwater inlets, or sump systems that collect drainage in a basin and pump it to an appropriate discharge point when gravity flow isn’t possible.
Regardless of outlet style, protection is essential. We place stone or erosion matting at discharge points to prevent soil erosion, install screens to prevent animals from nesting in your drainage system, and ensure outlets remain visible and accessible for future inspection and maintenance.
Scientific research on outlet spacing
As professional hardscapers serving Methuen and surrounding communities, we’ve seen both innovative solutions and common failures in retaining wall drainage pipe systems. Let’s explore advanced options and how to avoid costly mistakes.
Traditional gravel and pipe systems work well, but newer geocomposite panels offer advantages in certain situations:
These panels effectively replace the gravel layer behind the wall, creating a continuous drainage path that directs water to the base drain.
These specialized drainage products feature:
While more expensive than traditional systems, these products can provide superior performance in challenging conditions.
For high-end residential and commercial projects across our service area, we often recommend architectural-grade drainage solutions:
These products are particularly popular in Andover, North Andover, and other communities where aesthetic considerations are paramount.
After repairing countless failing walls, we’ve identified these frequent errors:
A drainage pipe without proper slope is barely better than no pipe at all. We’ve seen pipes installed completely level, which allows sediment to accumulate and eventually clog the system.
Solution: Always maintain a minimum 1-2% slope (1-2 foot drop per 100 feet of wall).
Round pea gravel seems like a good choice but creates three significant problems:
– Doesn’t compact properly
– Allows soil migration between stones
– Tends to settle over time
Solution: Use only angular 3/4-inch clean stone (#57).
Skipping the filter fabric is a short-term savings that leads to long-term failure as soil particles infiltrate the drainage stone and clog the pipe.
Solution: Always use non-woven geotextile to wrap the entire drainage zone.
Outlets placed too high, too far apart, or in locations prone to blockage will compromise the entire system.
Solution: Follow industry guidelines for spacing (30-50 feet) and ensure outlets are protected and accessible.
Even the best drainage systems require periodic maintenance:
For optimal performance:
– Every 3-5 years, flush the system with water
– Access via cleanout caps if installed
– Use camera inspection for larger commercial systems
Based on industry data, addressing drainage issues can vary widely in cost:
– Minor outlet repairs: $300-$900
– Partial system flushing: $500-$1,500
– Major drainage retrofits: $1,500-$7,500
These are average internet prices and not specific to Dube Property Maintenance & Hardscaping.
“The most expensive drainage system is the one you have to install twice. Do it right the first time.”
After installing hundreds of retaining walls throughout Methuen, Lawrence, Andover, and nearby towns, our team at Dube Property Maintenance & Hardscaping has heard just about every question imaginable about retaining wall drainage pipe systems. Let me share the most common questions we get, along with straightforward answers based on our New England experience.
Living in Massachusetts means dealing with some pretty extreme weather cycles. That’s why we recommend checking your drainage outlets at least twice a year:
Once in spring after the snow melts to clear any winter debris, and again in fall before the freeze-thaw cycles begin. It’s also smart to take a quick look after those heavy summer thunderstorms we sometimes get.
What should raise red flags? Watch for water seeping through the wall face between outlets, soil washing out near the base, any leaning or bulging in the wall structure, or new cracks appearing. If you spot any of these, give us a call right away—small problems are much easier to fix than big ones.
I get this question all the time, especially from homeowners working on DIY garden walls. Technically, walls under 4 feet tall don’t always require drainage pipe, but here in New England, I still recommend it as cheap insurance.
Think about it this way: adding drainage typically costs $3-$9 per linear foot, but repairs to a failed wall can run $20-$60 per foot or more. Those numbers are based on average internet data, not our specific pricing.
The decision really depends on your specific situation. If you have clay soil (common in parts of Methuen and Lawrence), if your wall sits at the bottom of a slope, or if it’s near downspouts or irrigation—definitely install drainage regardless of height. Our freeze-thaw cycles in Massachusetts are particularly tough on small walls without proper drainage.
An ounce of prevention is worth a pound of cure, especially with drainage systems. The simplest maintenance routine includes:
Keep those outlet areas clear of leaves, mulch, and debris—especially before winter sets in. Make sure the ground above your wall slopes away from it, not toward it. Be careful about planting choices near your wall—those beautiful willow trees have incredibly invasive roots that can clog pipes.
For important structural walls, consider professional flushing every few years. It’s much like having your home’s plumbing snaked—a preventive measure that can save thousands in repairs.
When we notice slow drainage or water seeping through wall faces during our maintenance visits, that’s usually the first sign of clogging that needs attention.
Many older retaining walls throughout Massachusetts and New Hampshire were built before current drainage standards. Here’s how to tell if yours is properly drained:
Look for visible outlets spaced every 30-50 feet along the wall. Check for small weep holes at the base—even these basic openings indicate someone thought about drainage. Examine the wall face for white powdery residue (called efflorescence), which means water is moving through the wall material rather than draining properly.
The most telling sign? Wall performance. Walls without good drainage often show bulging, leaning, or cracking, especially after wet seasons or spring thaws.
Yes, though it’s definitely more challenging than installing drainage during initial construction. We’ve successfully retrofitted drainage to many walls throughout our service area.
The most common approach is installing a toe drain by carefully excavating at the base of the wall. We can also improve surface drainage above the wall, which sometimes solves minor issues. For severe cases where access is limited, there are specialized drainage materials that can be injected behind the wall.
Each situation is unique, and the feasibility depends on access, wall type, and soil conditions. Our team can assess your specific wall and recommend appropriate solutions.
These systems are cousins, but they serve different purposes:
Retaining wall drainage pipe systems are specifically designed to relieve water pressure directly behind a wall structure. They typically run parallel to the wall at its base.
French drains have a broader application for yard drainage and are usually installed to lower the water table or intercept groundwater flowing across your property.
For many of our Methuen and Andover clients, we actually recommend installing both systems for comprehensive water management, especially on properties with significant grade changes or water issues.
When it comes to drainage, it’s always better to overdo it than underdo it. Water will always find the path of least resistance—our job is to make sure that path doesn’t damage your retaining wall.
More info about retaining wall services
Proper retaining wall drainage pipe installation isn’t just checking a box on a technical requirement list—it’s truly the foundation of your wall’s future. At Dube Property Maintenance & Hardscaping, we’ve built our reputation by creating drainage systems that weather every New England season across Methuen and surrounding communities.
While drainage might not be the showstopper feature of your retaining wall that guests immediately notice, it’s working silently behind the scenes as your wall’s most faithful protector. The investment in doing drainage right pays you back through:
Extended wall lifespan that often adds decades to your structure’s life. Many of our earliest projects still stand strong today, thanks to proper water management from the start.
Reduced maintenance needs throughout the seasons—no more scrambling after heavy rains to address problems.
Prevention of structural failures that can cost thousands to repair—we’ve seen too many beautiful walls ruined by water pressure that could have been managed.
Protection of your surrounding landscape from erosion and water damage that can affect other investments in your property.
Peace of mind when those heavy New England downpours hit—knowing your wall was built to handle the pressure.
Our approach blends time-tested drainage principles (we’ve learned what works in Massachusetts winters!) with modern materials that perform better than ever. Whether we’re crafting a charming garden wall in Andover or installing a substantial commercial retaining structure in Salem, NH, we bring the same careful attention to drainage design.
As our New England weather patterns become increasingly unpredictable—with those surprise intense rainfall events seeming more common every year—solid drainage becomes even more crucial. The systems we install today need to handle not just average conditions but prepare your property for those extreme weather moments too.
Drainage is definitely not where you want to cut corners. The relatively small additional cost (typically just 5-10% of your overall project budget) becomes insignificant when compared to the potential expense of wall failure and complete reconstruction.
Our dedicated team provides year-round service throughout Massachusetts and New Hampshire. We focus on creating retaining walls that not only improve your property’s beauty but function flawlessly through harsh New England seasons—from summer downpours to winter freeze-thaw cycles that can wreak havoc on poorly drained structures.
If you’re planning a new retaining wall or concerned about an existing one showing signs of water pressure, we’d love to schedule a consultation. Our experts will assess your specific situation and recommend the most appropriate drainage solution for your needs and budget.
More info about retaining wall services
Trust Dube Property Maintenance & Hardscaping – your Methuen MA experts for worry-free, well-drained retaining walls that stand the test of time.
