Dreaming of that beautiful terraced garden or need to tame a troublesome slope? A retaining wall block calculator is about to become your new best friend. Think of it as your project’s personal assistant—helping you plan with precision and avoid those dreaded mid-project hardware store runs.
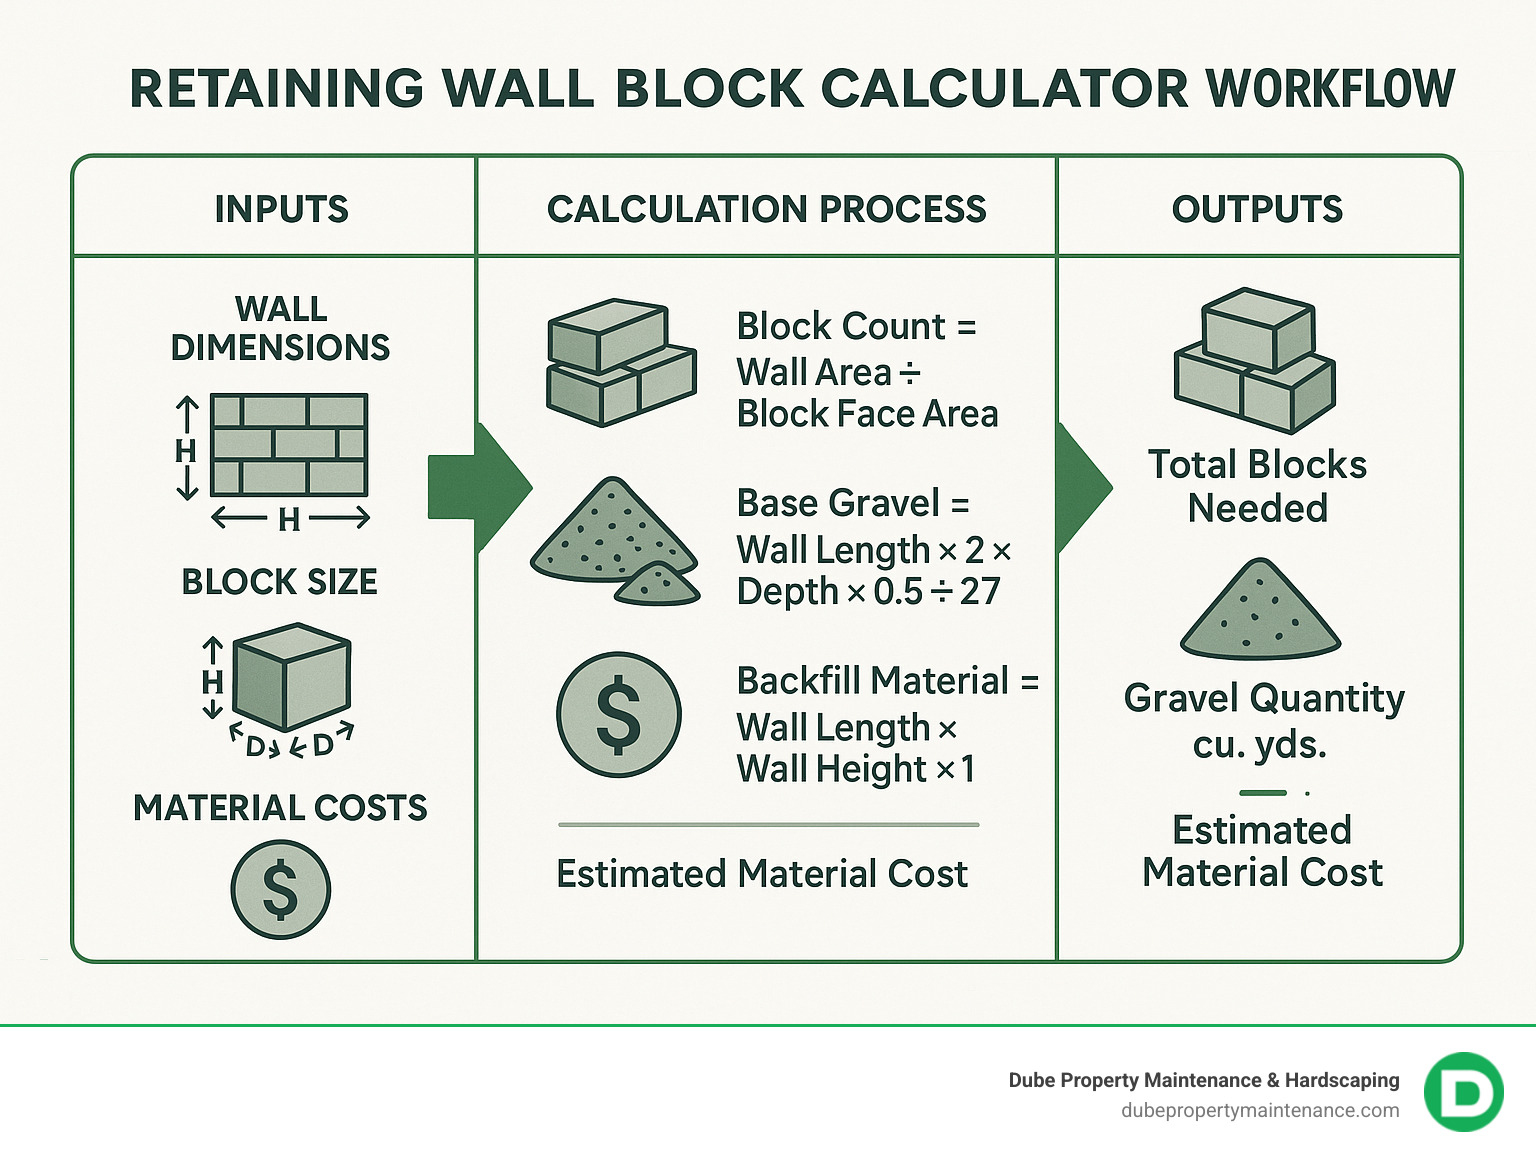
Here’s the straightforward approach to calculating your materials:
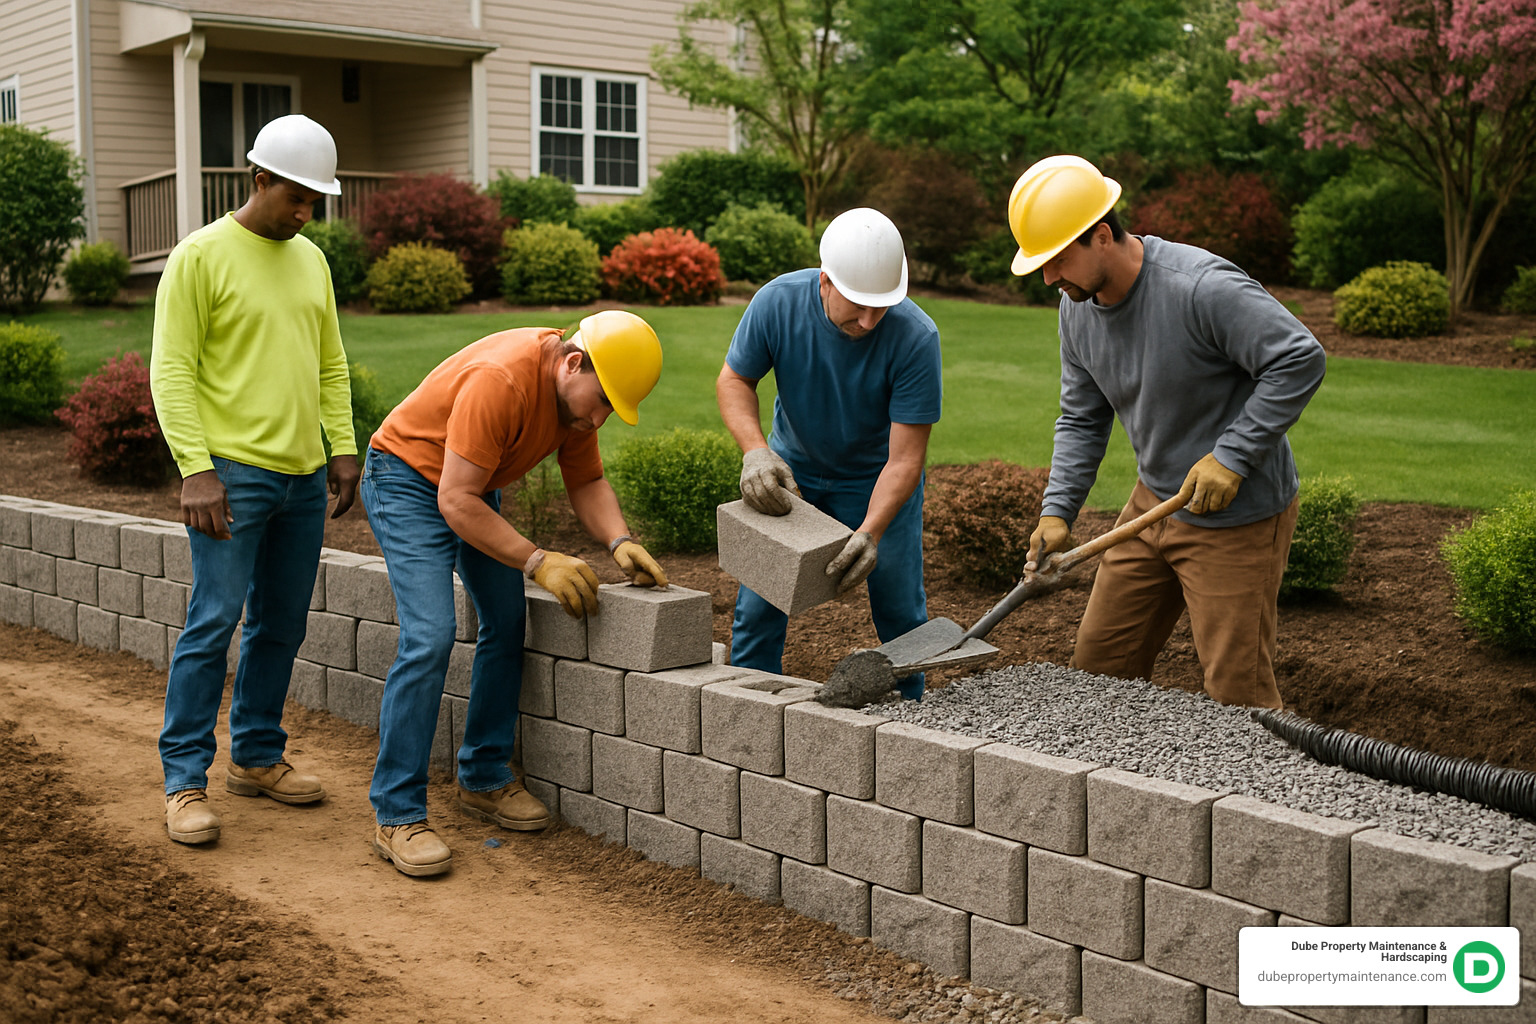
Retaining walls do double-duty in your landscape—they’re workhorses holding back soil and preventing erosion while also creating visual interest and usable space. But make no mistake, they’re significant investments that deserve proper planning.
“I’ve seen too many DIYers get halfway through a wall only to realize they’re short on materials,” says Tom from Dube Property Maintenance. “Nothing kills momentum faster than having to pause your project while you wait for more supplies.”
Proper embedment is crucial for wall stability—professionals recommend burying about 10% of your total wall height below grade. This creates a solid foundation that resists the forward pressure of the soil behind your wall.
Gravel compaction is a real thing! That beautiful pile of base material the supplier drops off will shrink by up to 20% once properly compacted. Your calculator needs to account for this to avoid coming up short.
The right calculations mean you can approach your weekend project with confidence instead of crossing your fingers and hoping for the best. You’ll know exactly how many blocks to order, how much gravel to have delivered, and what your project should cost before the first shovel hits the dirt.
Looking for specific materials for your project? Learn more about concrete retaining wall blocks or explore options for DIY retaining wall blocks to find the perfect fit for your landscape vision.
Ever stood in front of a slope in your yard wondering exactly how many blocks you’ll need for that retaining wall? That’s where a retaining wall block calculator comes to the rescue. Think of it as your digital assistant that transforms measurements into shopping lists.
A retaining wall block calculator is essentially a smart estimation tool that converts your wall dimensions into precise material quantities. Instead of playing the guessing game (and making multiple trips to the supply yard), you simply input your measurements and get exact numbers.
These handy calculators take your wall’s length, height, and block dimensions, then output everything you need to know: block count, base material amount, and backfill requirements. Most include that all-important 10% waste allowance too—because let’s face it, some blocks will break, some will need cutting, and having a few extras is always better than coming up short.
As one landscaper puts it, “Kill two birds with one stone by having your retaining wall cost estimated simultaneously.” Many modern calculators don’t just count blocks—they’ll also estimate your overall project budget, giving you financial clarity before you spend a single dollar.
Want to see one in action? Check out this YouTube demo of Speed-Calc that shows just how straightforward these tools can be.
Behind the scenes, a retaining wall block calculator is doing some clever math to save you time and headaches. Here’s the magic happening when you hit that “calculate” button:
First, it figures out your total wall face area by multiplying length by height. Then it calculates each block’s face area and determines how many rows and columns you’ll need. By multiplying these together and adding that safety buffer, you get your total block count.
The calculator doesn’t forget about practical considerations either. It factors in that first course being partially buried (typically about 10% of your wall height) and separately calculates specialty items like decorative cap blocks.
Let’s see this in action: For a 30-foot long, 3-foot high wall using 6″×10″ blocks, the math works out to 60 columns and 4 rows, totaling 240 blocks. Add that 10% waste factor, and you should order 264 blocks.
Today’s sophisticated calculators can handle much more than simple rectangular walls. Many incorporate algorithms for curved walls, varied block patterns, and specialty materials—making them invaluable whether you’re a weekend warrior or seasoned pro.
Getting your numbers right with a retaining wall block calculator pays off in multiple ways:
Budget Control is perhaps the most obvious benefit. When you know exactly what materials you need before you start, there are no financial surprises lurking around the corner. That peace of mind is priceless, especially for larger projects.
Waste Reduction matters both for your wallet and the planet. Over-ordering creates unnecessary waste that often ends up in landfills. By calculating precisely, you’re being environmentally responsible while saving money.
Project Schedule Efficiency improves dramatically when you’re not constantly running to the store. Nothing kills momentum (and morale) faster than realizing you’re short on materials halfway through a hot Saturday afternoon. As one contractor wisely notes, “Better safe than sorry – why waste gasoline driving to and from the store when you can be prepared in advance?”
Environmental Impact extends beyond just waste. Every block manufactured and transported has a carbon footprint. By ordering just what you need (plus that reasonable buffer), you’re reducing unnecessary environmental impact from production, transportation, and disposal.
When your calculations are spot-on, your project flows smoothly from start to finish. You’ll have the satisfaction of completing your wall without the frustration of unexpected delays or budget overruns—and that’s something every homeowner can appreciate.
Before you can use a retaining wall block calculator effectively, you need to gather accurate data about your project site. This preparation phase is crucial for getting reliable results.

Grab your trusty tape measure and let’s get started with the basics. You’ll want to carefully measure the wall length – that’s the total distance your wall will span. For straight walls, this is straightforward, but if you’re planning curves (which add wonderful character to a landscape), try laying out a garden hose or rope along your planned path, then measure that.
Next, determine your wall height from the planned base to the desired top. This includes any portion that will be hidden underground – a crucial detail many DIYers forget! Speaking of underground portions, plan for proper embedment depth. As a rule of thumb, you’ll want to bury about 10% of your wall’s total height. So for that impressive 6-foot wall you’re dreaming of, you’ll need to dig down about 7-8 inches for the first course of blocks.
Look around your yard and take note of the slope you’re working with. Steeper grades not only affect stability requirements but also change your material calculations. That gentle-looking incline might actually require more reinforcement than you initially thought!
Pay attention to your soil type too. Sandy soil drains well but might not hold shape, while clay soil holds moisture and puts more pressure on your wall. As one of our clients once joked, “My clay soil is great for pottery, terrible for drainage!”
And speaking of drainage, poor water management is the number one reason retaining walls fail prematurely. Notice where water flows during rainstorms, where your downspouts empty, and whether you have any naturally soggy areas. Proper drainage planning now saves headaches (and wallet-aches) later.
For a deeper dive into planning considerations, check out our detailed guide on Building a Retaining Wall.
Understanding block dimensions helps you get accurate calculations and avoid surprises. Different blocks cover vastly different areas:
| Block Type | Dimensions | Face Area | Blocks per Sq Ft | Notes |
|---|---|---|---|---|
| Standard CMU | 8″ × 8″ × 16″ | 0.89 sq ft | 1.12 | Common for structural walls |
| Small Decorative | 4″ × 8″ × 12″ | 0.17 sq ft | 5.88 | Often used for garden borders |
| Medium Decorative | 6″ × 8″ × 16″ | 0.32 sq ft | 3.13 | Popular for residential walls |
| Large Decorative | 8″ × 8″ × 18″ | 0.67 sq ft | 1.49 | Used for substantial walls |
Size matters more than you might think! Notice how you’d need nearly 6 small decorative blocks to cover the same area as one standard CMU block. This dramatically affects both your budget and the labor involved.
Most suppliers sell blocks by the pallet, with counts varying by size. Small blocks might give you 120-200 per pallet, medium blocks typically offer 80-100, and those substantial large blocks usually come 40-60 per pallet. When using your retaining wall block calculator, be sure to input the exact dimensions of your chosen blocks. Even small variations can lead to big differences in your total count, especially for larger projects.
The top of your wall deserves special attention. Cap blocks (sometimes called coping stones) provide that finished, professional look that makes neighbors ask, “Who did your landscaping?”
Cap blocks often have different dimensions than your standard wall blocks. Measure their cap length carefully to calculate how many you’ll need. Many designs include a slight overhang of cap blocks – typically 1-2 inches beyond the wall face – which creates attractive shadow lines and helps direct water away from the wall.
Don’t forget to budget for adhesive! Those cap blocks need to be secured properly, and you’ll need approximately one 10-oz tube of landscape block adhesive for every 10-12 linear feet of cap blocks. It’s a small detail that makes a big difference in durability.
Many homeowners incorporate aesthetic finishes like decorative patterns or alternating block sizes in visible courses. These special design elements need separate calculations. Similarly, most walls don’t end exactly at a full block length, so you’ll likely need half blocks to finish the ends neatly. Good retaining wall block calculators will account for these automatically, but it’s worth checking.
Unlike regular wall blocks, cap blocks are typically sold individually rather than by square footage. To figure out how many you need, divide your wall length by the cap block length and round up. Then add 5-10% extra for cuts and waste.
As one of our landscape architects likes to say, “The top of your wall is like the frame around a beautiful painting – it defines and completes the entire project.” Taking time to plan this finishing touch properly will lift your entire landscape design.
Now that you’ve gathered your measurements and understand the materials, it’s time to put that retaining wall block calculator to work. Don’t worry—these digital tools are designed to make your life easier, not more complicated!
First, find a calculator that matches your project needs. Many manufacturers offer free calculators specifically designed for their products, which can be incredibly helpful if you’ve already selected your blocks.
Once you’ve found your calculator, start by entering your wall dimensions. Be as precise as possible with your length and height measurements—even an inch off can lead to significant differences in your material estimates for larger walls. Old carpenter’s saying: “Measure twice, cut once.” The same wisdom applies here!
Next, you’ll need to input your block dimensions. Some calculators have dropdown menus with standard sizes, while others let you enter custom measurements. If you’re using unusual or specialty blocks, make sure your calculator can accommodate those dimensions.
Don’t forget about embedment! A properly built retaining wall needs its first course partially buried for stability. If your calculator doesn’t automatically factor this in, manually add about 10% to your wall height. For example, a 3-foot visible wall might actually need 3 feet 4 inches worth of blocks to account for the buried portion.
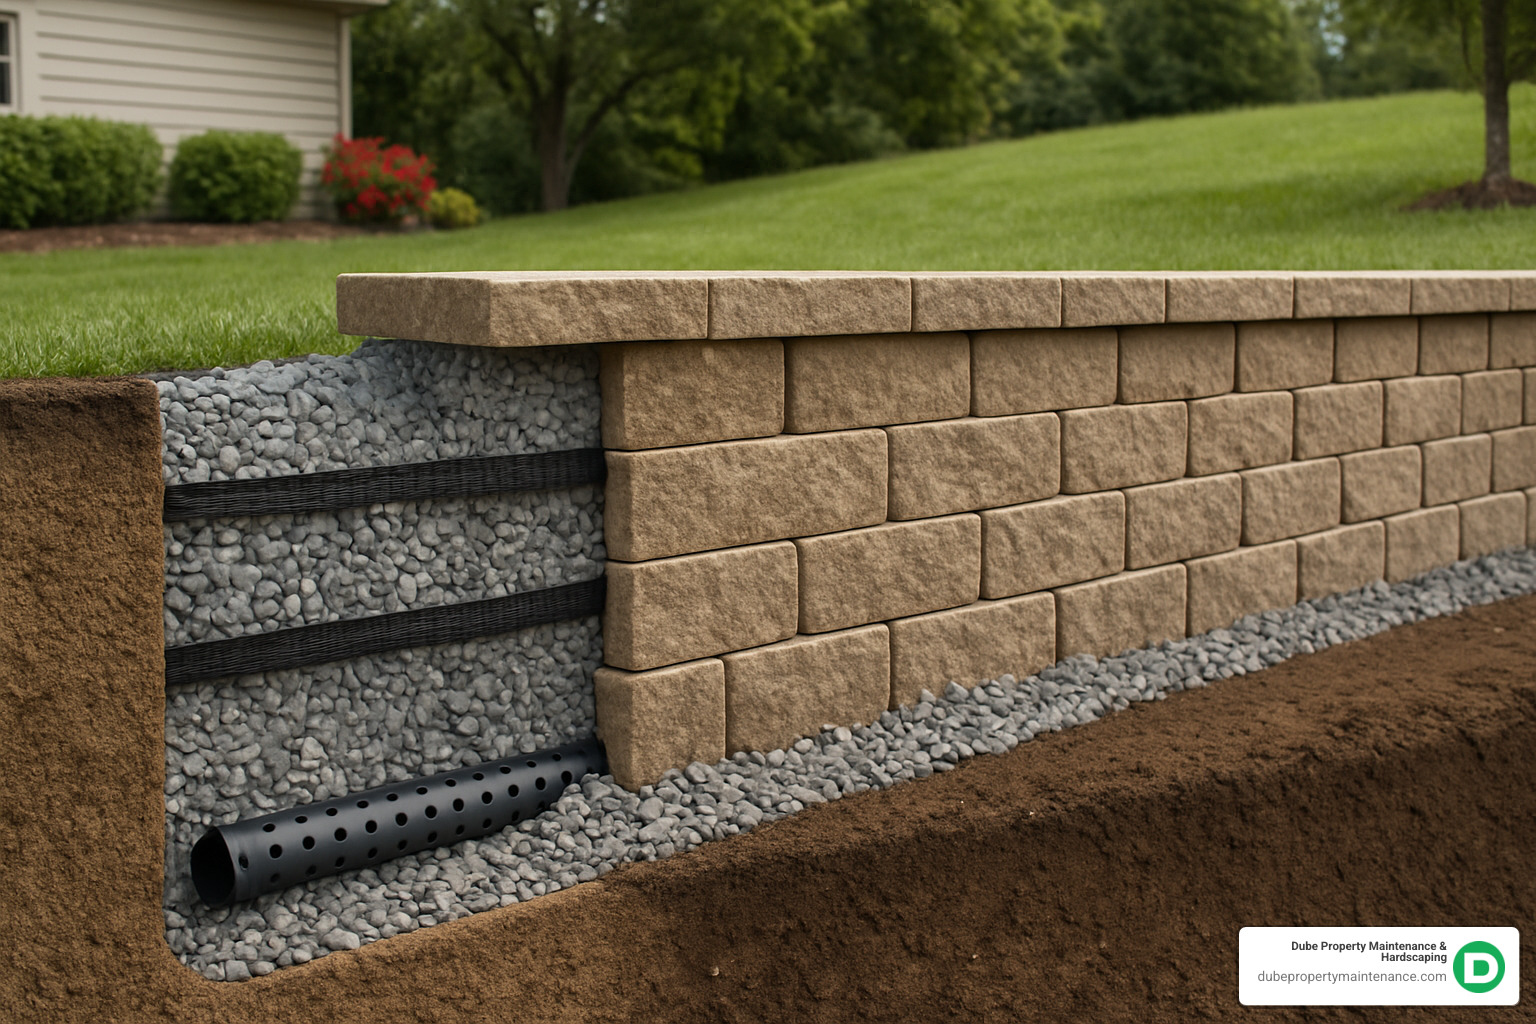
When specifying backfill details, industry standards recommend at least 12 inches of drainage material behind your wall. For walls over 4 feet, you’ll also need to include geogrid reinforcement at specific intervals—typically every 2-3 courses of blocks.
Cap blocks add that finished, professional look to your wall, so be sure to indicate whether you’re using them and enter their dimensions if they differ from your standard blocks.
Most quality calculators include options for safety factors—typically a 10% waste allowance for blocks and 20% compaction factor for gravel. These aren’t just padding; they’re realistic adjustments that account for the realities of construction.
When you’ve entered all your data, the calculator should provide a comprehensive list of materials including total standard blocks, cap blocks, base gravel volume, backfill volume, and any additional materials like drainage pipe or geogrid.
Finally, save or print your results. You’ll want these handy when shopping for materials or discussing your project with suppliers. Some calculators even generate detailed shopping lists you can take directly to your local building supply store.
Let’s break down the math behind block calculations so you understand what’s happening behind the scenes when you use a retaining wall block calculator.
The fundamental approach is dividing your wall into a grid of rows and columns. First, determine how many blocks you’ll need across (columns) by dividing your wall length by the length of each block. Then calculate how many rows you’ll need by dividing the wall height by the height of each block.
For instance, if you’re building a 20-foot wall that’s 3 feet high using standard 8″×8″×16″ blocks:
– You’ll need 240 inches ÷ 16 inches = 15 columns across
– And 36 inches ÷ 8 inches = 4.5 rows high (always round up to 5)
Multiplying these together gives you 75 blocks. But here’s where experience comes in—always add about 10% for waste, bringing your total to 83 blocks. This extra accounts for broken blocks, cuts, and those inevitable “oops” moments that happen on every project.
While your retaining wall block calculator handles these calculations automatically, understanding the process helps you double-check the results and make adjustments based on your specific site conditions.
The foundation of your wall is literally its foundation—skimp here, and you’ll regret it later. A properly prepared base is crucial for preventing settling and ensuring your wall stands strong for years.
For a stable foundation, your base width should be about twice the depth of your blocks. So if you’re using 12-inch deep blocks, your gravel base should extend about 24 inches wide. The standard depth for this base layer is 6 inches (or 0.5 feet) of compacted gravel.
To calculate the volume, multiply the length × width × depth, then divide by 27 to convert to cubic yards. For our 20-foot example wall:
– Base Gravel = (20 × 2 × 0.5) ÷ 27 = 0.74 cubic yards
But here’s a pro tip: gravel compacts significantly during installation. Add about 20% to account for this compaction:
– Final Base Gravel = 0.74 × 1.2 = 0.89 cubic yards (round to 1 cubic yard)
When ordering, suppliers typically sell gravel by weight rather than volume. As a rule of thumb, one cubic yard of gravel weighs approximately 1.5 tons, though this varies by stone type.
For more detailed installation guidance, check out our comprehensive guide on How to Install Landscape Fabric Behind Retaining Wall.
Proper drainage is the unsung hero of successful retaining walls. In fact, poor drainage is the number one cause of wall failure, so this step deserves your full attention.
To calculate backfill materials, you’ll need to multiply your wall’s length by its height by the recommended backfill width (typically 12 inches or 1 foot), then divide by 27 to get cubic yards. For our 20×3 foot wall:
– Backfill Volume = (20 × 3 × 1) ÷ 27 = 2.22 cubic yards
Add about 10% for settling and voids:
– Final Backfill = 2.22 × 1.1 = 2.44 cubic yards
But backfill is just part of the drainage system. You’ll also need:
Landscape fabric serves as a barrier between the native soil and your drainage gravel, preventing soil from washing into and clogging your drainage system. Calculate the area by multiplying your wall length by its height plus an extra foot for overlap. Then add 10% for overlapping seams.
Perforated drainage pipe runs along the base of your wall to collect and direct water away. You’ll need enough pipe to run the length of your wall plus about 5 extra feet to extend beyond the ends of the wall.
For walls over 4 feet tall, geogrid reinforcement becomes essential. This material extends from the wall into the soil behind it, creating a reinforced soil mass. Typically, geogrid layers are placed every 2-3 courses of blocks and extend back 60-70% of the wall’s height.
While some advanced retaining wall block calculators include these drainage components, many don’t. Be sure to add them to your materials list separately if needed.
After you’ve run the numbers through your retaining wall block calculator, it’s time for the moment of truth – figuring out what this project will actually cost. This is where all that careful measuring really pays off!
Let’s break down how to convert those material quantities into actual dollars and cents:
For your blocks, start by calling around to local suppliers to get current pricing. Blocks can vary widely in cost depending on style and quality – from basic concrete blocks at a few dollars each to premium decorative blocks that might cost $15-20 apiece. Once you have the price per block, simply multiply by your total count. Don’t forget that cap blocks typically cost more per unit than standard wall blocks, so calculate these separately.
“The difference between bargain blocks and premium ones isn’t just looks – it’s longevity,” as one of our experienced installers likes to say. “Sometimes spending a bit more upfront saves a lot down the road.”
When it comes to gravel, you’ll need to convert your cubic yards into tons, since that’s how most suppliers sell it. A good rule of thumb is that one cubic yard equals about 1.5 tons of typical drainage gravel. Your local quarry can give you current pricing, which you’ll multiply by your calculated tonnage.
Don’t forget to budget for those essential extras:
– Landscape fabric costs by the square yard
– Drainage pipe is priced per linear foot
– Adhesive for cap blocks runs about $5-8 per tube (with each tube covering 10-12 feet)
– Geogrid reinforcement (for taller walls) is sold by the square yard
Based on internet data, not our company pricing, most homeowners can expect to pay anywhere from $10 to $30 per square foot for a professionally installed retaining wall. The wide range reflects differences in materials, wall height, and site conditions. Materials typically make up about half of this total cost.
For a more detailed estimate that accounts for your specific situation, check out online tools like the Inch Calculator’s Retaining Wall Calculator. Of course, we at Dube Property Maintenance & Hardscaping are always happy to provide a personalized quote for your project that takes into account all the unique factors of your site.
Even with the most precise retaining wall block calculator, wisdom dictates building in a buffer when ordering materials. Think of it as insurance against project delays and frustration.
For blocks, add at least 10% to your calculated amount. This covers the inevitable breakage that happens during transport and installation. It also accounts for cuts you’ll need to make for curves and corners, blocks with chips or cosmetic defects, and having a few extras on hand for potential future repairs.
When it comes to gravel, be even more generous – add about 20% to your base gravel calculations to account for compaction. For the drainage backfill behind the wall, an extra 10% is typically sufficient to allow for settling.
One often overlooked consideration is color matching. If you’re using colored or textured blocks, ordering everything at once from the same production batch is crucial. Different manufacturing runs can have subtle but noticeable color variations that become glaringly obvious when placed side by side in your wall.
“I’ve built hundreds of walls, and I’ve never once regretted having a few extra blocks left over,” says our senior hardscape installer. “But running short? That’s a headache you don’t want.”
Seasonal availability is another factor to consider. During peak construction seasons (typically spring and summer), popular materials can be in short supply. Having that small buffer ensures your project won’t grind to a halt because you’re short just a few pieces.
If you do end up with unused materials, many suppliers will accept returns of unopened pallets. Alternatively, those extra blocks can come in handy for smaller projects around your property – like building a matching garden bed or fire pit that complements your new retaining wall.
Even with the best retaining wall block calculator at your fingertips, it’s surprisingly easy to make mistakes that can derail your project. Let’s walk through the most common errors homeowners make when planning their retaining walls—so you don’t have to learn these lessons the hard way.
Rounding down might seem like a small thing, but it’s a major pitfall. When you calculate that you need 10.2 blocks per row, you can’t install just 0.2 of a block! Always round up to the next whole number. Having a few extra blocks is far better than stopping work to make an emergency trip to the store.
Many DIYers forget about proper embedment, which leads to serious underestimation. Good wall stability requires burying approximately 10% of your wall height below grade. For a 4-foot wall, that’s nearly 5 inches of buried blocks that you need to include in your calculations.
I can’t tell you how many homeowners call us in a panic because they forgot about cap blocks entirely! These finishing pieces aren’t just decorative—they help manage water runoff and complete the wall visually. They typically have different dimensions than standard blocks and need to be calculated separately.
Gravel seems simple, but it’s easy to under-order base materials. What looks like plenty in the delivery truck will compact down significantly during installation. Compaction can reduce loose gravel volume by up to 20%, so always add this factor to your calculations to avoid coming up short.
One of the biggest mistakes is ignoring soil pressure differences. The clay soil common in our Methuen area holds more water and creates significantly more lateral force than sandy soil. Your wall might need additional reinforcement depending on your soil type—something basic calculators often don’t factor in.
If your design includes curves, beware! Curved walls require more blocks than straight walls of the same length because the blocks are placed in a fan pattern. Most basic calculators don’t account for this geometry, so add 10-15% extra blocks for curved sections.
Perhaps the most dangerous error is overlooking drainage requirements. I’ve seen beautiful walls crack and fail within a year simply because proper drainage was an afterthought. Poor drainage isn’t just a minor issue—it’s the number one cause of retaining wall failure.
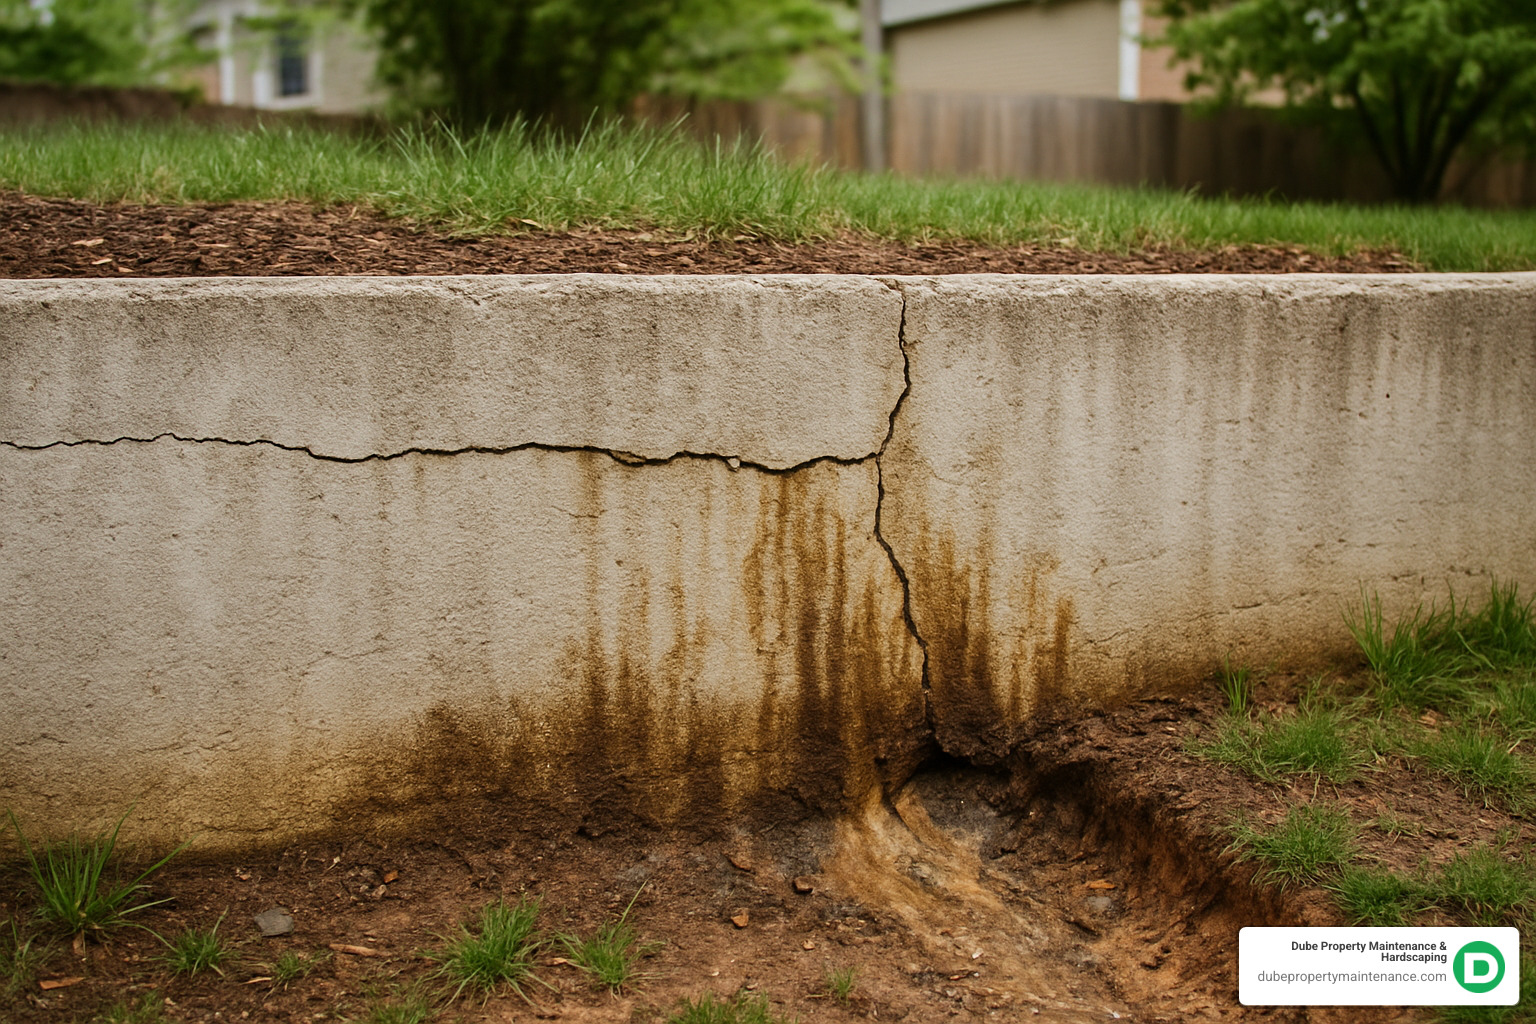
As we tell our clients at Dube Property Maintenance & Hardscaping, “A retaining wall is only as good as its foundation and drainage.” These estimation errors lead to more than just inconvenience—they can seriously compromise your wall’s integrity and lifespan.
When a homeowner tries to save a few dollars by cutting corners on calculations, they often end up cutting corners on construction too. What looks like a small miscalculation on paper can translate to a structurally compromised wall that may need complete replacement down the road.
Taking the time to double-check your estimates with a reliable retaining wall block calculator and accounting for these common pitfalls will save you headaches, time, and money in the long run. Trust me—I’ve seen the alternative, and it’s never pretty!
While concrete blocks are the most common retaining wall material, a retaining wall block calculator needs some tweaking when you’re working with alternative materials. Let’s explore how different materials change your calculation approach.
Railroad ties offer that classic, rustic look many homeowners love. When calculating for these, a standard railroad tie measures about 7″ × 9″ × 8′ with a face area of roughly 6 square feet. To figure out how many you’ll need, simply divide your total wall area (in square feet) by 6. Don’t forget to include “deadman” anchors – those are perpendicular ties that extend back into the soil every 8 feet or so for added stability.
Wood timbers bring a natural warmth to your landscape but require a slightly different approach. Instead of calculating by square footage, you’ll need to think in terms of linear feet. You’ll also need to factor in fasteners (typically galvanized spikes or specialized Timberlock screws), additional anchoring systems for walls over 2 feet high, and drainage gravel behind the wall – just like with block walls.
Gabion baskets – those wire mesh containers filled with stone – have become increasingly popular for their industrial-modern aesthetic. These are calculated by basket volume (typically 3′ × 3′ × 3′), plus the stone fill (about 1.5 tons per cubic yard) and connecting wire for joining adjacent baskets together.
For more traditional CMU block walls with grout, your block count calculation remains similar to decorative blocks, but you’ll need additional calculations for grout, mortar, reinforcing steel (rebar), and a concrete footing rather than a simple gravel base.
Walls over 4 feet in height typically enter a new territory of requirements: building permits, engineered plans with structural calculations, possible geogrid soil reinforcement, and mandatory inspections during construction. These aren’t just good practices – they’re often legal requirements designed to ensure safety.
“Once you go beyond four feet, you’re no longer in DIY territory,” notes one contractor. “The forces involved increase exponentially with height, and the consequences of failure become much more serious.”
If you’re interested in natural stone options, our Stone Retaining Wall page provides detailed information on materials and construction techniques that might be perfect for your property.
Standard online calculators might not account for all these variables. When working with special materials or tackling complex projects, it’s worth consulting with professionals who can provide material-specific calculations custom to your unique situation.
While a retaining wall block calculator is an invaluable tool for planning, certain situations call for professional expertise. Consider reaching out to our team at Dube Property Maintenance & Hardscaping when facing:
Complex wall designs with multiple curves, corners, or varying heights require specialized calculations that basic calculators simply can’t handle. These intricate designs often need expert eyes to ensure proper material quantities.
Surcharge loads change everything. If your wall will support additional weight like a driveway, parking area, or structure, standard calculations won’t suffice – you’ll need professional engineering input.
Poor site access might seem like just a logistical issue, but it can actually affect material delivery options and installation methods, potentially changing your material needs significantly.
Local code requirements vary tremendously by location. Some municipalities have specific engineering or material requirements that online calculators don’t account for – and ignoring these can lead to costly corrections later.
Walls over 4 feet face substantially greater soil pressure and typically require engineering approval and possibly different construction methods altogether. The physics changes dramatically with height.
Challenging soil conditions like expansive clay, loose sand, or high water tables may necessitate specialized drainage and reinforcement solutions that go beyond standard calculator assumptions.
At Dube Property Maintenance & Hardscaping, our team brings years of hands-on experience to every project. We understand the unique soil and climate conditions throughout Massachusetts and New Hampshire, allowing us to provide region-specific expertise that no online calculator can match.
As one client recently told us, “I thought I had it all figured out with my calculations, but their site assessment identified drainage issues I never would have caught. That advice alone was worth the consultation.”
When your retaining wall needs to be not just beautiful but structurally sound for decades to come, having experienced professionals in your corner makes all the difference.
One of the trickiest parts of using a retaining wall block calculator is making sure you’re speaking its language when it comes to measurements. Most calculators are picky about units—they want everything in the same format.
If your calculator works in feet, you’ll need to convert those inches to decimal feet. Simply divide the inches by 12. For instance, 6 inches becomes 0.5 feet (6 ÷ 12 = 0.5). If you’re measuring 3 feet 9 inches, that’s 3 + (9 ÷ 12) = 3.75 feet.
Going the other direction? When your calculator wants inches, multiply your feet by 12. So 4.5 feet converts to 54 inches (4.5 × 12 = 54).
Double-checking which unit your calculator expects before plugging in numbers can save you from some head-scratching results and potentially costly estimation errors. As one of our clients once joked, “I accidentally ordered enough blocks for a Great Wall of China situation because I mixed up my units!”
When it comes to gravel backfill, the magic number starts at 12 inches. This foot-thick layer of clean, angular 3/4″ stone behind your entire wall creates a drainage zone that prevents water pressure from building up and pushing against your beautiful new wall.
Think of this drainage zone as your wall’s best friend—it’s literally got your back. For taller walls (over 4 feet) or if you’re dealing with stubborn clay soil that holds water like a sponge, consider bumping up to 18-24 inches of backfill. It’s like upgrading from basic protection to premium insurance.
Your gravel should run from the base all the way to the top, with a perforated pipe at the bottom serving as a water highway to direct moisture away from your foundation. Don’t forget the landscape fabric between your native soil and the gravel—it’s like a bouncer that keeps soil particles from sneaking into your drainage system and clogging things up.
As we like to tell our Massachusetts clients dealing with spring thaws: “Water always wins unless you give it somewhere else to go.”
Recycling old retaining wall blocks is both wallet-friendly and environmentally conscious—but it requires a bit of detective work on your part.
First, play block inspector. Examine each piece for cracks, chips, or signs that it’s seen better days. Structural integrity isn’t something to compromise on—that block will still need to hold back tons of soil.
Next, ensure your old soldiers will play nice with any new recruits. Check that dimensions match up, interlocking features align, and they’ll create a visually cohesive wall. Nothing screams “DIY gone wrong” like mismatched blocks creating a wall that looks like it has an identity crisis.
When using a retaining wall block calculator, only input dimensions for additional blocks needed. Your math becomes:
– Total blocks needed (from calculator)
– Minus your stash of usable existing blocks
– Plus a slightly higher waste factor (bump it up to 15-20% versus the standard 10% for new blocks)
Be aware that even if blocks are structurally identical, weathering means your old and new blocks might have different coloration—like trying to match your natural hair color after years in the sun. Consider using old blocks for less visible sections or creating a purposeful two-tone design.
One of our Methuen customers cleverly used her salvaged blocks for the buried courses and new blocks for everything visible—smart thinking that saved nearly 30% on materials!
A retaining wall block calculator is more than just a convenient tool—it’s the foundation of a successful landscaping project. By providing precise material estimates, these calculators help you budget accurately, reduce waste, and ensure you have everything you need before breaking ground.
As we’ve seen, proper calculations involve more than just counting blocks. From base preparation to drainage considerations, from cap blocks to structural requirements, a comprehensive approach to estimation sets the stage for a retaining wall that’s both beautiful and durable.
For DIY enthusiasts, these calculators offer the confidence to tackle projects with professional-level planning. For larger or more complex walls, they provide a starting point for discussions with contractors like us at Dube Property Maintenance & Hardscaping.
While online calculators are valuable resources, they’re no substitute for experience and local knowledge. Our team understands the unique challenges of New England soils, weather patterns, and building codes—factors that no calculator can fully account for.
Whether you’re planning a simple garden wall or a major slope stabilization project, we’re here to help at every stage. From material selection to professional installation, our comprehensive services ensure your retaining wall will stand the test of time.
Ready to transform your landscape with a beautiful, functional retaining wall? Learn more about our retaining wall services or contact us today for a consultation. We serve communities throughout Massachusetts and New Hampshire, bringing precision and expertise to every project.
