Paver walkway installation is the perfect way to improve the beauty and functionality of your outdoor spaces. Whether you’re looking to add a welcoming path to your home or a graceful transition to your patio, this process combines aesthetics with practicality. But what exactly does it involve, and why is it so beneficial?
By understanding the key elements and benefits of installing a paver walkway, you’ll be equipped to create a space that is both beautiful and functional.
Paver walkway installation vocabulary:
– building a paver patio
– paver patio installation
– paver stone walkway ideas
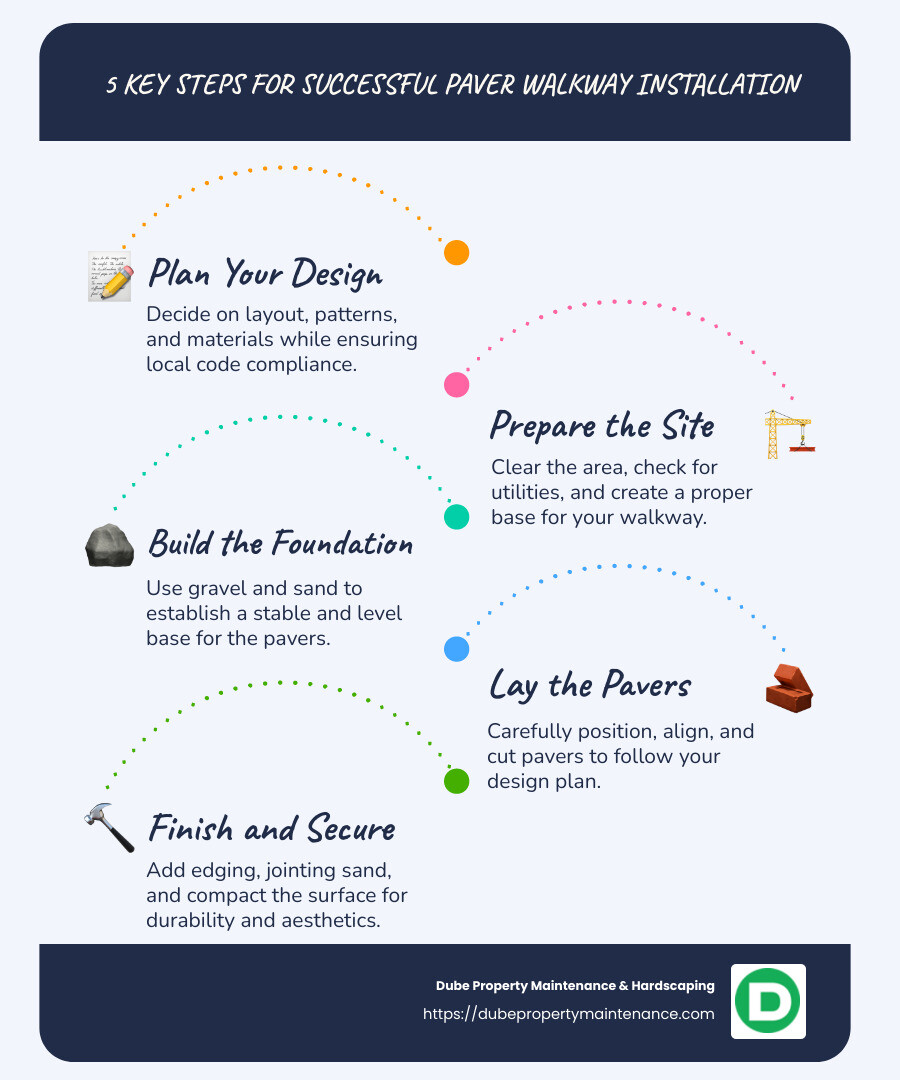
Planning is the first crucial step in your paver walkway installation. A well-thought-out plan ensures a smooth process and a satisfying result.
Pavers are the stars of your walkway. You have several options:
Sand and Gravel are essential for creating a stable base. The gravel base is crucial for drainage, while sand helps in leveling the pavers. If you want an easier option, consider paver base panels. They’re lightweight and require less sand.
Polymeric Sand is used to fill the gaps between pavers. It hardens when wet, preventing weed growth and adding stability.
Your design choice impacts the style and complexity of your walkway. Here are some popular patterns:
Use a paver calculator to determine how many pavers you need. Consider the area size and the pattern chosen. Always order a little extra to account for cuts and mistakes.
By carefully planning your materials and design, you’ll set the foundation for a successful paver walkway installation. Next, we’ll dive into preparing the site to bring your vision to life.
Preparing your site is a vital step in ensuring a successful paver walkway installation. Proper preparation lays the groundwork for a stable, long-lasting walkway.
Start by marking out the layout of your walkway. Use stakes and string to outline the path. This will give you a clear visual and help keep the project on track. A tape measure is essential here to ensure accuracy in dimensions.
A level surface is crucial for stability. Use a 2-ft level or a line level to check the evenness of your site. However, a slight slope (about 1/4 inch per foot) is necessary for drainage. This prevents water from pooling on your walkway.
If your design includes curves, now is the time to plan them. Use a garden hose or flexible tape measure to outline curves. This approach helps visualize the flow and ensures smooth transitions.
Once your layout is set, it’s time to dig. Use a shovel to excavate the trench. The depth depends on your base materials but typically ranges from 6 to 8 inches. This allows room for base layers, like gravel and sand, which provide stability and drainage.
Before digging, always call 811 to check for underground utilities. This is a critical safety step to avoid damaging utility lines.
Having the right tools makes the process smoother and more efficient:
With your site prepared, you’re ready to move on to building a solid foundation for your walkway. Next, we’ll explore the steps to lay the base layers that will support your beautiful paver path.
A strong foundation is the backbone of any successful paver walkway installation. It ensures durability and stability. Let’s break down the process of building this foundation, focusing on using paver base panels.
The first step is to install the base layer. Traditionally, this involves using a gravel layer. However, modern methods often use interlocking paver base panels. These panels are lightweight and easy to handle, making the installation process quicker and less labor-intensive.
If you’re opting for the traditional method, start with a 6-inch layer of gravel. This layer provides excellent drainage and a stable base for your pavers. Use a hand tamper or a plate compactor to compact the gravel. Compacting is crucial as it prevents shifting and settling over time.
Next, add a 1-inch layer of sand on top of your gravel or directly under your paver base panels. The sand acts as a cushion, allowing for minor adjustments in paver height. Use a garden rake to level the sand, ensuring a smooth surface for the pavers to rest on.
Interlocking paver base panels are a game-changer in walkway installations. These panels replace the gravel layer, reducing the need for deep excavation. They require only a 1/2 inch of sand underneath.
Installation Tips for Interlocking Panels:
Why Choose Paver Base Panels?
These panels are not only easy to install but also provide excellent drainage and stability. They are ideal for DIY enthusiasts and professionals alike.
With your foundation set, you’re ready to start laying the pavers. This next step will bring your vision to life, creating a beautiful, functional path.

With the foundation set, it’s time to bring your vision to life by laying the pavers. This step is where precision meets creativity.
Begin by placing the pavers on the prepared base. Start at one edge and work your way across the walkway. Use a rubber mallet to gently tap each paver into place, ensuring they sit firmly on the sand or paver base panels.
Tips for Proper Placement:
Not every paver will fit perfectly. You’ll need to cut some to fit edges or curves. Use a circular saw with a concrete blade or a wet/tile saw for precise cuts.
Cutting Tips:
Once all pavers are in place, it’s time to secure them.
1. Edging
Edging is crucial for keeping the pavers in place and preventing shifting. Install edging material along the perimeter of your walkway. Use landscape spikes to anchor it firmly into the ground.
2. Jointing Sand
Next, fill the joints between pavers with polymeric or jointing sand. This sand locks the pavers together, preventing weeds and stabilizing the surface.
Finally, compact the entire walkway with a plate compactor. This step ensures all pavers are firmly set and level. If needed, add more jointing sand and compact again.
By following these steps, your paver walkway installation will be both beautiful and durable, ready to improve your outdoor space for years to come.
With your paver walkway in place, it’s time to add the finishing touches that will make it truly stand out. These improvements not only improve the look but also increase the functionality of your outdoor space.
1. Mulching
Mulching is an easy way to define the edges of your walkway and separate it from the rest of your yard. Spread a layer of mulch along the sides to create a neat border. Choose a color that complements your pavers for a cohesive look.
Benefits of Mulching:
2. Landscaping
Landscaping around your walkway can dramatically improve its appeal. Consider adding garden beds with colorful flowers or shrubs that complement the design of your walkway.
Ideas for Landscaping:
3. Lighting
Adding lighting to your walkway not only improves safety but also creates a welcoming atmosphere in the evening.
Types of Landscape Lighting:
Lighting Tips:
By incorporating these finishing touches, your paver walkway installation will not only be functional but also a stunning focal point in your landscape.
Now, let’s explore how to maintain your new walkway to ensure it remains beautiful for years to come.
Beneath a paver walkway, it’s crucial to have a solid foundation to ensure durability and stability. The typical layers include:
These layers create a stable platform for the pavers, preventing movement and ensuring longevity.
The depth of your excavation depends on the layers needed under the pavers. Generally, you’ll want to dig about 8 inches below the ground surface:
Ensure the base is level and compacted to prevent any future settling. Also, consider a slight slope (1/8″ per foot) away from your home to direct water runoff.
While placing pavers directly on dirt is possible, it’s not recommended for long-term stability. If you’re in a pinch and need a quick solution:
This method is more susceptible to shifting and settling over time. For a durable and professional result, follow the recommended installation process with a proper base and bedding layers.
Congratulations on completing your paver walkway installation! With the right planning and execution, your walkway will not only improve your home’s curb appeal but also provide a durable and functional outdoor space for years to come. To ensure its longevity, regular maintenance is key.
At Dube Property Maintenance & Hardscaping, we pride ourselves on delivering high-quality outdoor solutions. Whether you’re looking to install a new walkway or need help maintaining an existing one, our professional team is here to assist you. We understand the importance of a well-maintained landscape and offer a range of services to keep your outdoor spaces looking their best.
For more information on our services or to get started on your next project, visit our Walkway Installation page. Let us help you create the outdoor space of your dreams with our expertise and dedication to excellence.
With these tips and the support of a trusted partner like Dube Property Maintenance & Hardscaping, your paver walkway will remain a beautiful and functional feature of your home for many years.
