Paver installation steps are the key to creating a beautiful, durable outdoor space that can stand up to harsh New England weather. Whether you’re planning a backyard patio in Methuen, MA, a walkway in Andover, or a driveway in Salem, NH, understanding the complete process helps ensure your investment lasts for decades.
Quick Overview: The 10 Essential Paver Installation Steps
The foundation is everything. According to industry best practices, the base layer should be between 4 and 6 inches deep for pedestrian walkways and 8 to 12 inches for driveways. That base must be compacted properly in layers no thicker than 3-4 inches, since most plate compactors can’t effectively compact deeper layers.
But here’s what many DIYers miss: it’s not just about following steps. Each phase builds on the previous one. Skip proper base compaction, and your beautiful patio will settle unevenly within a year. Forget adequate drainage slope (at least 1/4 inch per foot), and you’ll deal with pooling water that can cause frost heave damage during our cold Massachusetts winters.
For homeowners and business owners in towns throughout northeastern Massachusetts and southern New Hampshire, the difference between a paver installation that lasts 20+ years and one that needs repairs in just a few seasons often comes down to execution quality at each step.

Know your paver installation steps terms:
Before we even think about touching a paver, thorough planning and preparation are absolutely essential. This is where we lay the groundwork, not just for the physical installation, but for the entire project’s success. Skipping these crucial first paver installation steps is like trying to build a house without a blueprint – it’s just asking for trouble!
Every great paver project begins with a detailed plan. We start by sketching out the project design, whether it’s a simple rectangular patio or a winding walkway. This involves carefully measuring the area to determine the square footage. Once we have the dimensions, we can accurately calculate the materials needed, including the number of pavers. A good rule of thumb is to add 5-10% to our paver calculations for cuts and waste. If the design has many intricate cuts, we might even bump that up to 10% or more.
Next, we transfer our design to the physical space. We mark the layout with stakes and string, extending the outline about 8 inches beyond the planned edge. This helps us visualize the space and ensures we have enough room for the base and edge restraints. For perfect 90-degree corners, we can use the classic 3-4-5 triangle method—a little geometry goes a long way!
One of the most critical pre-installation paver installation steps is calling 811 (Miss Utility) to locate any underground utilities. This simple, free call can prevent serious accidents, injuries, and costly damage to gas lines, water pipes, or electrical cables. We always make this call before any digging begins.
Finally, we establish the finished grade and plan for proper drainage. In New England, managing water runoff is paramount. We aim for a slope of at least 1% to 2%, which translates to about a 1/4 inch drop per foot, sloping away from any structures like your home or garage. We try not to exceed a 1/2 inch drop per foot to keep the surface comfortable for walking. This slope ensures water runs off the paved surface, preventing pooling and potential frost heave during our Massachusetts winters.
With our layout marked and utilities cleared, it’s time to get digging – the part nobody loves, but it’s vital! We calculate the precise excavation depth by summing the paver height, the bedding sand depth, and the aggregate base depth. For a standard 2 3/8-inch paver, a 1-inch bedding sand layer, and a 4-6 inch base for a patio, we’re looking at a total excavation of approximately 7-9 inches. For driveways, which require an 8-12 inch base, the excavation depth will be considerably more, potentially up to 18 inches.
We remove all existing topsoil and sod, ensuring we dig a few inches wider than the project area to accommodate the base and edge restraints. Once the initial excavation is complete, we focus on the subgrade itself. This underlying soil needs to be firm and stable. We use a plate compactor to thoroughly compact the exposed soil. For pedestrian walkways and patios, we aim for at least 95% compaction. For areas that will see vehicular traffic, like driveways in Salem, NH, we achieve even higher compaction rates to ensure maximum stability. This stable subgrade is the absolute bedrock of a long-lasting paver installation.

Now that the site is prepped and the subgrade is compacted, we move on to building the robust foundation that will support your pavers for years to come. These paver installation steps are arguably the most critical for the longevity and performance of your hardscape.
The aggregate base is the workhorse of your paver system, providing structural support and drainage. We typically use a 3/4″ minus crushed stone, also known as crusher run. This material is ideal because its sharp, angular edges and varying particle sizes interlock tightly when compacted, creating an incredibly strong and stable layer.
The depth of this base varies significantly depending on the application. For pedestrian walkways and patios in towns like North Andover, we install a base layer that is 4 to 6 inches deep. For residential driveways, which bear heavier loads, we increase this to a substantial 8 to 12 inches deep.
We spread the base material in manageable layers, or “lifts,” typically 2 to 4 inches thick. After each layer is spread, we thoroughly compact it using a plate compactor. Compacting in these thinner layers is crucial because most traditional plate compactors cannot effectively compact more than 4 inches of material at once. If the material is too dry, we lightly spray it with water to aid in compaction and reduce dust. We also ensure that we maintain the correct drainage slope established in Step 1 throughout the base layers. This meticulous attention to the base is what prevents settling and shifting, ensuring your paver project remains beautiful and functional for decades.

With the aggregate base firmly in place, the next of our paver installation steps is to create a perfectly smooth and level bedding layer for the pavers. The bedding sand serves several important purposes: it provides a cushion for the pavers, helps distribute the load evenly, and allows for slight adjustments during paver placement.
We use coarse concrete sand for this layer. It’s free-draining and easy to work with, unlike stone dust or limestone screenings which can trap water and cause issues. To achieve a uniform 1-inch thick layer, we use rigid screed rails, often 3/4-inch electrical conduit, laid parallel on the compacted base, typically 4-6 feet apart. We then spread the sand between these rails and use a straight 2×4 to “screed” or strike off the excess, pulling it across the pipes to create a perfectly flat and consistent surface.
A critical point here: we do not compact the bedding sand. This is a common mistake. The sand needs to remain loose so that when the pavers are laid and later compacted, they can properly settle and interlock. A loose sand bed also allows for minor adjustments to the paver’s position, ensuring a smooth, even finished surface. For more in-depth information about patio installation, you can visit our page on More info about patio installation.
Edge restraints are the unsung heroes of any paver installation. Their purpose is simple yet vital: to prevent the pavers from moving laterally, shifting, or spreading apart over time. Without proper edge restraints, even the most carefully laid pavers can become unstable due to foot traffic, vehicular loads, or the freeze-thaw cycles we experience in New England.
We install heavy-duty plastic or metal edge restraints around the entire perimeter of the project. These are placed directly on the compacted aggregate base, tight against where the outer edge of the pavers will sit. We secure them firmly with 10-inch landscape spikes driven every 8 to 12 inches. This creates a strong, continuous border that contains the bedding sand and locks the pavers in place, ensuring the integrity and longevity of your paver patio, walkway, or driveway.
With our robust foundation built, we’re finally ready for the most visually rewarding part of the process: laying the pavers themselves! These paver installation steps bring your hardscape vision to life.
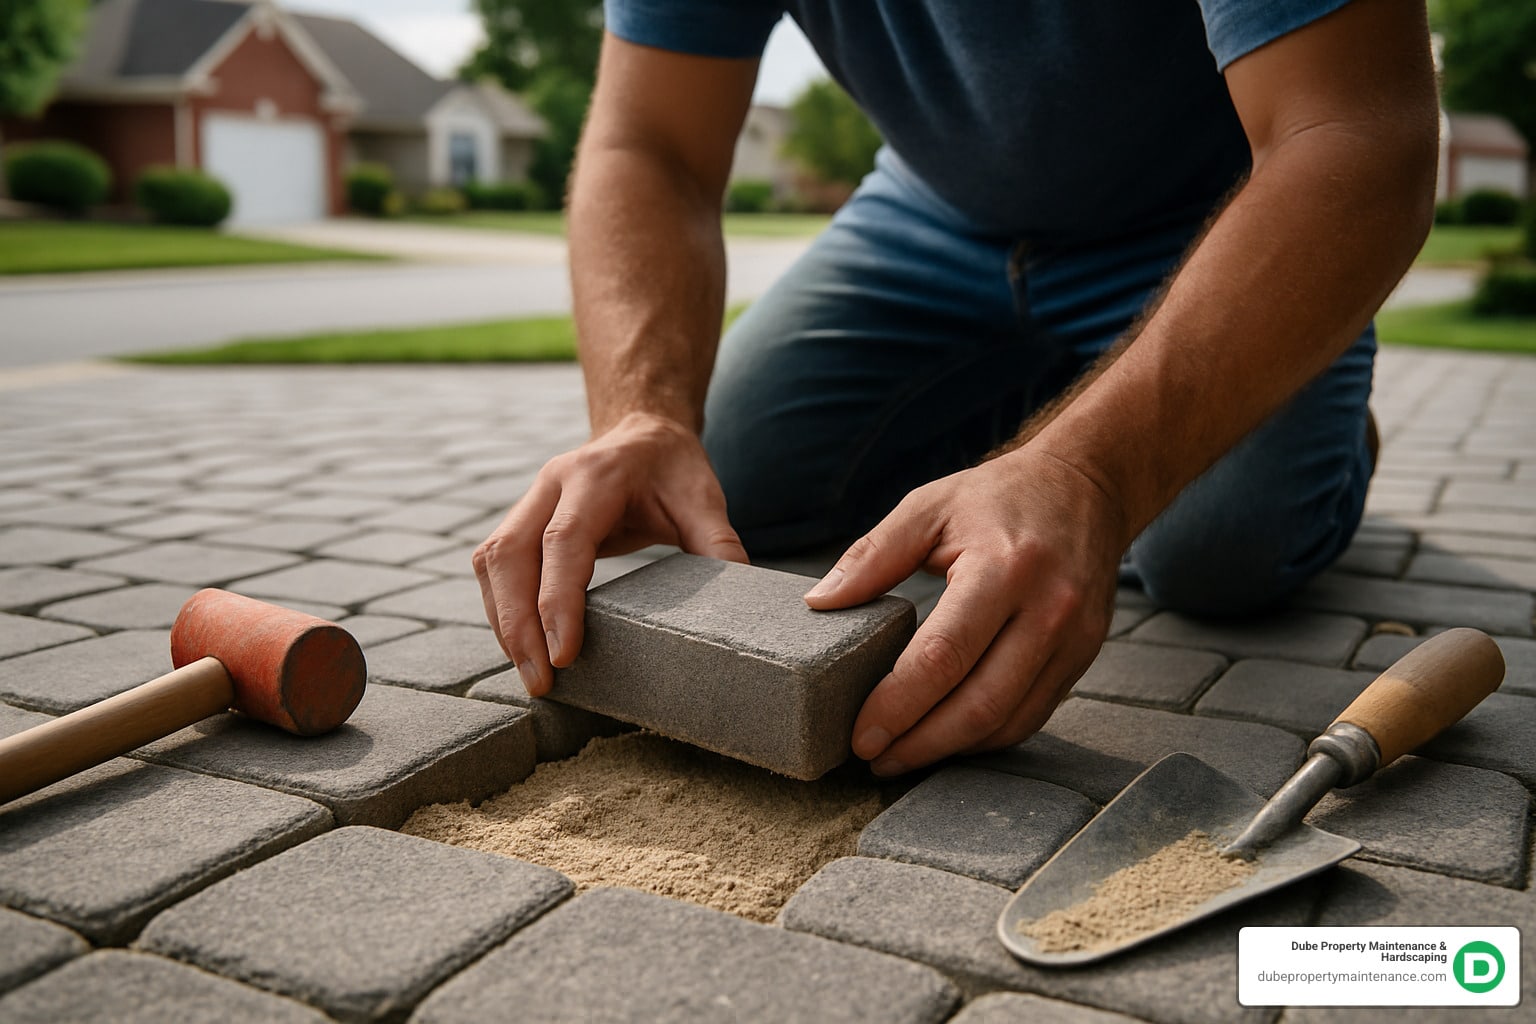
This is where the artistry begins. We start laying the pavers from a permanent, straight edge, typically a 90-degree corner near a house or existing structure. This provides a stable starting point and helps ensure our lines stay straight. As we work, we always lay pavers from the previously laid surface, often using a piece of plywood to distribute our weight, rather than stepping directly on the screeded sand bed. This prevents disturbing the perfectly leveled sand.
We place each paver gently onto the sand, hand-tight, ensuring they don’t get pushed or hammered into the bed. We pay close attention to the paver pattern, whether it’s a classic running bond, a captivating herringbone, or a more intricate design. To maintain consistent joint spacing (typically 1/16″ to 3/16″), we often use small spacers or simply rely on the built-in spacer bars on the pavers themselves. Periodically, we check our alignment with string lines to ensure we’re keeping our courses perfectly straight. To achieve a consistent color blend across the entire installation, we make sure to mix pavers from multiple pallets as we go.
As we approach the edges, curves, and any obstacles like drain pipes or garden beds, we’ll inevitably need to cut pavers. This requires precision and the right tools. For straight cuts, a diamond blade wet saw is our best friend, providing clean, accurate lines. For more complex shapes, such as curves, we might use a paver splitter, or even a combination of a circular saw to score the top layer and a hammer and chisel to chip away the excess. This can be a bit slow, but it’s worth the time for a seamless finish.
Safety is paramount during this step. We always wear appropriate safety gear, including goggles and gloves, to protect ourselves from flying debris and dust. When cutting pavers for vehicular surfaces, it’s good practice to avoid cutting any pieces smaller than one-third of a whole paver at the edges, as these smaller pieces can be more prone to shifting under heavy loads.
Once all the full and cut pavers are laid, it’s time for the first round of compaction. This is a crucial step that “seats” the pavers into the sand bed and begins the process of interlock, making the entire surface stable.
We use a vibratory plate compactor for this. To protect the paver surface from scuffs or chips, we often attach a protective pad, such as a piece of carpet or rubber, to the bottom of the compactor. We make multiple passes over the entire paved area, ensuring a slight overlap with each pass. The first pass will usually settle the pavers about 1/8 inch lower as they find their home in the sand bed. For optimal interlock, we often make a second pass at a 45-degree angle to the first. This initial compaction is essential for achieving proper interlock and stability before we introduce the joint sand.
We’re in the home stretch! These final paver installation steps are what truly lock your pavers into place and provide the aesthetic and protective finishing touches that make your hardscape truly shine.
Joint sand is the glue that holds your paver system together. It fills the small gaps between each paver, locking them into place and preventing them from shifting. We apply joint sand only after the initial compaction (Step 8) and ensure the paver surface is completely dry.
There are two main types of joint sand we use: regular sand or polymeric sand. Regular fine-grained sand, often called paver sand or sifted play sand, works well. However, we often recommend polymeric sand for its superior benefits. Polymeric sand is a special blend of sand and polymers that, when activated with water, hardens like concrete. This hardening action makes the joints nearly 20% stronger and offers significant advantages:
To apply, we spread the dry sand generously over the entire paved surface. Using a stiff-bristle broom, we sweep the sand into all the joints until they are completely full. We then make another pass with the plate compactor (with its protective pad) to vibrate the sand deeper into the joints, adding more sand as needed until the joints are topped off. Before activating polymeric sand, it’s crucial to use a leaf blower to remove any fine dust or residue from the paver surface to prevent a milky haze. Finally, we lightly mist the polymeric sand with water, following the manufacturer’s instructions, to activate the polymers and allow it to harden. You can learn more about the complete process from this 10-step guide to installing pavers .
Once the joint sand is in place and, if using polymeric sand, has had time to cure, we perform a final sweep of the entire area, removing any leftover debris.
For the exposed edges around your new paver installation, we backfill with topsoil and can seed it with grass or lay sod for a seamless transition to your lawn. Alternatively, we might install decorative rock or mulch for a finished look.
Finally, we consider optional paver sealing. While not always necessary, sealing offers several benefits:
We typically recommend waiting a period after installation, often a few weeks to a month, to allow for any efflorescence (a white, chalky residue that can appear on concrete products) to pass before applying a sealer. This ensures the sealer adheres properly and the aesthetic benefits are maximized.
Even with a detailed guide, it’s easy to fall prey to common missteps. Knowing what not to do is just as important as knowing what to do. Here are some of the most frequent mistakes we see during paver installation steps:
The journey through these paver installation steps reveals that a durable, beautiful paver hardscape is built on precision, quality materials, and meticulous execution at every stage. From the initial planning and excavation to the final joint sand application and sealing, each step is foundational to the next.
In our New England climate, where frost heave and harsh winters are a reality, cutting corners simply isn’t an option. The longevity of your paver patio, walkway, or driveway—whether in Andover, Methuen, or any of our service areas—hinges on the integrity of its construction. While understanding these paver installation steps is invaluable, the challenges of proper subgrade compaction, precise base installation, and expert paver laying often underscore the benefits of professional execution.
At Dube Property Maintenance & Hardscaping, we pride ourselves on providing high-quality, comprehensive outdoor solutions. Our professional team understands the nuances of hardscaping in Massachusetts and southern New Hampshire, ensuring that every project we undertake is built to last. If you’re looking for a hardscape that combines aesthetic appeal with enduring strength, trust our expertise to bring your vision to life. For more information about our comprehensive hardscaping services, please visit our More info about hardscaping services page.