Paver driveway maintenance isn’t just about keeping things pretty—it’s about protecting a major investment in your home. When done right, proper care can extend your driveway’s lifespan by up to 25% and save you thousands in replacement costs.
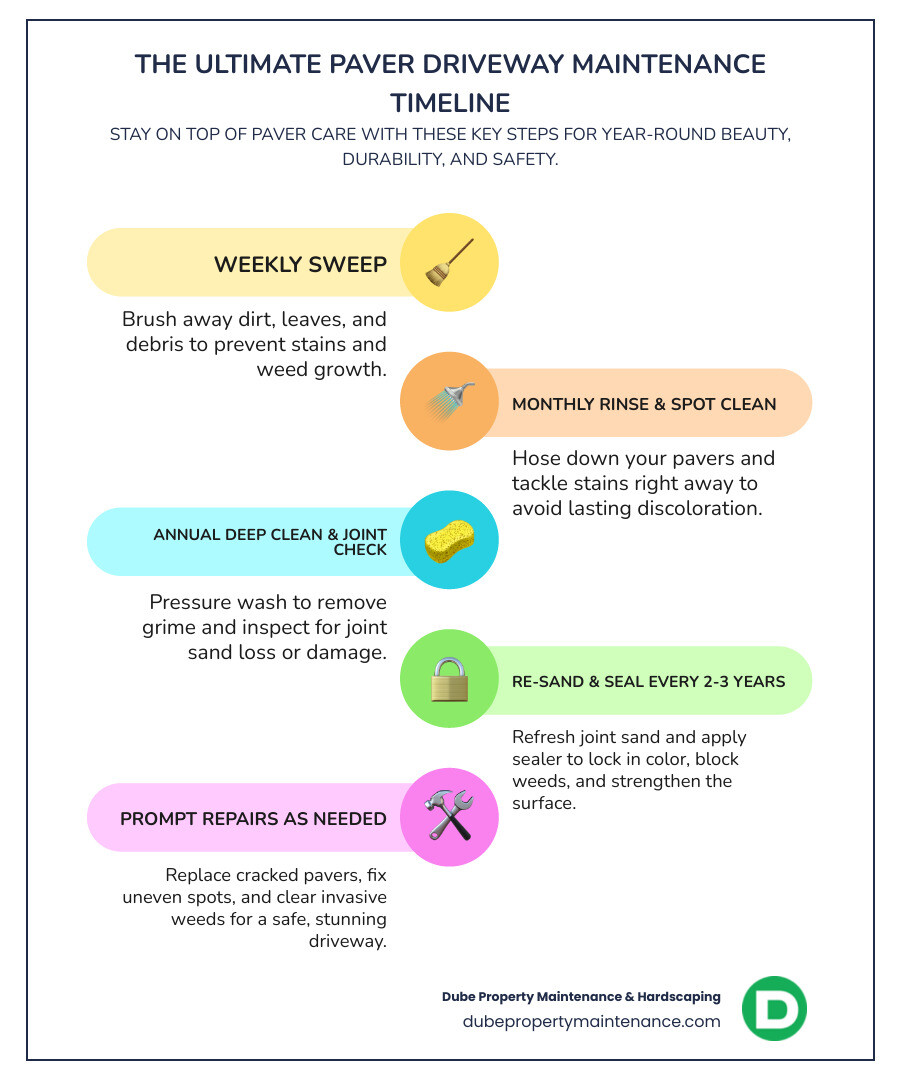
Quick Answer: Essential Paver Driveway Maintenance Schedule
– Weekly: Sweep debris and leaves
– Monthly: Hose down surface, spot-clean stains
– Annually: Pressure wash and inspect joints
– Every 2-3 years: Re-sand joints and seal surface
– As needed: Replace damaged pavers, clear weeds
Your beautiful paver driveway faces serious challenges every day. Freeze-thaw cycles crack the surface. Heavy vehicles stress the joints. UV rays fade the color. Weeds push through gaps. Without regular care, what started as your home’s crown jewel can become a safety hazard and eyesore.
But here’s the good news: most paver maintenance is surprisingly simple. A few basic tools, the right schedule, and some know-how will keep your driveway looking fresh for decades.
The research shows that homeowners who stick to annual cleaning and re-sanding report 80% fewer weed problems. Those who seal every 3-5 years maintain vibrant color and make future cleaning much easier.
Whether you’re dealing with oil stains, loose sand, or just want to boost curb appeal, this guide covers everything you need to know about keeping your pavers in top shape.
Must-know paver driveway maintenance terms:
– cost to seal driveway pavers
– cost to widen driveway with pavers
– paver driveway cost vs concrete
Think your paver driveway is tough enough to handle whatever nature throws at it? Think again. Here in Massachusetts and New Hampshire, we get front-row seats to one of the most destructive forces your driveway will ever face: freeze-thaw cycles.
Here’s how it works: Water sneaks into tiny gaps between pavers or small surface cracks. When winter hits, that water freezes and expands with incredible force—enough to crack solid rock. Come spring, it melts and creates bigger gaps for more water to collect. This vicious cycle repeats 30-50 times each winter, and it’s relentless.
But Mother Nature isn’t done yet. Your driveway also takes a beating from load stress every single day. That Amazon delivery truck weighing 26,000 pounds? Your garbage truck at 40,000 pounds? Even your neighbor’s moving van can tip the scales at 80,000 pounds. Without proper joint sand and a solid base, all that weight makes pavers shift and settle like puzzle pieces coming apart.
Then there’s the slow burn of UV damage. Those gorgeous rich colors that made you fall in love with your pavers? The sun is working overtime to fade them, especially on south-facing driveways that bake in full sunlight all day. Without protection, vibrant reds turn pink, deep charcoals become washed-out gray.
Don’t even get me started on weed intrusion. Those pesky little seeds are like nature’s ninjas—they find every tiny crack and crevice to call home. Once they take root, their growing power is surprisingly strong. Weeds can actually push pavers apart and destabilize your entire driveway structure.
The safety hazards of neglected paver driveway maintenance are no joke either. Loose pavers become trip hazards that can send someone tumbling. Standing water from poor drainage turns into slip-and-fall accidents waiting to happen, especially when it freezes into invisible ice patches.
Here’s the encouraging news: Scientific research on surface wear shows that proper maintenance can boost your paver lifespan by up to 25%. That means instead of replacing your driveway in 20 years, you might get 25-30 years or more. We’re talking about potentially saving $15,000 to $40,000 in replacement costs down the road.
The real kicker about skipping paver driveway maintenance? The problems that develop behind the scenes cost way more than what you can see on the surface.
When joint sand washes out from between your pavers, each stone loses its structural support system. Individual pavers start rocking and shifting under vehicle weight like loose teeth. This creates a domino effect where one wobbly paver puts extra stress on all the surrounding stones, speeding up the whole deterioration process.
Base erosion is the silent killer of paver driveways. Water infiltration through compromised joints gradually washes away the bedding sand that supports your entire driveway. Once that foundation starts failing, you’re not looking at simple repairs anymore—you’re facing major reconstruction work that can cost as much as installing a brand new driveway.
Trip hazards from uneven, rocking pavers aren’t just annoying—they’re liability nightmares. If a visitor gets injured on your property because of poorly maintained surfaces, you could be facing legal troubles and insurance headaches that make regular maintenance costs look like pocket change.
The bottom line? A little prevention now saves a fortune later. Your driveway is begging for some TLC, and trust me, it’s a lot cheaper to give it what it needs than to deal with the consequences of neglect.

Think of paver driveway maintenance like taking care of your car—a little regular attention keeps everything running smoothly and prevents expensive breakdowns. The secret isn’t doing everything at once, but creating a simple routine that fits your life.
Your weekly sweep is the easiest win in the maintenance game. Grab that stiff-bristled broom and spend ten minutes clearing away leaves, dirt, and debris. It might seem small, but this simple step prevents organic matter from staining your pavers and keeps water flowing where it should. Plus, there’s something satisfying about seeing those clean lines emerge as you sweep.
When monthly cleaning time rolls around, it’s time to bring out the garden hose. A good rinse washes away the grime that regular sweeping can’t handle. For those stubborn spots—maybe where the delivery truck dripped oil or kids spilled their drinks—mix about 16-20 ounces of mild dish detergent with a gallon of warm water. A little scrubbing with a stiff brush and thorough rinse usually does the trick.
The annual deep clean is where things get serious. This is power washer territory, but here’s the crucial part—keep that pressure low. High-pressure washing might feel more satisfying, but it can damage your paver surfaces and blast out all that important joint sand. Use a surface cleaner attachment or turbo nozzle, and keep the spray at an angle. Your pavers will thank you for the gentler approach.
Moss loves those shady spots where moisture lingers. When you spot that green fuzz starting to take hold, a diluted bleach solution (about 10-15% strength) applied with a garden sprayer works wonders. Let it sit for 10-15 minutes, scrub with your trusty stiff brush, and rinse thoroughly. You might need to repeat this dance a few times during growing season, especially in those persistently damp areas.
Oil stains are the enemy of beautiful pavers, but speed is your friend here. The moment you spot a spill, grab some granular absorbent—even cat litter works in a pinch—and soak up what you can. For stains that have already set in, commercial degreasers can save the day, but always test them on a hidden spot first.
Creating the right maintenance rhythm depends on your specific situation, but here’s what we’ve learned works best for New England homeowners dealing with our unique weather challenges.
Weekly sweeping becomes second nature once you start. It’s especially critical during fall when those beautiful maple leaves can turn into staining nightmares if left too long. Think of it as a quick walk around your property—you’ll often spot other issues while you’re at it.
Quarterly deep cleaning aligns perfectly with the seasons. Spring cleaning after winter’s harsh treatment is non-negotiable. Summer maintenance keeps dust and organic growth in check. Fall preparation removes leaves before they become a problem, and winter… well, winter is when you appreciate all that prep work you did.
Annual pressure washing should happen every spring, ideally combined with your other spring yard cleanup tasks. It’s the perfect time for that thorough inspection we mentioned—checking joints, looking for loose pavers, and planning any repairs before the busy summer season.
Bi-annual inspections might sound formal, but they’re really just taking a careful look twice a year. Fall inspections are particularly important because you want to address any issues before winter weather makes them worse.
The right tools make paver driveway maintenance feel less like work and more like a satisfying home improvement project. You don’t need a garage full of equipment—just a few quality basics that’ll last for years.
Your stiff-bristled broom is the MVP of paver care. Skip the wire brushes that can scratch surfaces and leave rust stains. A good push broom with sturdy bristles handles most cleaning tasks and doubles as great exercise.
When it comes to pressure washing, a surface cleaner attachment is worth every penny. It provides even coverage and prevents those frustrating streaks that standard wands can leave behind. No surface cleaner? A turbo nozzle is your next best friend.
Keep granular oil absorbent in your garage for those inevitable spills. Regular clay-based cat litter works in emergencies, but commercial absorbents grab more oil and work faster.
A garden sprayer with adjustable nozzles handles cleaning solutions and moss treatments like a pro. Choose one that feels comfortable in your hands—you’ll be grateful during longer cleaning sessions.
For joint sand work, that same push broom does double duty. Some folks like using a leaf blower to distribute sand evenly, but the broom gives you more control in tight spots.
Safety gear isn’t optional when working with cleaning chemicals. Gloves and eye protection are basic requirements, and good ventilation is crucial when working with bleach or stronger cleaners. Your health is worth more than saving a few minutes on setup.

Think of joint sand as the secret ingredient that keeps your paver driveway maintenance simple and effective. Those skinny gaps between your pavers might look insignificant, but they’re actually doing some serious heavy lifting behind the scenes.
Here’s the thing about regular sand—it’s basically an open invitation for trouble. Ants love digging through it, creating unsightly hills and loose pavers. Rain washes it away bit by bit. Weeds see it as prime real estate for setting up shop.
Polymeric sand changes the game completely. When you add water, this specially formulated sand transforms into a flexible, semi-solid material that locks your pavers together like puzzle pieces. It’s strong enough to prevent shifting but flexible enough to handle freeze-thaw cycles without cracking.
The numbers don’t lie—properly installed polymeric sand can reduce paver movement by up to 90% compared to regular sand. That means fewer repairs, less settling, and a driveway that stays level and beautiful for years longer.
But the benefits go way beyond structural support. Ant control becomes practically effortless because these industrious insects can’t excavate through the hardened surface. Weed prevention improves dramatically since seeds can’t find the loose, moist conditions they need to sprout. And erosion control means you won’t be constantly sweeping sand back into joints after every heavy rain.
The timeline for re-sanding depends on your specific conditions, but most driveways need fresh polymeric sand every 3-5 years. High-traffic areas or driveways that get frequent pressure washing might need attention more often.
For detailed information about professional sealing and maintenance services, check out our guide on cost to seal driveway pavers.
Here’s something that catches many homeowners off guard: every time you pressure wash, you’re removing joint sand. Even with perfect technique and gentle pressure, some sand loss is inevitable. It’s just physics—water has to go somewhere, and it takes sand particles along for the ride.
Without adequate joint sand, your beautiful pavers basically become individual islands instead of a unified surface. Each stone has to handle vehicle loads independently instead of sharing the stress with its neighbors. That’s when you start seeing rocking pavers, uneven surfaces, and premature cracking.
The load distribution effect is particularly crucial for driveways. When a delivery truck rolls over properly sanded pavers, the weight spreads across multiple stones like a team effort. Remove that sand, and each paver is basically going one-on-one with a 40,000-pound vehicle. Guess who wins that battle?
Timing your re-sanding is critical for success. The pavers need to be completely clean and bone dry before you start. Any leftover cleaning residue or moisture will interfere with proper sand distribution and activation. That’s why most pros schedule re-sanding for a sunny day, at least 24 hours after cleaning.
Not all sand is created equal, and this is definitely not the place to cut corners. Regular masonry sand might save you a few bucks upfront, but it lacks the binding agents that make polymeric sand so effective. You’ll end up re-doing the job much sooner.
Color matching your polymeric sand makes a huge difference in the final appearance. Most manufacturers offer several shades to complement different paver colors. A good match makes the joints virtually disappear, creating a clean, seamless look. Some homeowners actually prefer a slight contrast to highlight the individual paver pattern—it’s really a matter of personal taste.
Quality matters when selecting polymeric sand. Premium products contain better binding agents and flow additives that make installation easier and create stronger, longer-lasting joints. The extra cost usually pays for itself in improved performance and fewer maintenance headaches.
Activation tips can make or break your installation. After sweeping the sand into joints and removing excess from paver surfaces, you’ll mist the entire area with water. The goal is activating those binding agents without washing sand out of the joints. Think gentle rain, not fire hose. Multiple light mistings work much better than one heavy soaking.

Think of sealing your paver driveway like putting a protective jacket on your favorite coat. You can’t always see the protection, but boy, do you notice when it’s missing! Paver driveway maintenance gets so much easier when you’ve got that invisible shield working for you.
Here’s the thing about sealed pavers—they’re basically stain-fighting superheroes. That morning coffee you spilled rushing to work? No problem. The oil drip from your teenager’s first car? Easy cleanup. Without sealer, these everyday accidents become permanent reminders of life’s little mishaps.
The magic happens because quality sealers create a barrier that blocks UV rays and keeps stains from soaking into the paver material. Your driveway’s colors stay vibrant instead of fading to that tired, washed-out look that screams “I’ve given up on maintenance.”
You’ve got two main sealer families to choose from, and each has its own personality. Film-forming sealers are the showoffs—they create a protective layer on top that can give you that gorgeous wet-look finish or a more subtle natural appearance. These sealers really make colors pop, but they’re a bit high-maintenance and need reapplication more often.
Penetrating sealers are the strong, silent types. They soak into the paver material and protect from within, maintaining that natural texture you love. They won’t dramatically change your pavers’ appearance, but they’ll keep them protected longer with less fuss.
The choice between solvent-based and water-based formulas often comes down to your comfort level and local regulations. Solvent-based sealers typically penetrate deeper and last longer, while water-based options are easier to work with and more environmentally friendly.
Patience is a virtue when it comes to sealing new pavers. Wait at least 30 days after installation before applying any sealer. This waiting period lets any efflorescence (those white, chalky deposits) show up and get cleaned off first. Seal over efflorescence, and you’re stuck with it forever—not a good look.
Color retention is probably the most dramatic benefit you’ll notice. Unsealed pavers can lose up to 30% of their vibrant color within just a few years. It’s heartbreaking to watch your beautiful driveway slowly fade to gray when a simple sealing routine could have prevented it.
The easier cleaning benefit becomes obvious the first time you deal with a spill. What used to require scrubbing with harsh chemicals now wipes away with basic soap and water. Your weekend cleaning routine just got a whole lot shorter.
Don’t overlook the joint hardening effect either. Quality sealers penetrate into your polymeric sand joints and help lock them in place. This means less frequent re-sanding and fewer weeds pushing through the cracks.
Most sealers need refreshing every 3-5 years, but your specific timeline depends on traffic levels and weather exposure. High-traffic areas and full-sun driveways might need attention on the shorter end of that range.
Let’s talk about the mistakes that make us cringe when we see them. Over-application tops the list—more sealer doesn’t mean better protection. It means a milky, cloudy mess that might peel or flake off later. Follow the manufacturer’s coverage rates religiously, even if it feels like you’re being stingy.
Sealing damp pavers is another recipe for disaster. Trapped moisture under the sealer creates bonding problems and that cloudy appearance nobody wants. Wait for at least 24-48 hours of dry weather, and make sure those pavers are bone dry before you start.
Overlap marks are the telltale sign of amateur application. When you’re rolling or spraying, maintain that wet edge and resist the urge to go back over areas that have started to dry. Those overlap lines will haunt you every time you look at your driveway.
Safety isn’t negotiable when working with sealers, especially solvent-based products. Proper ventilation is crucial—work on calm days when fumes won’t get trapped in enclosed areas. Invest in respiratory protection and keep kids and pets away until everything’s fully cured. Your lungs will thank you later.
The key to successful sealing is taking your time and doing it right the first time. Rush the job, and you’ll be dealing with the consequences for years to come.

Here’s the beautiful thing about paver driveway maintenance—when something goes wrong, you don’t need to tear up your entire driveway like you would with concrete. Individual pavers can be lifted, repaired, or replaced without disturbing the rest of your installation. It’s like having a puzzle where you can swap out individual pieces instead of starting over.
Settlement and shifting happen to even the best-maintained driveways. Maybe a delivery truck was heavier than expected, or perhaps last winter’s freeze-thaw cycles took their toll. The key is catching these issues early before they spread to surrounding pavers.
Cracked pavers are more than just an eyesore—they’re accident waiting to happen. A cracked paver creates weak points that can trip up family members or visitors. Plus, water can seep into cracks and cause freeze damage that spreads to neighboring stones.
Don’t forget about your edge restraints—those plastic, metal, or concrete borders that keep your pavers from wandering off. Over time, these can shift, crack, or get buried under soil and mulch. Without proper edging, your beautiful straight lines will gradually become wavy, and pavers will start spreading apart.
Winter brings its own set of challenges here in Massachusetts and New Hampshire. Snow removal becomes an art form when you want to protect your investment. The wrong technique can scratch surfaces or chip edges, undoing years of careful maintenance.
Most paver repairs are surprisingly manageable for handy homeowners. When you notice a paver that’s settled or is rocking when you step on it, don’t panic—this is fixable.
Start by lifting the problem paver along with any surrounding stones needed for workspace. Use a couple of flat pry bars or large screwdrivers to gently lift the pavers. Work carefully to avoid chipping edges.
Check the base material underneath. If it’s just a matter of low bedding sand, you’re in luck. Clean out the old sand and add fresh bedding sand to bring the area back to proper grade. A screed board helps ensure you get the slope right for drainage.
For re-tamping the base, a hand tamper works fine for small areas. Make sure the base is firm and level before adding your bedding sand layer. This extra step prevents the same problem from happening again in six months.
Edge restraint inspection should happen at least twice a year. Walk your driveway’s perimeter and look for loose or damaged edging. Even small gaps can allow pavers to gradually migrate, so fix these promptly.
Water damage prevention is like insurance—boring until you need it, then absolutely crucial. Your driveway needs a proper slope of at least 1/4 inch per foot to move water away from your home and off the paver surface.
French drains might sound fancy, but they’re just trenches filled with gravel that redirect water. If you’ve got a low spot that always stays wet, a simple french drain can solve years of headaches.
Pay attention to your gutter extensions and downspouts. Roof runoff contains a surprising amount of water, and if it’s dumping directly onto your driveway, it can wash out joint sand and erode the base over time. A simple downspout extension can redirect this water to your lawn instead.
Perimeter edging maintenance prevents the domino effect of paver movement. When edge restraints fail, pavers start shifting outward, creating gaps that collect debris and allow weeds to take hold. A small repair now prevents major reconstruction later.
Winter paver driveway maintenance starts with having the right tools in your garage. Plastic shovels are your best friend—they won’t scratch paver surfaces like metal shovels can. If you use a snow blower, adjust the height so you’re not scraping directly on the stones.
Calcium-based de-icers are gentler on pavers than regular rock salt. Standard salt can be harsh on both the pavers and your landscaping. Whatever de-icer you choose, use it sparingly—more isn’t better, and excessive amounts can actually accelerate surface wear.
Avoid metal tire chains or studded tires on your paver driveway. The metal contact can chip and scratch surfaces, creating permanent damage that’s impossible to repair. If you need traction aids, fabric tire socks work without the surface damage.
Prompt snow clearing within 24-48 hours prevents the worst freeze-thaw damage. Snow that sits and melts repeatedly works its way into joints and can cause significant problems by spring.
For homeowners dealing with harsh winters year after year, heated driveway systems are becoming more popular. These electric or hydronic systems eliminate snow and ice entirely, though they’re typically installed during initial construction rather than added later.
Let’s talk money—because understanding paver driveway maintenance costs helps you make smart decisions about your investment. The good news? Most basic maintenance is surprisingly affordable when you handle it yourself.
For DIY enthusiasts, supply costs typically run $0.25 to $1.00 per square foot for basic cleaning and re-sanding materials. That means maintaining a typical 600-square-foot driveway might cost you $150 to $600 in supplies annually. You’ll need polymeric sand, cleaning solutions, maybe some replacement pavers, and sealer every few years.
Professional services tell a different story. Based on internet research averages (not specific to Dube Property Maintenance & Hardscaping pricing), professional cleaning, sanding, and sealing runs $1.50 to $4.50 per square foot. That same 600-square-foot driveway could cost $900 to $2,700 for professional maintenance. The wide range reflects differences in regional markets, surface conditions, and service complexity.
Here’s where pavers really shine compared to other driveway materials. When concrete develops cracks or stains, you’re often looking at expensive resurfacing or complete replacement. With pavers, you can swap out individual damaged stones for a fraction of the cost. This repairability makes pavers incredibly cost-effective over their lifetime.
For detailed cost comparisons with other materials, check out our comprehensive guide on paver driveway cost vs concrete.
The math gets interesting when you factor in time and equipment costs. A thorough paver driveway maintenance session can easily consume an entire weekend. Professional crews typically complete the same work in a few hours with specialized equipment.
This question comes up constantly, and honestly, the answer depends on your situation. Time savings is usually the biggest factor. Between pressure washing, re-sanding, and sealing, you’re looking at 12-16 hours of work for a typical driveway. That’s assuming everything goes smoothly and you don’t need multiple trips to the hardware store.
Equipment costs can tip the scales toward professional service. A quality pressure washer runs $300-800, plus you’ll need surface cleaners, sand spreaders, and other specialized tools. If you’re only maintaining your own driveway, that equipment investment might not make financial sense.
Warranty preservation is something many homeowners overlook. Most paver installations come with manufacturer or installer warranties that require proper maintenance. Professional service provides documentation that maintenance was performed correctly—crucial if you ever need to file a warranty claim.
The specialized equipment professionals use makes a real difference. Commercial-grade pressure washers, mechanical sand spreaders, and professional-grade sealers often achieve better results than homeowner equipment. Plus, experienced contractors know how to avoid common mistakes that can damage your pavers.
Insurance and liability protection is another professional service advantage. If something goes wrong during DIY maintenance—say you damage pavers with excessive pressure washing—you’re on the hook for repairs. Professional contractors carry insurance that protects both parties.
Sealer selection can feel overwhelming with all the options available, but it boils down to understanding penetrating versus film-forming sealers and your personal preferences.
Penetrating sealers (also called non-film-forming) soak into the paver material and provide protection from within. They maintain the natural look and texture of your pavers while offering excellent UV and stain protection. These sealers typically last 3-5 years and are ideal if you love your pavers’ original appearance.
Film-forming sealers create a protective layer on the surface. They provide maximum stain protection and can dramatically improve color saturation—often called the “wet look” because they make pavers appear constantly moist. However, they require more frequent reapplication and can show wear patterns in high-traffic areas.
Sheen preference is largely aesthetic. Matte finishes look most natural, while higher gloss levels provide more dramatic color improvement. Consider your home’s architectural style when choosing. Modern homes often look great with higher gloss, while traditional styles typically favor matte finishes.
The water-based versus solvent-based decision affects both performance and application. Water-based sealers are easier to apply, have minimal odor, and are more environmentally friendly. Solvent-based sealers typically penetrate better and last longer but require careful ventilation and handling.
Your driveway will tell you when it needs attention—you just need to know what to look for during your regular inspections.
Loose sand is often the first warning sign. If you can easily sweep sand out of joints with a regular broom, it’s definitely time for re-sanding. This usually happens gradually, so check a few different areas of your driveway.
Standing water after rainfall is a red flag for drainage problems. Water should run off your driveway within a few hours of rain stopping. Persistent wet spots or puddles suggest base settlement or inadequate slope that needs professional attention.
Dull or faded color indicates that sealer protection has worn off. This is especially noticeable on pavers that were previously sealed. Unsealed pavers are vulnerable to staining and accelerated color loss, so don’t wait too long to reseal.
Rocking stones are a serious concern that requires immediate attention. If pavers move or rock when you step on them, the base underneath has likely shifted or eroded. This problem will only get worse under vehicle traffic and can lead to expensive repairs if ignored.
Weed growth between pavers suggests that joint sand has eroded or was never properly installed. While a few weeds aren’t catastrophic, extensive weed growth indicates structural problems that need addressing.
The key is catching these issues early when they’re still manageable and affordable to fix. A little preventive attention saves major headaches down the road.

Your paver driveway is more than just a place to park your car—it’s the first thing people notice about your home and a significant investment that deserves protection. The good news? Paver driveway maintenance doesn’t have to be overwhelming or expensive when you stay on top of it.
Think of maintenance like going to the dentist. A little prevention now saves you from major problems later. Weekly sweeping takes ten minutes but prevents years of stain damage. Annual cleaning and re-sanding might cost a few hundred dollars but can save you thousands in premature replacement costs.
The research is clear: homeowners who follow a consistent maintenance schedule extend their driveway’s life by up to 25%. That’s potentially saving $15,000 to $30,000 in replacement costs over the lifetime of your driveway. Not bad for a weekend’s work each year.
Remember the simple formula for success: sweep regularly, clean annually, re-sand as needed, and seal every 3-5 years. When you spot problems like loose pavers, standing water, or faded colors, address them promptly. Small issues are always easier and cheaper to fix than big ones.

Here in Massachusetts and New Hampshire, we know how brutal winters can be on outdoor surfaces. At Dube Property Maintenance & Hardscaping, we’ve been helping homeowners in Methuen, Andover, Salem, and surrounding communities protect their paver investments for years. We understand the unique challenges that New England weather throws at your driveway.
Whether you’re a DIY enthusiast who wants to handle basic maintenance yourself or prefer to leave everything to the professionals, the important thing is having a plan. Your beautiful paver driveway will reward consistent care with decades of curb appeal and functionality.
Don’t let a gorgeous driveway turn into an expensive headache. Protect your investment with proper maintenance, and it’ll keep adding value and beauty to your home for years to come.
Ready to give your driveway the care it deserves? For comprehensive information about installation costs and options, check out our detailed guide on cost to install paver driveway.
Contact Dube Property Maintenance & Hardscaping today for expert maintenance, repairs, or new installations. We’re your one-stop solution for keeping your outdoor spaces looking their absolute best, no matter what New England weather throws your way.
