Install patios to transform empty outdoor spaces into functional and beautiful havens. Whether you’re looking to increase your home’s value, create a serene retreat, or build an entertainment hub, installing a patio offers unparalleled benefits. Here are prompt insights into the reasons why you should consider adding a patio to your property:
Incorporating a well-planned patio not only boosts the curb appeal of your property but also improves your quality of life. Imagine leisurely evenings beside a warm firepit or lively afternoons hosting BBQ sessions in your custom pavilion. As we dig deeper into this guide, you’ll find how creating your own outdoor oasis can be both rewarding and achievable.
Basic install patios terms:
– Backyard Patio Installer
– affordable patios
– brick paver installation
Planning is the foundation of a successful patio project. Whether you’re aiming for a cozy nook or a grand entertainment space, a solid plan ensures your patio meets your needs and fits your budget.
When it comes to materials, your choices will significantly impact the look, durability, and cost of your patio. Here’s a quick rundown:
Accurate calculations prevent headaches down the road. To determine how much material you’ll need, start by measuring your patio’s square footage. This will help you estimate the quantity of gravel, sand, and paver stones required.

Before you start digging, consider a design consultation. This step helps align your patio’s layout with your goals, whether it’s creating a dining area, a play zone for kids, or a tranquil garden spot. During the consultation, discuss:
Finally, set a realistic budget. Factor in the cost of materials, tools, and any professional help you might need. By planning carefully, you’ll be well on your way to creating a patio that improves both your home and lifestyle.
Before you start laying down those beautiful paver stones, it’s crucial to prepare the patio area properly. This step ensures a solid foundation and a smooth installation process.
Begin by marking the perimeter of your future patio. Use stakes and mason’s line to outline the area. This gives you a visual guide and keeps everything aligned. Make sure the lines are taut and level, as this will be your reference for the entire project.
Next, clear the grass and topsoil within the marked area. Use a spade or shovel to dig down to the required depth, usually 6 to 8 inches, depending on your base materials. Removing the grass and soil ensures a stable base and prevents future weed growth.
Once the area is cleared, it’s time to focus on depth and slope. A slight slope, about 1/4 inch per foot, is essential for drainage. Use a level to check your work frequently. If the ground is uneven, adjust it with a landscape rake or by adding or removing soil.
To prepare the patio area efficiently, you’ll need a few key tools:
Investing in these tools or renting them will make the process smoother and more efficient. With the groundwork laid, you’re ready to move on to the next step: Installing the Patio Base.
Creating a solid base is the backbone of any successful patio installation. It ensures your patio remains stable and level over time. Here’s how to do it right.
1. Start with a Gravel Base
Begin by spreading a 4-inch layer of gravel across your prepared area. This gravel base provides essential drainage and stability. Use a landscape rake to distribute the gravel evenly.
2. Compact the Gravel
Once the gravel is spread, it’s time to compact it. Use a tamper or a plate compactor to press the gravel down firmly. This step is crucial for preventing future settling. For larger areas, a plate compactor is more efficient and ensures even compression.
3. Wet the Base
Lightly spray the compacted gravel with a garden hose. The moisture helps the gravel settle and bind together, creating a more solid foundation.
4. Leveling Sand Layer
Now, add a 1-inch layer of leveling sand. To make sure the sand is evenly distributed, lay down two parallel electrical conduits across the area. These will act as guides.
5. Smooth the Sand
Pour the sand between the conduits, then use a 2×4 board to screed, or smooth, the sand. Drag the board across the conduits to ensure an even layer. Check for levelness with a level.
6. Remove the Conduits
Carefully remove the conduits and fill the gaps with additional sand. Smooth these areas to maintain an even surface.
7. Avoid Rework
While leveling the sand, be cautious not to step on the leveled areas. If you do, you’ll need to re-level that section. Plan your work to avoid walking on freshly leveled sand, moving systematically from one end to the other.
By following these steps, your patio base will be well-prepared for the next phase: laying the paver stones. A level, compacted base ensures your patio will be both beautiful and durable.
After preparing your base, it’s time to lay the paver stones. This is where your patio starts to take shape.
1. Choose a Starting Point
Begin laying your pavers in a corner or along the longest straight edge. This helps maintain alignment and ensures you work systematically across the area.
2. Fit Pavers Snugly
Place each paver straight down into the sand. Avoid dragging them, as this can disrupt the leveled surface. Fit the pavers snugly together, ensuring there are no gaps. This snug fit not only looks good but also helps prevent shifting over time.
3. Avoid Stomping
Resist the urge to stomp on the pavers to set them in place. Instead, use gentle pressure to adjust them. Stomping can cause uneven surfaces and may damage the pavers.
If you need to cut pavers to fit your design, use a masonry saw for a clean cut. Safety is crucial, so always wear gloves and protective eyewear when operating the saw.
2. Safety Gear
When cutting pavers, ensure you’re equipped with the right safety gear. This includes gloves, goggles, and ear protection. Safety first!
3. Edging Stones or Paver Edging
Once all pavers are in place, it’s time to secure the edges. Use edging stones along the exposed edges of your patio. Alternatively, consider using paver edging, a hard plastic material that matches the height of your pavers. Secure this with stakes driven into the ground.
By following these steps, you’ll ensure that your pavers are well-laid and secure, setting the stage for the finishing touches that will complete your patio project.
With your paver stones snugly in place, it’s time to focus on the finishing touches that will ensure your patio is both durable and visually appealing.
1. Spread Polymeric Sand
Once the pavers are laid, spread polymeric sand over the entire surface. This special sand contains additives that bind the particles together, helping to lock the pavers in place.
2. Sweep Sand into Joints
Use a stiff-bristled broom to sweep the sand into the joints between the pavers. Be thorough, ensuring all gaps are filled. This step helps prevent weeds from growing and adds stability to the patio surface.
1. Use a Plate Compactor
After the sand is in place, run a plate compactor over the entire patio. This machine vibrates, helping to settle the pavers into the sand and ensuring a firm, level surface. It’s important to compact after sweeping the sand to maximize stability.
2. Add More Sand if Needed
After compacting, you might notice some joints need more sand. Repeat the sweeping and compacting process until all joints are completely filled.
1. Consider Sealing
Sealing your patio is an optional step, but it can improve the color of your pavers and protect them from stains and the elements. Choose a sealer that suits the material and your aesthetic preference.
2. Apply Evenly
Using a roller or sprayer, apply the sealer evenly across the surface. Make sure the patio is clean and dry before starting this step. Follow the manufacturer’s instructions for drying times and additional coats.
By following these steps, your patio will not only look great but will also stand the test of time. The final touches of sweeping, compacting, and sealing bring everything together, ensuring your outdoor space is ready for years of enjoyment.
When it comes to cost, gravel takes the top spot as the most budget-friendly option for installing patios. Gravel is affordable and offers excellent drainage, making it a practical choice for many homeowners. However, it may not provide the same level of comfort as other surfaces, especially if you plan to use the patio for dining or lounging.
For a bit more investment, consider using concrete pavers. They are still relatively cheap, easy to install, and offer a uniform shape and flat surface, which makes them comfortable to walk on. Plus, they come in various colors and styles to suit your design preferences.
If you’re looking for a DIY-friendly option, concrete pavers and bricks are your best bet. These materials are easy to handle due to their uniform size and shape. They fit together like puzzle pieces, allowing for straightforward installation without the need for cutting or specialized tools.
Concrete pavers offer a smooth, flat surface, making them ideal for beginners. Bricks, on the other hand, add a classic charm and are also quite manageable. Both options allow you to create a sturdy patio without the hassle of mixing and pouring concrete.
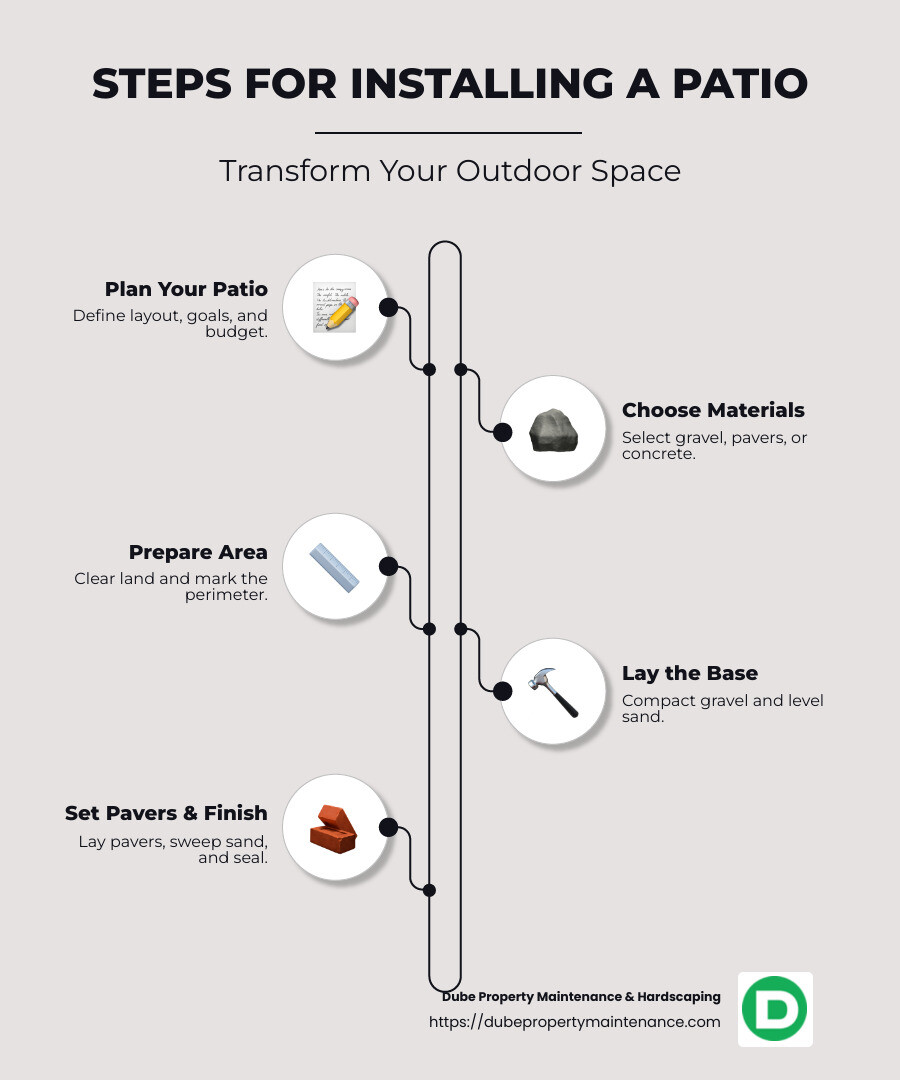
Installing a patio involves several key steps to ensure a durable and attractive result:
1. Marking and Clearing
Begin by marking the perimeter of your desired patio area using stakes and string. Clear the area of grass, plants, and debris. This preparation step is crucial for creating a clean slate for your new patio.
2. Creating a Sub Base
Dig down to the required depth to accommodate your sub base, which typically consists of gravel. Spread and compact the gravel to form a stable foundation. This layer is essential for drainage and preventing the patio from shifting over time.
3. Laying the Sand Base
Once the sub base is in place, add a layer of sand. Use a level to ensure the sand is even, which will help your pavers or slabs sit properly.
4. Laying Slabs or Pavers
Start placing your pavers or slabs from one corner, working your way out. Ensure they fit snugly together. Use a rubber mallet to tap them into place, and check for levelness as you go.
5. Pointing
Fill the joints between the pavers or slabs with sand or mortar, depending on the material. This step, known as pointing, helps secure the units in place and prevents weeds from growing between them.
By following these steps, you can install patios that are both functional and visually appealing. Whether you opt for gravel, bricks, or concrete pavers, careful planning and execution will ensure your patio stands the test of time.
At Dube Property Maintenance & Hardscaping, we pride ourselves on being your go-to partner for all your outdoor needs in Methuen, MA. Our professional team is committed to providing high-quality, comprehensive outdoor solutions that transform your space into a stunning and functional area.
Whether you’re looking to install patios, create a beautiful landscape, or manage snow and ice during the winter months, our experienced team has got you covered. We bring decades of expertise and cutting-edge equipment to every project, ensuring that your outdoor space reflects your vision and improves your property’s curb appeal.
From initial consultation to the final touches, we guide you through each step of the process. Our approach is personalized, and we work closely with you to understand your goals and preferences. Whether you’re a homeowner dreaming of a cozy outdoor retreat or a business owner seeking to improve your property’s exterior, we’re here to help you achieve your landscaping and hardscaping aspirations.
Ready to transform your outdoor space? Contact us today to get started with Dube Property Maintenance & Hardscaping. Let’s make your outdoor dreams a reality, and turn your backyard into a place you’ll love to spend time in. Your satisfaction is our top priority, and we’re excited to collaborate with you on your next project.
