When it comes to how to design outdoor landscape lighting, the goal is to blend beauty, safety, and function seamlessly. Whether you’re lighting up a home garden or a business driveway, lighting can transform your outdoor space into a captivating showcase.
Quick Guide to Designing Outdoor Landscape Lighting:
Outdoor lighting is not just about visibility—it’s about creating atmosphere and enhancing your property’s look. From preventing trips at night to deterring intruders, the right lighting can make a significant difference. Plus, energy-efficient lights, like LEDs, offer long-term savings and are environmentally friendly.

Selecting the right lights is crucial in achieving the desired effect in your outdoor landscape lighting design. Here are a few techniques to consider:
Your power supply is the backbone of your landscape lighting system. Most homeowners opt for low voltage systems due to their safety and ease of installation. Here’s what you need to know:
Before you start installing, sketch a rough layout of your property. This will help you visualize the placement of lights and estimate distances for wire runs. Use graph paper for accuracy and mark each fixture’s position.
Mark the approximate positions of your fixtures in the landscape using small flags or pencils. This helps in visualizing the final look and making rough measurements for wire runs. Indicate the types of fixtures at each location on your sketch.
Choose a location for your transformer that is close to the house and hidden from view. If you have a large property, you might need multiple transformers. Mark these locations on your sketch.
Planning your wire runs is essential to minimize the total amount of wire used. You don’t want to run a single wire from each fixture to the transformer. Instead, consider these wiring methods:
Each method has its advantages, so choose the one that best fits your layout and minimizes wire usage.
Implementing these steps will ensure a well-planned and effective outdoor lighting system. Next, we’ll dive into the specific techniques and areas to illuminate for the best visual and functional results.
Designing effective and aesthetic outdoor landscape lighting involves several key steps. Let’s break these down into manageable parts.
First, define the purpose of your lighting. Do you want to highlight specific garden features, improve security, or create a cozy ambiance? Understanding the purpose will guide your choices in fixtures and placement. For example, accent lighting is perfect for highlighting statues or trees, while downlighting enhances safety on pathways.
Next, sketch a layout of your property. Include all key elements like trees, pathways, and architectural features. This will help you visualize where to place the lights.
Gauge the effort required. Are you comfortable digging trenches for wires and installing transformers, or would you prefer to hire professionals? Knowing this upfront can save you time and headaches later.
Set a budget for your project. Landscape lighting can range from a few hundred to several thousand dollars. Consider the cost of fixtures, transformers, wiring, and any professional help you might need.
Once you have your plan, it’s time to install the fixtures. Here’s a step-by-step guide:
Choose a wiring method that suits your layout:
Position the lights for optimal effect. In the evening, turn on the lights to ensure they’re placed correctly. Adjust as needed to avoid overlapping pools of light or casting unwanted shadows.
Finally, test the entire system. Check each connection and bulb to ensure everything works as planned. Make adjustments as needed and bury the wires 2-6 inches deep to protect them from damage.
By following these steps, you’ll create a landscape lighting system that’s both functional and beautiful.
Next, we’ll dive into the specific techniques and areas to illuminate for the best visual and functional results.
When designing your outdoor landscape lighting, utilizing specific techniques and understanding the proper application of different fixtures can make a significant impact. Let’s explore some of the most effective techniques and areas to illuminate.
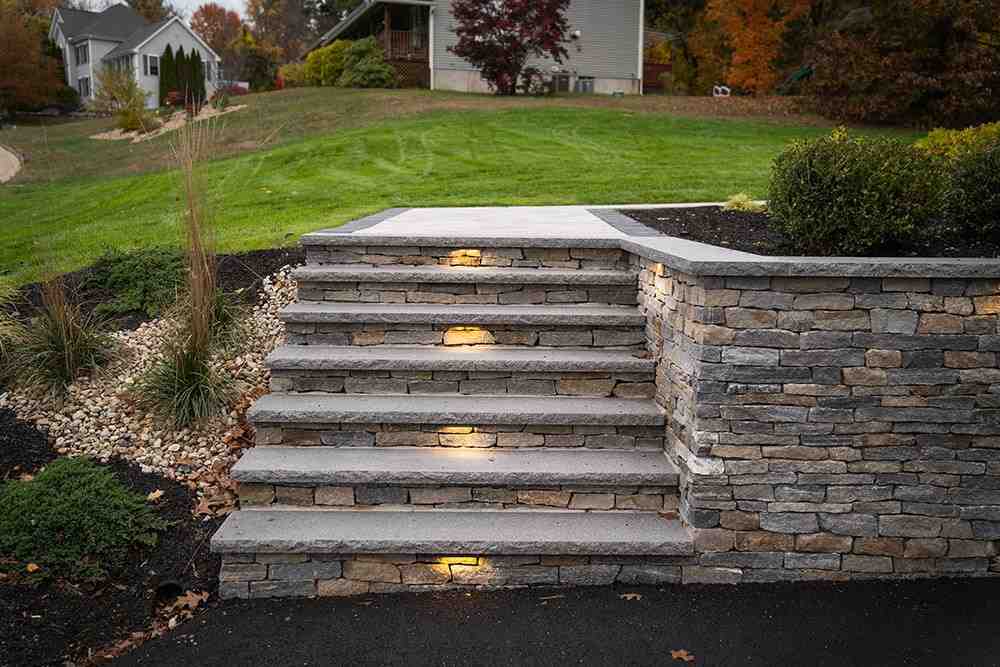
Uplighting involves placing fixtures at ground level to shine light upward. This technique is perfect for highlighting trees, statues, and architectural features. By focusing light from below, you can create dramatic shadows and make tall objects stand out.
Moonlighting mimics the gentle glow of the moon. It involves placing lights high up in trees or structures to cast a soft, downward light. This technique creates a natural, serene ambiance and is ideal for patios and garden areas.
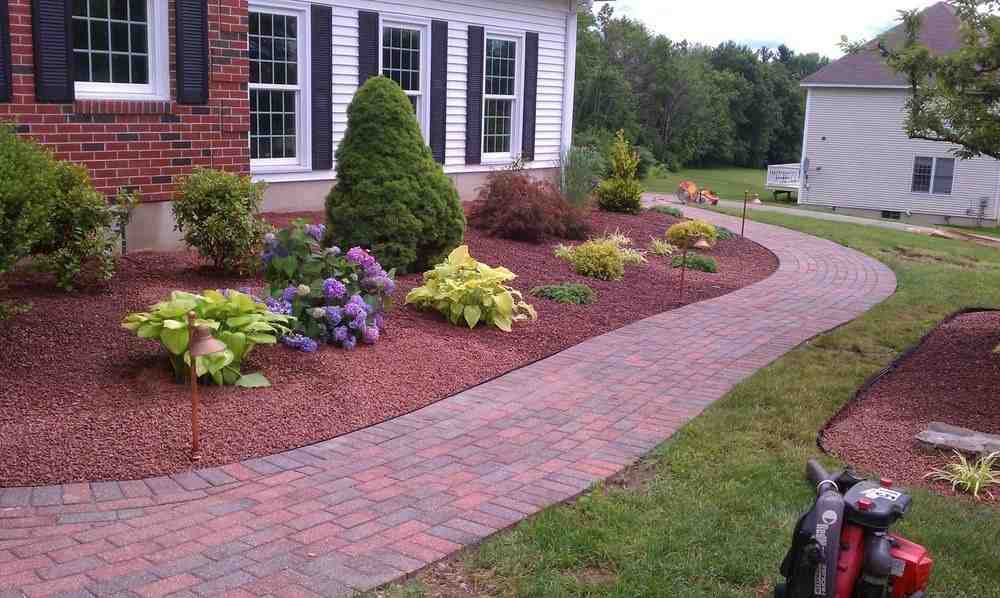
Path lighting enhances safety and guides visitors along walkways. Place fixtures close to the ground to illuminate paths and highlight landscaping features. This technique ensures safe navigation and adds a charming glow to your garden.
While not always necessary due to car headlights, driveway lighting can add a touch of elegance and improve safety. Consider using bollard lights or uplighting adjacent trees and landscape features to create a welcoming entrance.
Pool lighting adds a magical touch to your outdoor space. Use underwater lights or spotlights to accentuate the water’s surface and create a captivating effect. This not only enhances beauty but also improves safety around the pool area.
Different fixtures serve various purposes. Here are the common types and their best uses:
By understanding these techniques and fixtures, you can create a landscape lighting design that enhances beauty, safety, and functionality. Next, we’ll explore how lighting can enhance home safety and aesthetics.
Outdoor landscape lighting isn’t just about making your yard look good. It’s also about security, safety, and lifestyle enhancement. Let’s break down how to achieve these goals while keeping energy efficiency and cost-effectiveness in mind.
Lighting improves security by deterring intruders. Dark areas around your home are inviting to burglars. Strategically placed lights can eliminate these dark spots.
Outdoor lighting prevents accidents by illuminating pathways, steps, and other potential hazards.
Enhance the aesthetic appeal of your home by highlighting its best features.
Extend your living space outdoors and make it enjoyable in the evening.
Energy-efficient lighting options like LEDs and solar lights can save you money and reduce your carbon footprint.
Using the right accessories can make your lighting system more cost-effective.
By combining these elements, you can design an outdoor landscape lighting system that enhances your home’s safety and beauty while being mindful of energy use and costs.
Next, we’ll look at how to maintain and troubleshoot your landscape lighting system to ensure it remains effective and efficient.
Keeping your landscape lighting fixtures in good condition is essential for long-lasting performance. Clean the fixtures regularly to remove dirt, debris, and cobwebs. Use a soft cloth and mild soap solution to avoid damaging the finish. For stubborn grime, a gentle brush can help.
Tip: Avoid using harsh chemicals or abrasive materials, as they can scratch or corrode the fixtures.
Even with LED bulbs known for their longevity, replacements are inevitable. When a bulb goes out, ensure you replace it with one of the same type and wattage. This maintains uniformity in brightness and color temperature across your lighting system.
Steps for bulb replacement:
1. Turn off the power to the fixture.
2. Remove the old bulb carefully.
3. Insert the new bulb, ensuring it fits snugly.
4. Turn the power back on and test the light.
Landscape lighting systems can face various issues, from flickering lights to complete outages. Here are some common problems and solutions:
Pro Tip: Use gel-filled wire connectors for outdoor splices to prevent corrosion and ensure a long-lasting connection.
While DIY installation is possible, hiring professionals like Dube Property Maintenance & Hardscaping ensures a seamless and efficient setup. Our experts handle everything from planning to installation, using high-quality products that stand the test of time.
Client Story: One of our clients, Jane from Burlington, MA, was thrilled with the transformation of her backyard. “The team at Dube Property Maintenance took my vague ideas and turned them into a stunning reality,” she said. “The professional installation was smooth, and the results speak for themselves.”
Maintaining your landscape lighting isn’t a one-time task. Dube Property Maintenance & Hardscaping offers year-round services to keep your system in top shape. From seasonal adjustments to regular check-ups, we ensure your outdoor lighting remains functional and beautiful throughout the year.
Services Include:
– Regular cleaning and maintenance
– Seasonal bulb replacements
– Wiring inspections and repairs
– System upgrades and expansions
By following these maintenance tips and leveraging professional services, you can enjoy a reliable and stunning landscape lighting system all year long.
Next, we’ll explore various lighting techniques and areas to further enhance the beauty and safety of your home.
Designing an effective and aesthetic outdoor landscape lighting system can transform your home, adding beauty, safety, and functionality. Let’s recap the essentials and provide some final tips to get you started on your project.
Don’t be intimidated by the process. Whether you choose to DIY or hire professionals like Dube Property Maintenance & Hardscaping, the result will be worth the effort. Your home will not only look stunning but also become a safer and more inviting place for family and friends.
Ready to light up your landscape? Start planning today and watch your outdoor space transform into a nighttime wonderland. For more inspiration and professional assistance, contact us at Dube Property Maintenance & Hardscaping.
The best color temperature for landscape lighting is typically around 2700 Kelvin. This softer yellow light is ideal because it creates a warm and inviting atmosphere without being too harsh or too dim. According to Environmental Designs, this color temperature works well for most landscape purposes, enhancing the beauty of your outdoor space while providing adequate illumination.
For optimal coverage, place path lights about 6 feet apart. This spacing ensures that your pathways are well-lit without overlapping pools of light. When it comes to up-lighting trees, you generally need only one light for smaller trees and two for mature trees. Proper spacing not only improves visibility but also contributes to an aesthetically pleasing arrangement.
Yes, LED landscape lights require specific transformers. Both low and high voltage landscape lighting systems need different types of transformers to function correctly. For LED lights, make sure your transformer matches the voltage and current requirements specified by the manufacturer. This ensures that your lighting system operates efficiently and safely.
For more detailed information and professional guidance on how to design outdoor landscape lighting, contact us at Dube Property Maintenance & Hardscaping. We’re here to help you create a stunning and functional outdoor lighting setup.