How to build retaining wall effectively is a skill that combines creativity with practical landscaping solutions. This popular DIY project not only improves the aesthetic appeal of outdoor spaces but also provides crucial support to sloping soil, preventing erosion and creating level terraces. Whether you’re aiming to boost your garden’s look or create functional garden beds, constructing a retaining wall adds both beauty and stability to your landscape.
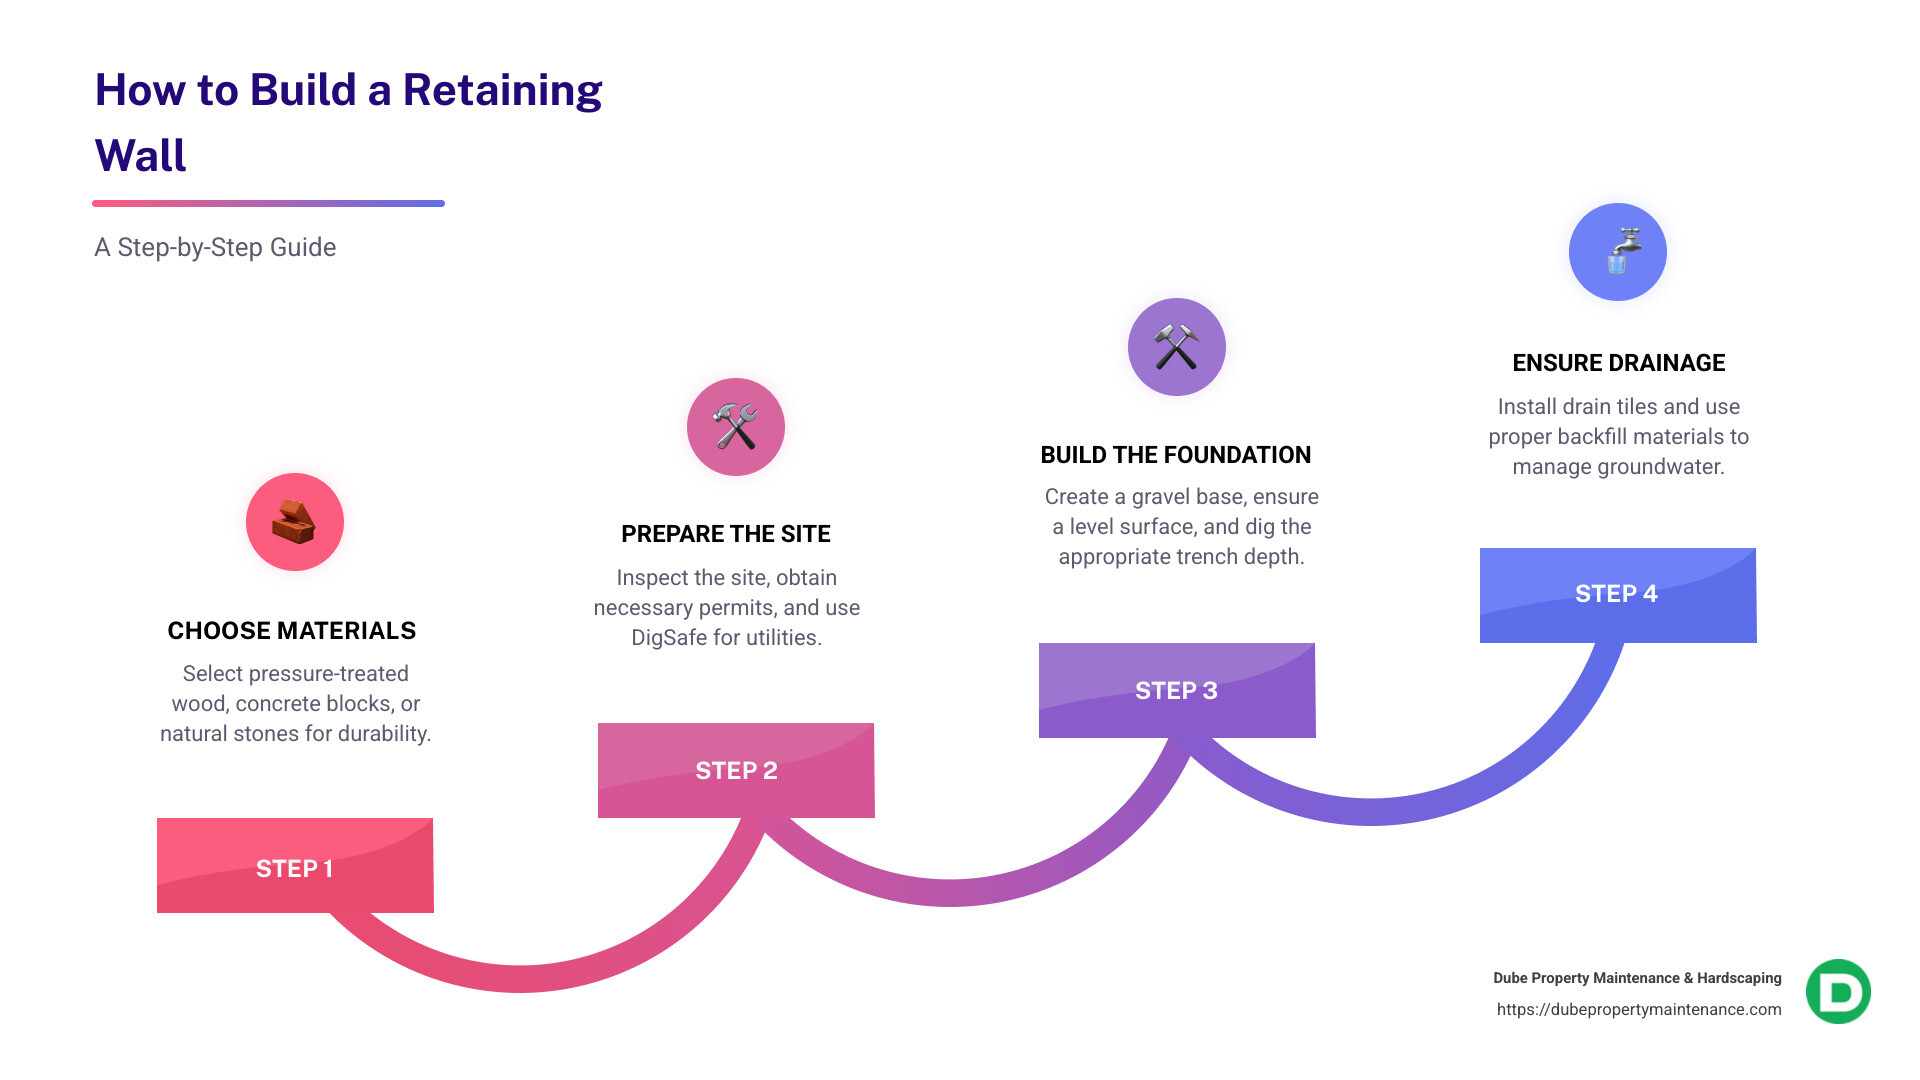
Here’s a quick overview:
Retaining walls are more than just functional structures. With a touch of creativity and the right guidance, anyone can transform their yard into a picturesque and durable landscape.
Retaining walls are much more than barriers holding back soil. They are a blend of functionality and beauty that can dramatically transform your landscape.
One of the primary functions of retaining walls is to prevent soil erosion. On sloped land, rainwater can wash away valuable topsoil, leading to unsightly and potentially damaging erosion. A well-constructed retaining wall acts as a barrier, holding the soil in place and maintaining the landscape’s integrity. This is particularly important in areas with heavy rainfall, where the pressure of wet soil can be immense.
Retaining walls can turn steep, unusable slopes into beautiful terraced backdrops. By creating level areas, they provide opportunities for planting gardens, setting up outdoor seating, or even installing a small patio. These terraces not only make the land more usable but also add depth and interest to your outdoor space. Imagine a series of lush, green terraces cascading down a hillside, each level offering a unique view of your garden.
Beyond their practical benefits, retaining walls can serve as striking focal points in your landscape. By choosing attractive materials—such as natural stone or textured concrete blocks—you can create a feature that draws the eye and improves the overall aesthetic of your yard. Retaining walls can also be designed to incorporate seating, planters, or even water features, making them versatile elements in any landscape design.
Incorporating retaining walls into your landscape can address functional needs while also elevating the beauty and usability of your outdoor space. Whether you’re tackling a small DIY project or planning a larger installation, understanding the role of retaining walls is the first step in creating a landscape that is both stunning and sustainable.
Building a retaining wall isn’t just about stacking blocks or arranging stones. It’s a combination of smart planning, choosing the right materials, and ensuring your site is ready for construction. Let’s explore the essentials that will help you master the art of building retaining walls.
The first step in your retaining wall project is selecting the right materials. Your choice will depend on your budget, the wall’s purpose, and the aesthetic you want to achieve.
Before you start building, it’s crucial to prepare your site properly. This involves several key steps:
Planning and preparation are as essential as the construction itself. By choosing the right materials and ensuring your site is ready, you’ll set a solid foundation for a successful retaining wall project.
Building a retaining wall involves more than just stacking blocks. It’s about creating a strong foundation, ensuring proper drainage, and constructing a wall that stands the test of time. Let’s break it down step by step.
The foundation is the backbone of your retaining wall. A solid foundation ensures your wall remains stable and secure.
Drainage is crucial to prevent water buildup, which can exert pressure on your wall and cause it to fail.
Once the foundation and drainage are set, it’s time to build the wall itself.
By following these steps, you’ll create a retaining wall that not only looks great but also stands strong against the elements.
In the next section, we’ll answer some frequently asked questions about retaining walls, including whether you can build one yourself and the necessity of drainage systems for shorter walls.
Yes, you can build a retaining wall by yourself, especially if it’s a low-level wall. The key is having the right DIY skills and using basic tools like a level, spade, and cordless drill. However, it’s important to recognize that building a retaining wall is labor-intensive and may require a helper for tasks like digging and lifting heavy materials. Recruiting a friend or hiring a helper can make the process smoother and more efficient.
Absolutely, a 3-foot retaining wall does need a drainage system. Without proper drainage, water can accumulate behind the wall, increasing water pressure and potentially causing the wall to fail. Installing a drain tile—a perforated pipe at the wall’s base—helps channel groundwater away, reducing pressure. Backfilling with gravel or crushed stone further aids in managing water flow, ensuring the longevity and stability of your wall.
The most cost-effective way to build a retaining wall is by using pressure-treated wood or concrete blocks. These materials are generally less expensive than natural stone and are readily available at most home improvement stores. Opting for a DIY approach can also save on labor costs. While the average price for materials can vary, expect to spend anywhere from a few hundred to a few thousand dollars depending on the wall’s size and the materials chosen. These are average costs based on internet data and not actual costs for Dube Property Maintenance & Hardscaping.
By considering these factors, you can build a functional and affordable retaining wall that improves your landscape.
At Dube Property Maintenance & Hardscaping, we understand that building a retaining wall is more than just stacking stones or blocks. It’s about creating a structure that not only supports soil but also improves your landscape’s beauty. Our team offers professional solutions custom to meet your specific needs, ensuring high-quality service from start to finish.
Whether you’re looking to prevent soil erosion, create terraced backdrops, or simply add a focal point to your yard, our expertise in retaining wall installation can help you achieve your goals. We pride ourselves on our attention to detail and commitment to using the best materials and techniques available.
Building a retaining wall can be a complex task, and while a DIY approach might be tempting, having a professional team ensures that every aspect—from foundation to drainage—is handled with precision. Our services are designed to provide peace of mind, knowing that your retaining wall will stand the test of time.
If you’re ready to transform your outdoor space with a beautifully crafted retaining wall, contact us today. Let Dube Property Maintenance & Hardscaping bring your vision to life with our high-quality, comprehensive outdoor solutions.
