Ever looked at that sloped area in your yard and wished you could actually use it? That’s where DIY retaining wall blocks come in to save the day! These clever interlocking concrete units are designed to hold back soil and create level areas where there once were unusable slopes.
Think of retaining walls as the unsung heroes of landscape change. They don’t just hold back dirt—they reclaim valuable outdoor space, prevent erosion, and add a touch of architectural charm to your property. With a well-built wall, that awkward slope can become a gorgeous garden bed, a level patio, or even extra play space for the kids.
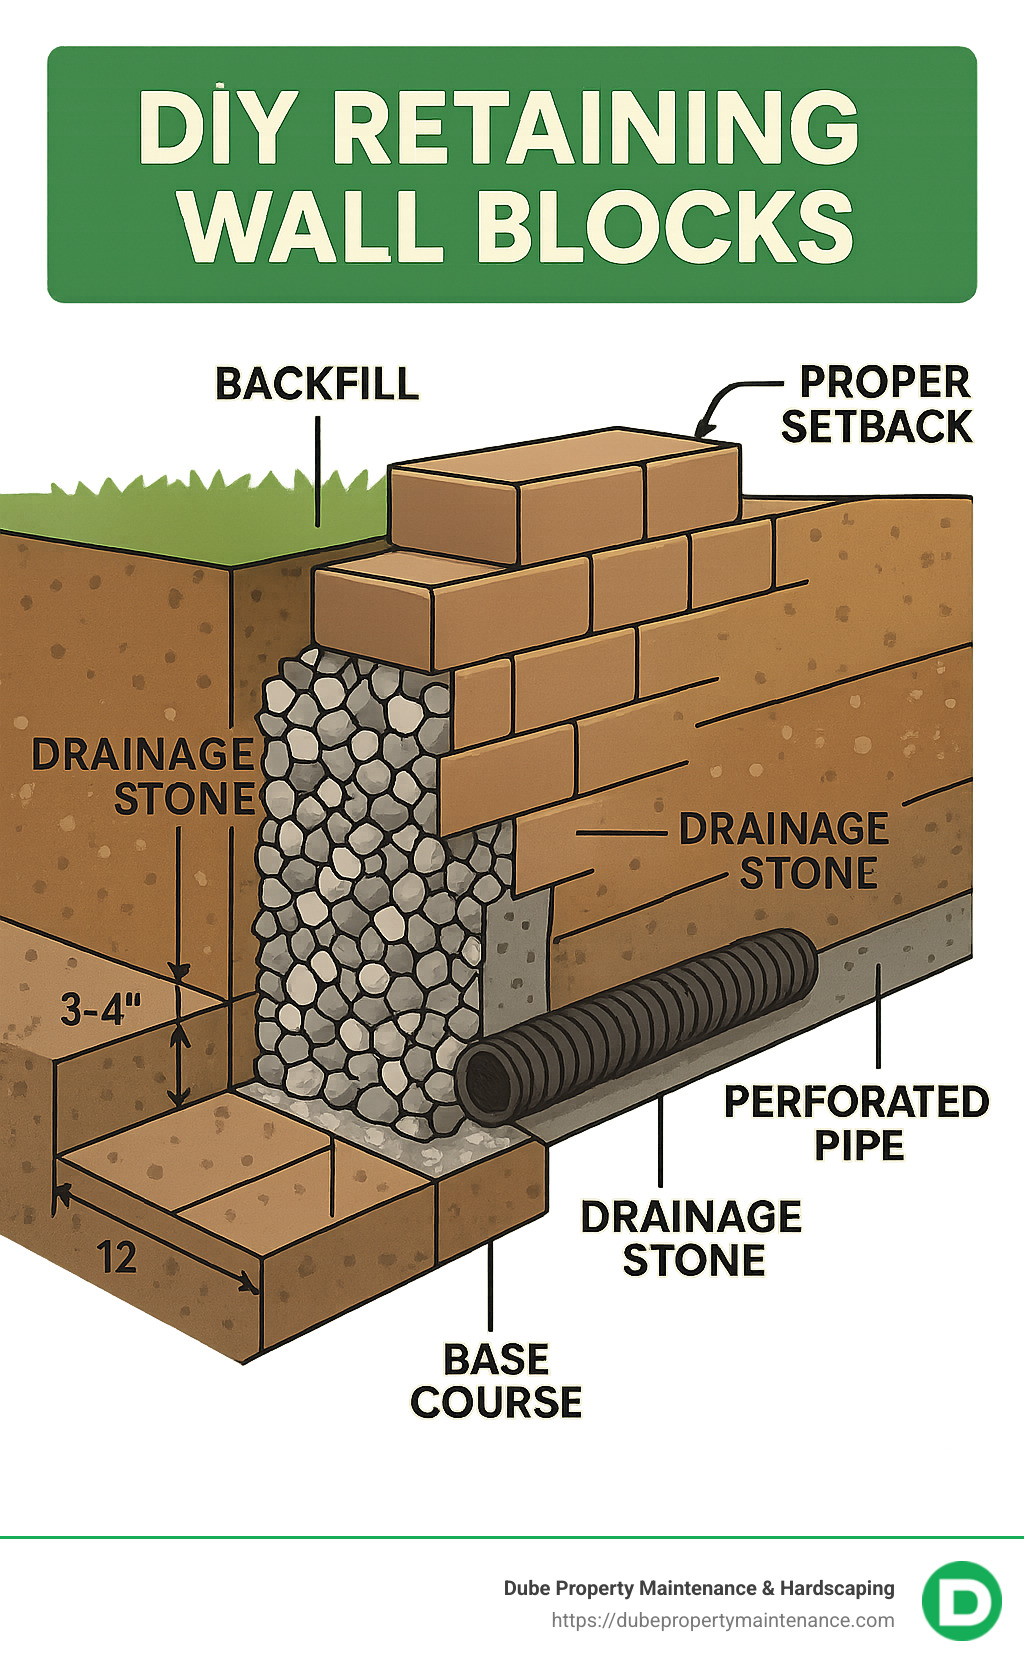
Quick Guide to DIY Retaining Wall Blocks:
- Excavate a trench 4-6 inches deep and 12 inches wide
- Add 3-4 inches of compacted gravel base
- Install first row level, with blocks half-buried
- Stack additional rows with 1/2″ setback per course
- Include proper drainage with gravel backfill and perforated pipe
- Finish with adhesive-secured capstones
I love what Family Handyman points out about these projects: “Lots of people think a retaining wall needs to hold back all 6 gazillion tons of soil in the yard behind it.” The truth is much less intimidating—a properly built DIY wall only needs to retain the soil within its failure plane, making this a perfect weekend project for homeowners with basic tools and some muscle power.
Let’s talk dollars and cents. The national average cost for having a professional install a 60-foot retaining wall ranges from $6,800 to $10,350. By rolling up your sleeves and tackling this project yourself with concrete blocks, you can save significantly on labor costs while adding both function and beauty to your property.
But before you grab that shovel, remember this crucial fact: the secret to a long-lasting retaining wall isn’t just in how you stack the blocks—it’s in the invisible parts. Proper base preparation, drainage installation, and backfill techniques make all the difference. As experts consistently point out, “Hydrostatic pressure is the leading cause of retaining wall failure,” so managing water properly is absolutely critical to your wall’s success.
There’s something deeply satisfying about changing your landscape with your own two hands. Budget savings are perhaps the most obvious benefit—DIY installation can save you 40-60% compared to hiring professionals. While we at Dube Property Maintenance & Hardscaping are always ready to help with larger or more complex projects, we understand that some homeowners enjoy the challenge of DIY work.
The curb appeal boost is instant and impressive. A well-built retaining wall immediately improves your property’s visual appeal and can increase your home’s value. It’s like giving your yard an architectural facelift!
For weekend warriors, there’s that special pride that comes from pointing to a finished project and saying, “I built that.” Most block retaining walls under 3 feet can be completed in a weekend or two, making them perfect for those looking to make a big impact without a months-long commitment.
You also get complete design control when you DIY. Want to incorporate built-in seating? Add landscape lighting? Create planting pockets? The choices are entirely yours when you’re the designer and builder.
As Kevin Bailey from Cape Town notes about quality retaining wall blocks: “The longevity of the blocks is phenomenal and highly recommended as a solution to all applicable retaining requirements.”
Whether you’re looking to tame an eroding hillside, create more usable space, or simply add some architectural interest to your landscape, DIY retaining wall blocks offer a practical, affordable solution that can truly transform your outdoor living space. And if you find yourself in over your head, Dube Property Maintenance & Hardscaping is just a phone call away!
Before diving into construction, let’s understand the building blocks of your project—literally.
DIY retaining wall blocks are specially designed concrete units that stack together to create walls that resist the lateral pressure of soil. Unlike regular bricks or paving stones, these blocks feature:
These blocks work on the principle of a “gravity wall”—their combined weight and setback angle counteract the pressure from the soil behind them. For walls up to 3-4 feet high, this simple physics is usually sufficient without additional reinforcement.
At Dube Property Maintenance & Hardscaping, we’ve installed countless retaining wall blocks throughout Massachusetts and New Hampshire, and we’ve seen how the right block selection makes all the difference in both appearance and longevity.

When selecting blocks for your DIY project, you’ll encounter several varieties that each offer unique benefits. Blocks with lips (or flanges) have a concrete projection on the back that automatically creates the proper setback when stacked. This lip catches on the block below, making alignment easier for beginners and preventing forward sliding—perfect if you’re new to hardscaping projects.
Pin-connection blocks use fiberglass or plastic pins inserted into pre-formed holes to connect courses. They offer precise alignment and the flexibility to create both straight and curved walls with the same block, which is great if your design includes gentle curves or corners.
Many homeowners also consider plain stackable blocks which don’t have mechanical connections but rely on weight, friction, and optional adhesive. While simpler in design, they require more attention to proper setback and leveling throughout the installation process.
“Interlocking concrete blocks are the easiest DIY material and add extra security,” notes Home Depot’s installation guide—and after years of installing retaining walls in New England, we couldn’t agree more. The built-in alignment features make the learning curve much gentler for weekend warriors.
When choosing your blocks, consider the face textures and colors available. From rugged split-face that mimics natural stone to smooth contemporary finishes that complement modern homes, the aesthetic options can dramatically change your landscape’s character. We always recommend selecting a style that harmonizes with your home’s architecture for a cohesive look.
Here in Methuen and surrounding areas, climate durability is non-negotiable—make sure your chosen blocks are rated for our notorious freeze-thaw cycles. Also weigh the tradeoffs of size and weight; larger blocks create stable walls faster but might have you calling your strongest friends for help on installation day!
Getting your material quantities right saves both time and money. No one wants to halt a Saturday project for an emergency supply run! To calculate what you’ll need, start by measuring your planned wall’s length and height in feet. Then, convert these measurements to block units by dividing your wall length by the block length to determine blocks per row, and your wall height by block height to calculate the number of rows needed.
Multiply these two numbers together for your base quantity, then add 10% extra for cuts, breakage, and future repairs. This buffer has saved many DIY warriors from frustration!
For instance, if you’re building a 20-foot wall that’s 3 feet high using blocks that are 12 inches long and 6 inches high, you’d need approximately 132 blocks (including that crucial 10% extra). Many manufacturers offer online calculators specific to their block systems, which can help refine these estimates.
Before loading up your truck, check out our detailed guide on how to build a landscape block retaining wall for additional tips on material estimation and preparation steps. Proper planning now means fewer headaches later when you’re in the thick of your project!
The difference between a weekend project and a weekend disaster comes down to proper planning. Trust me, when it comes to retaining walls, a little homework saves a mountain of headaches!
Before you grab that shovel, take a breath and do some important prep work:
Always call 811 before digging – this free service marks underground utilities so you don’t accidentally turn your wall project into an unexpected plumbing or electrical trip. I’ve seen too many DIYers skip this step only to find the hard way why it matters!
Check your local building codes next. Here in Massachusetts and New Hampshire (where we at Dube Property Maintenance work), walls over 3-4 feet typically require permits and sometimes professional engineering approval. Height restrictions vary by town, so a quick call to your building department can save you from an awkward conversation with an inspector later.
When you’re ready to visualize your wall, mark your layout using stakes and string. For curved walls, a garden hose works wonderfully as a flexible guide. I love watching homeowners’ faces light up when they first see their project take shape, even if it’s just outlined on the ground.
Don’t forget to measure your slope accurately – for every foot of wall height, plan to extend at least 2 feet into the slope. And while you’re measuring, verify your property lines too. Nothing sours neighborhood relationships faster than accidentally building on someone else’s land!
As RCP Block & Brick wisely notes, “It is paramount that this course is absolutely level both front-to-back and side-to-side.” Taking time during planning to establish solid reference points makes the actual building process so much smoother.
Let me share a secret that professional hardscapers know: water is your wall’s worst enemy. Saturated soil can literally double in weight, pushing against your beautiful new wall with devastating force.
To keep your wall standing strong for years, include these drainage essentials:
Use clean 3/4″ crushed gravel behind your wall – not regular soil and definitely not pea gravel. This creates pathways for water to flow downward instead of pushing against your wall.
Install a 4″ perforated pipe wrapped in a filter sock at the base. This pipe works like a hidden gutter system, collecting water and directing it away from your wall’s foundation.
Line your excavated area with non-woven filter fabric to prevent soil from washing into your drainage gravel. Think of it as a coffee filter for your wall – letting water through while keeping soil particles out.
Always ensure proper surface grading so water flows away from your wall, not toward it. I’ve seen beautiful walls fail simply because rainwater pooled behind them.
As one industry expert bluntly puts it, “Hydrostatic pressure from water buildup is the primary failure mode for retaining walls.” I couldn’t agree more – proper drainage isn’t a nice-to-have, it’s absolutely essential.
For modest garden walls, the weight and setback of the blocks themselves might provide enough stability. But when your ambitions grow taller, it’s time to consider geogrid – a synthetic mesh material that extends into the soil behind your wall.
You’ll need geogrid reinforcement when:
Your wall exceeds 3-4 feet in height. Think of geogrid as invisible support beams extending into the hill.
Your wall needs to support additional loads like driveways, patios, or structures.
You’re building in areas with poor soil conditions that might not provide adequate stability.
Your project involves steep slopes either above or below the wall location.
Installing geogrid isn’t complicated, but it must be done correctly. Typically, you’ll place your first layer on top of the first course of blocks, cut it to the proper length (usually 60% of your wall height), and lay it perpendicular to the wall face. After covering it with 6 inches of backfill and compacting, you’ll add additional layers every 16 inches of wall height.
Ready to build? Here’s what you’ll need in your arsenal:
For digging and moving materials, gather your shovel, pick, and wheelbarrow (or rent a small excavator for larger projects – your back will thank you!).
For measuring and leveling, you’ll need a tape measure, string line, 4-foot carpenter’s level, and torpedo level. A wall that starts level stays level.
To adjust and compact, grab a dead-blow rubber mallet and plate compactor (this can be rented for the weekend).
For safety, don’t skip safety glasses, gloves, and steel-toe boots. Working with concrete blocks is physically demanding, and proper safety equipment prevents painful injuries.
You’ll also need a masonry saw or chisel for cutting blocks and a broom for cleaning block surfaces before applying adhesive.
As for materials, your shopping list should include retaining wall blocks, capstones, crushed stone base material, drainage gravel, perforated drainage pipe with sock, landscape fabric, construction adhesive (like PL500), and geogrid if your project requires it.
As Lowe’s wisely advises, “Wear safety glasses, gloves, hearing protection, and back support.” Having installed countless walls ourselves at Dube Property Maintenance, I can’t emphasize enough how important proper safety gear is when handling heavy concrete blocks all day.
With careful planning and the right materials, you’re setting yourself up for a successful project that will stand the test of time—and weather!
Now that you’re prepared, let’s roll up our sleeves and build that retaining wall you’ve been dreaming about!
Think of your trench as the foundation of a house – get this right, and everything else will follow smoothly.
Start by excavating a trench that’s 4-6 inches deep, plus half the height of your first block. Make it about 12 inches wider than your block depth to give yourself some working room. For perspective, if you’re using a 6-inch tall block with an 8-inch depth, your trench should be 10-12 inches deep and about 20 inches wide.
Once excavated, take time to level the trench bottom thoroughly. Remove any sneaky roots, rocks, or debris that could cause problems later. Then compact the native soil with a plate compactor until it’s firm and stable.
Next comes the crucial base material. Spread 3-4 inches of crusher run (that’s 3/4″ crushed gravel with fines) in 1-2 inch layers, compacting each layer before adding the next. Use a straight 2×4 and level to screed the surface flat – this old carpenter’s trick works wonders for creating a level base.
Before moving forward, double-check that your base is perfectly level in all directions. This is where the saying “measure twice, cut once” really applies to hardscaping!
“I spent nearly three hours just on my base preparation,” shares Mike from New Hampshire, one of our customers who attempted a DIY wall before calling us. “It felt excessive at the time, but it was the best decision I made on the whole project.”
For more detailed guidance specific to New England’s challenging soil conditions, check out our article on building a retaining wall.
The first course is your foundation’s foundation – get this right, and the rest of your wall will thank you.
Begin by establishing a string line as your alignment guide. Make sure it’s perfectly level – even a slight tilt here will become magnified as your wall rises. If you’re building on a slope, always start at the lowest point and work your way up from there.
When placing your first block, set it carefully on the prepared base and check for level both front-to-back and side-to-side. Make any necessary adjustments by adding or removing small amounts of base material. This might feel tedious, but it’s time well spent.
Continue placing the first course blocks side by side, checking level as you go. A dead-blow hammer (the kind with sand inside) is perfect for making those tiny adjustments without damaging your blocks. Keep checking your alignment against that trusty string line.
If your blocks have rear lips, you’ll need to remove these lips on the first-course blocks only. For curves, follow the manufacturer’s guidelines for minimum radius, and for corners, use dedicated corner blocks if they’re available.
“It is paramount that this course is absolutely level both front-to-back and side-to-side,” as the RCP Block & Brick installation guide emphasizes. At Dube Property Maintenance, we’ve rescued many DIY projects where this critical step was rushed, leading to unstable walls that needed complete rebuilding.
With your base course perfectly level, it’s time to build upward with confidence.
Maintain what’s called a “running bond pattern” by starting your second course with a half block. This creates staggered joints where each block spans the joint between blocks below – much like traditional brickwork. This isn’t just for looks; it significantly strengthens your wall by preventing continuous vertical seams that could become failure points.
Creating proper setback is absolutely essential for wall stability. For blocks with built-in lips, the lip automatically creates the proper setback when you place the next course. If you’re using a pin system, follow the manufacturer’s pin placement guidelines carefully. For stackable blocks without connections, manually step back each course by approximately 1/2 inch. This backward lean is what helps your wall resist the pressure of the soil behind it.
Adhesive use is an art form in retaining wall construction. Clean surfaces thoroughly before applying construction adhesive (PL500 works great), and use it sparingly but strategically. Always use adhesive on the top course and capstones, and for walls without lips, a small bead between courses adds welcome stability.
If you’re working with blocks that don’t have lips, consider creating a small gravel “lip” behind each course as you build. This DIY lip helps maintain your setback and adds stability. Keep checking level and setback constantly – a small error in course three becomes a big problem by course six!

Drainage installation happens simultaneously with wall construction – think of it as building the wall and its support system at the same time.
After completing your first course, place filter fabric against the excavated soil – this acts like a coffee filter, letting water through but keeping soil particles out. Next, install a 4-inch perforated drain pipe with sock behind this first course. Make sure the pipe has a slight slope toward an exit point where water can escape. Surround this pipe with #57 drainage stone (clean, 3/4-inch crushed stone).
The backfilling process is methodical: add drainage stone in 6-inch layers (called “lifts” in the trade), then compact each lift before adding the next. Maintain at least a 12-inch width of drainage stone behind the wall. Continue this pattern with each course of blocks you add.
Remember to fold the filter fabric over the top of your drainage stone when you reach the top. This final wrap prevents soil from washing down into your carefully constructed drainage system.
“I skipped the drainage pipe to save money,” admits Tom from Methuen, “and after the first heavy rain, I understood why it’s non-negotiable. The water pressure pushed part of my wall forward overnight.”
A common DIY mistake we see at Dube Property Maintenance is inadequate compaction. Each 6-inch lift needs thorough compaction, but be careful not to over-compact directly behind the blocks – this can push them outward and ruin your carefully created setback.
The finishing touches transform your functional wall into a beautiful landscape feature.
Installing capstones is both practical and aesthetic. Clean the top course thoroughly – even use a leaf blower to remove all dust and debris. Apply a generous bead of outdoor construction adhesive in a zigzag pattern, then press capstones firmly into place. If using multiple capstones, stagger the joints for a more professional look and better structural integrity.
For backfilling behind the drainage zone, add topsoil above your drainage stone and compact it lightly. Too much compaction here can damage your drainage system, while too little will lead to future settling.
Consider your landscaping options carefully. Plant ground cover or low-maintenance perennials near the wall – their roots help prevent erosion. Many of our clients at Dube Property Maintenance add edging at the base for a crisp, finished look, then apply mulch to control weeds and retain moisture.
Before considering your project complete, do a final drainage check. Ensure the area behind the wall slopes gently away from it, and verify that all drain pipe exits are clear and functioning properly.
“The difference between an amateur and professional wall often comes down to these finishing details,” notes our lead hardscaper at Dube. “It’s worth taking the extra time to get the caps perfect and the landscaping just right.”
For more inspiration on finishing options that complement New England homes, check out our gallery of retaining wall bricks showcasing various cap styles and landscaping integrations we’ve completed throughout Massachusetts and New Hampshire.
Understanding the financial commitment, potential pitfalls, and ongoing care requirements helps ensure your DIY retaining wall remains an asset for years to come.

Let’s talk money—because knowing what you’re getting into financially is just as important as understanding the technical aspects of your wall project.
Based on internet data (not Dube Property Maintenance & Hardscaping pricing), a DIY retaining wall can cost anywhere from $15 to $60 per square foot depending on your material choices and project complexity. The good news? By doing it yourself, you’re already saving on labor costs, which typically account for 50-60% of professional installation prices.
For materials, expect to invest in basic concrete DIY retaining wall blocks at around $15-$45 per square foot, while premium decorative options might run $20-$60. Don’t forget the finishing touches—capstones typically cost $3-$9 per linear foot. Your drainage system, including stone and pipe, adds roughly $1-$3 per square foot, and a tube of quality adhesive (covering about 10 linear feet) runs $8-$24.
Equipment rental can add up quickly too. A plate compactor might cost $75-$225 per day, a masonry saw $60-$180, and if you’re tackling a larger project, a small excavator rental could set you back $300-$900 daily. This is where some smart planning comes in—consider splitting rental costs with a neighbor or scheduling your project to minimize rental days.
Don’t forget those often-overlooked expenses: delivery fees ($50-$150), crushed stone ($50-$150 per ton), geogrid if needed ($1-$3 per square foot), and filter fabric ($30-$90 per roll). I always recommend setting aside a 15% contingency fund—because in my experience, almost every landscape project has at least one surprise expense!
As Tom from Billerica told us after completing his own wall: “I saved about 40% doing it myself, but I definitely earned every penny in sweat equity!” That’s the trade-off—what professionals might finish in a day could take you a full weekend or more, but the satisfaction and savings can make it worthwhile.
I’ve seen plenty of DIY walls fail prematurely, and almost always for the same handful of reasons. Let me help you avoid these common pitfalls.
The foundation is literally where things fall apart for most DIYers. Inadequate base preparation is mistake number one—skimping on compaction, using too little base material, or rushing through the leveling process. You can’t fix a poor foundation once the wall is built!
Poor drainage planning is the silent wall-killer. Water is incredibly powerful, and when trapped behind a wall, it becomes your biggest enemy. I’ve seen beautiful walls collapse after just one heavy rainstorm because the builder skipped the drainage pipe or used the wrong backfill material. As my old mentor used to say, “Build for the worst rainstorm, not the average day.”
Construction errors add up quickly too. Failing to maintain proper setback means your wall won’t have the necessary lean to counteract soil pressure. Vertical joints that line up (instead of being staggered) create weakness throughout your structure. And building too high without reinforcement is asking for trouble—I’ve seen more than one ambitious DIYer exceed manufacturer height recommendations only to watch their wall fail within a year.
Material mistakes can undermine even careful construction. Using rounded pea gravel instead of angular stone means your backfill won’t lock together properly. Backfilling with clay soil is practically guaranteeing failure, as it retains water and expands. And those capstones? They’re the first things kids will sit on and the first to come loose if you skimp on adhesive.
Finally, design flaws can cause headaches beyond structural concerns. Building too close to property lines might violate local codes, while corners that are too tight can be difficult to construct properly. And if you don’t plan for water to exit at the ends of your wall, you might be creating erosion problems elsewhere in your yard.
A well-built retaining wall isn’t maintenance-free, but the upkeep is minimal if you stay on top of it. Think of it as seasonal check-ups rather than constant care.
In spring, take a walk around your wall after the final frost. Look for any winter damage and clear any debris from drainage exits. This is the perfect time to spot and address small issues before they become big problems.
During summer, keep an eye on weed growth—those persistent plants can work their roots between blocks and gradually create instability. A gentle weed killer or regular hand-pulling keeps things in check. While you’re at it, check for any insect activity, especially carpenter ants that might make homes in wooden elements.
Fall maintenance is all about clearing leaves and debris from behind the wall and ensuring water can flow freely through your drainage system. A clogged drain pipe can turn your carefully constructed wall into a dam during winter thaws.
In winter, be careful with snow removal—mechanical shovels and blowers can chip blocks, and salt can damage concrete over time. If you must use ice melt near your wall, choose a product labeled as safe for concrete.
Keep an eye out for warning signs that need immediate attention: bulging or leaning sections, cracks in the blocks, erosion at the base, loose capstones, or water seeping through the face instead of draining properly. These are red flags that shouldn’t be ignored.
When should you call in experts like us at Dube Property Maintenance & Hardscaping? Any wall over 4 feet high should be professionally designed and installed—that’s not just our recommendation but a building code requirement in most Massachusetts and New Hampshire communities. Complex drainage situations, significant failures, or projects requiring permits or engineering are also best left to professionals.
As one client told us after we repaired his DIY wall: “I wish I’d known when to call for help sooner—would have saved me money in the long run.” There’s no shame in recognizing when a project exceeds your DIY comfort zone. Our team offers free consultations and can provide guidance whether you ultimately decide to hire us or tackle the project yourself.
For more information about professional installation options, visit our retaining walls page.
When building your own retaining wall, height limits are something you’ll need to consider early in your planning. In most Massachusetts and New Hampshire towns we serve, walls up to 3-4 feet can typically be built without formal engineering approval—but this isn’t universal.
DIY retaining wall blocks usually come with manufacturer guidelines that recommend maximum heights of 24-36 inches for non-reinforced walls. These recommendations aren’t arbitrary—they’re based on the physics of how much soil pressure the blocks can safely hold without additional support.
“Walls over 4 ft tall may require engineering approval and building permits,” cautions industry experts, and for good reason. Taller walls hold back significantly more weight and pose greater safety risks if they fail.
If you’re dealing with a steep slope that would require a tall wall, consider the tiered approach instead. Building two smaller walls often looks more attractive anyway! Just remember the golden rule: set the upper wall back from the lower wall by at least twice the height of the lower wall. This prevents the upper wall from adding pressure to the lower one.
Not sure about your local requirements? A quick call to your town’s building department can save you headaches later. Better to check first than to have to modify or remove a wall that doesn’t meet code!
Yes, absolutely! Non-woven landscape fabric is a must-have component for retaining walls of any size. Think of it as the unsung hero of your wall system—invisible once installed, but crucial to long-term performance.
This specialized fabric serves two vital functions:
1. It prevents soil particles from washing into your carefully placed drainage gravel
2. It allows water to pass through freely while keeping different materials separated
“Wrap drainage stone and pipe in non-woven fabric to prevent silt clogging,” advises one expert installer, highlighting how this simple material prevents one of the most common causes of wall failure.
This isn’t the same as regular weed barrier fabric you might use in garden beds. You’ll need non-woven geotextile fabric specifically designed for drainage applications, which has different permeability properties.
Installation is straightforward: place the fabric against the excavated soil before adding your drainage stone, then fold it over the top of your drainage zone before adding topsoil. This creates a complete protective envelope around your drainage system—a small investment that pays huge dividends in wall longevity.
I wish I could tell you there’s an easy way around this, but the truth is that building on a slope absolutely requires “stepping” or “benching” your base. This isn’t just a recommendation—it’s a fundamental requirement for structural stability.
Here’s why stepping is non-negotiable:
First, your blocks must remain level from front to back, regardless of the slope they’re sitting on. Blocks installed parallel to a slope will slide forward over time.
Second, physics demands that your wall base be perpendicular to gravity, not parallel to the hill. This ensures the weight transfers properly into the ground.
Third, a stepped base prevents the entire wall from gradually sliding downhill—a common failure mode for improperly constructed slope walls.
The process isn’t complicated, though it does require careful attention:
– Begin at the lowest point of your slope
– Create a level section wide enough for several blocks
– Step up the base in increments equal to your block height
– Ensure each section is completely level before moving to the next
“Adjust trench steps to account for slopes so the top of the wall remains level,” notes one installation guide. This technique might seem like extra work, but it ensures your wall will stand strong for decades while following the natural contour of your landscape.
At Dube Property Maintenance & Hardscaping, we’ve seen many DIY walls fail precisely because this stepping technique was skipped. Taking the time to do it right the first time saves money and frustration in the long run.
Building a DIY retaining wall with blocks transforms your landscape while solving practical problems—it’s the perfect blend of function and beauty. There’s something deeply satisfying about stepping back and admiring a wall you built with your own hands, knowing it will serve your property for decades to come.
The journey from sloped, eroded yard to beautiful, usable space isn’t just about stacking blocks—it’s about reclaiming your outdoor living area and protecting your property from erosion. A well-built retaining wall stands as a testament to your hard work while silently performing its crucial job year after year.
Throughout this guide, we’ve covered the essential elements that lead to success. Proper drainage isn’t just another step—it’s the difference between a wall that lasts generations and one that fails prematurely. Taking extra time with your base preparation might feel tedious, but it’s the foundation (literally!) of your wall’s long-term performance.
When your friends and neighbors compliment your new landscape feature, you’ll appreciate having followed the key principles: thorough planning, meticulous base work, quality materials, consistent attention to detail, and effective drainage systems. These aren’t just suggestions—they’re the non-negotiable elements of retaining wall success.
While the DIY approach can save significantly on labor costs, it’s also important to recognize when a project exceeds your comfort zone. Walls over 4 feet tall, complex drainage situations, or projects requiring engineering approval often benefit from professional expertise. At Dube Property Maintenance & Hardscaping, we’ve helped countless homeowners throughout Massachusetts and New Hampshire turn challenging slopes into beautiful, functional spaces.
“I never thought I could tackle something like this myself,” shared one homeowner after completing their first DIY retaining wall. “The sense of accomplishment is almost as valuable as the added usable space in our backyard.”
Whether you’re rolling up your sleeves for a weekend warrior project or would prefer to leave the heavy lifting to experienced professionals, the end result is the same—a beautiful, functional retaining wall that improves your property’s value and usability for years to come.
For projects beyond DIY scope or for homeowners who’d rather skip the sore muscles, learn more about our professional retaining wall services. Our team brings specialized equipment, design expertise, and years of experience to create stunning, durable retaining walls that stand the test of time.
