Building interlocking block retaining wall projects can feel overwhelming at first glance. But here’s the truth: these systems were designed specifically for DIY success. Unlike traditional concrete or stone walls that require mortar and years of masonry experience, interlocking blocks snap together like giant LEGO pieces.
Quick Answer for Building Interlocking Block Retaining Wall:
The beauty of interlocking systems lies in their built-in engineering. Each block has lips and notches that create a secure connection without hardware. The hollow cores allow water to drain naturally, preventing the hydrostatic pressure that destroys traditional walls.
Most homeowners can build walls up to 3 feet high without permits or engineering. A typical 3×16-foot wall takes 10-20 hours and costs around $1,200 in materials according to research data. The blocks weigh 30-75 pounds each, making them manageable for most people with basic tools.
The biggest advantage? These walls flex with freeze-thaw cycles instead of cracking. In New England’s harsh winters, that flexibility means your wall will still look great after decades of seasonal ground movement.
Think of building interlocking block retaining wall systems as nature’s own engineering solution. These walls work so well because they follow two simple principles that have kept structures standing for thousands of years: gravity and flexibility.
Gravity walls are beautifully straightforward. They use their own weight, plus the soil you pack behind them, to push back against the hillside trying to slide down. The secret sauce is that built-in lean – usually 6° to 12° – that tilts the wall back into the slope. It’s like leaning into a strong wind. The harder the soil pushes, the more stable your wall becomes.
The lip-lock system is what makes these blocks so foolproof for DIY builders. Each block has a molded lip on the bottom that hooks over the block below it, like puzzle pieces that only fit one way. This mechanical connection is actually stronger than mortar in many situations. Even better, that lip automatically sets your wall at the perfect angle – no protractor needed.
Here’s where these walls get really clever: hollow-core drainage. Most retaining walls fail because water builds up behind them, creating pressure that eventually pushes them over. But interlocking blocks turn this problem into a solution. Water flows right through the hollow cores and out the front face, eliminating that dangerous pressure buildup. Scientific research on retaining wall design shows this drainage feature is crucial for long-term wall stability.
The flexible dry-stack construction means your wall can handle New England’s brutal freeze-thaw cycles without cracking. When the ground heaves in winter, these walls flex and settle back into place come spring. Traditional mortared walls fight this movement and lose – usually with expensive cracks to show for it.
This freeze-thaw resistance isn’t just theory. Ancient builders used similar mortarless techniques to create structures that have lasted centuries. The flexibility that seems like a weakness is actually the wall’s greatest strength.
The best part? These systems are incredibly cost-effective and DIY friendly. You don’t need years of masonry training or expensive specialized tools. The blocks guide you through the process, and mistakes are easy to fix – just lift the block and try again.
With proper installation, these walls deliver impressive longevity. We’ve seen interlocking block walls that still look great after 20+ years of New England weather, while concrete walls from the same era show significant cracking and settling.
No mortar means no mixing concrete in a wheelbarrow or racing against cure times. Quicker installation happens because blocks stack immediately – no waiting for anything to dry. Material reuse is possible since walls can be taken apart and moved if your landscaping plans change. Adjustable courses let you modify height or alignment as you build, and fewer tools are needed since basic hand tools handle most of the work.
Let’s be honest – the planning phase isn’t the fun part. But trust me, spending a few hours getting this right will save you days of headaches later. I’ve watched too many eager DIYers rush to start digging, only to find they’ve planned their wall right through a gas line or need engineering approval they didn’t know about.
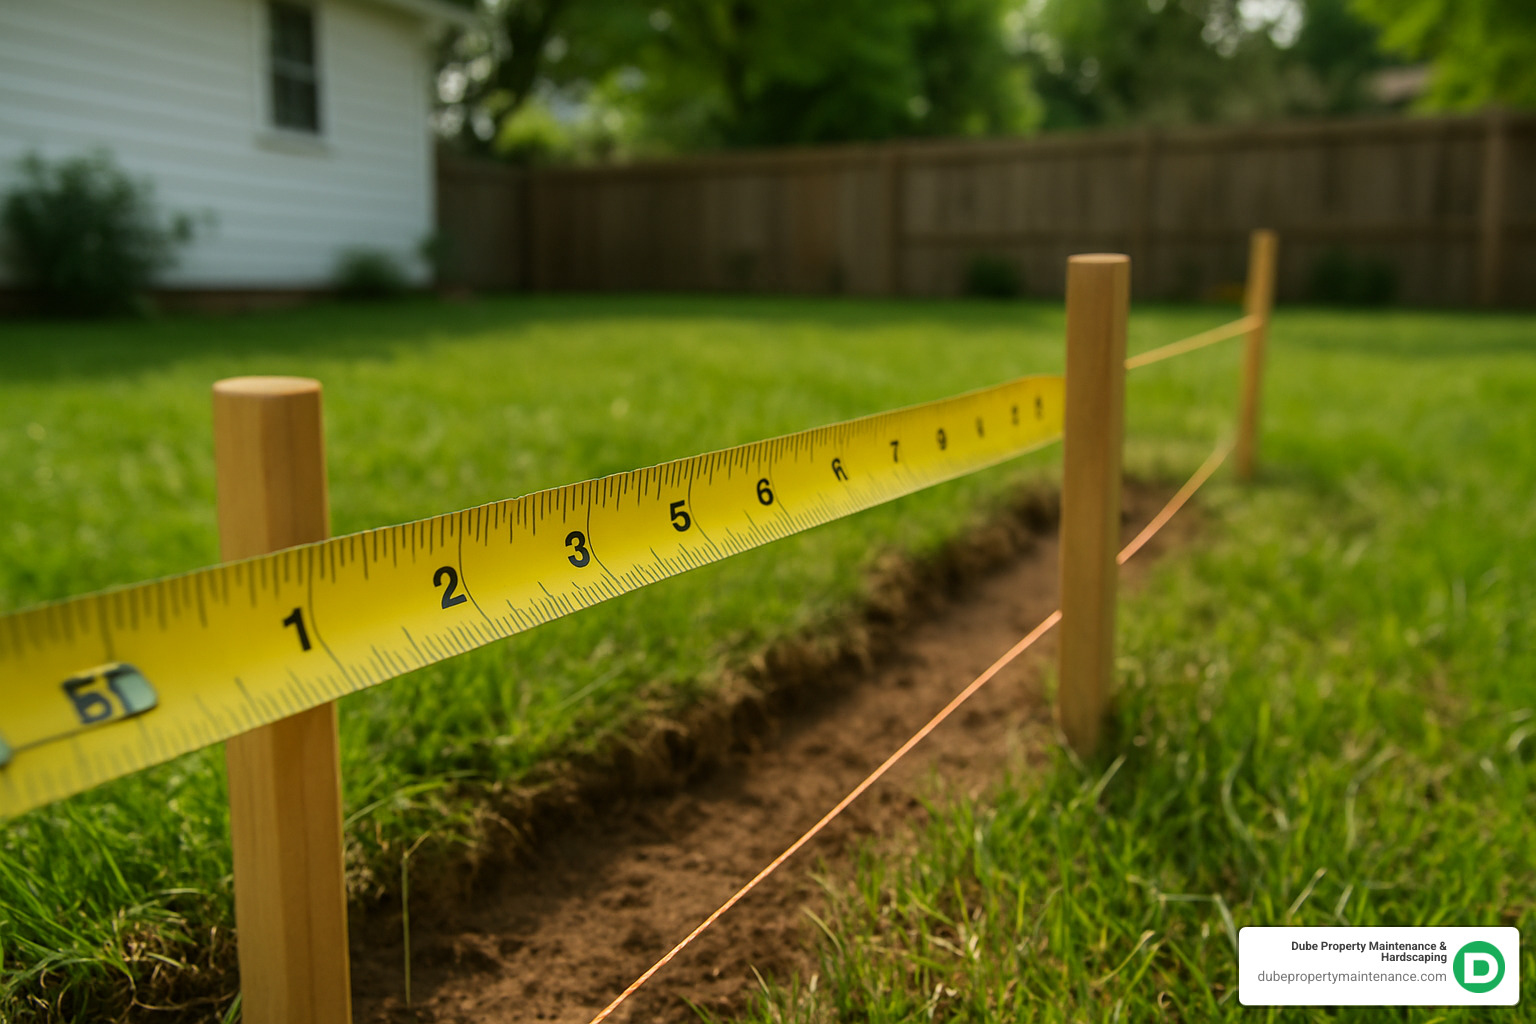
Start with layout stakes and string lines to mark exactly where your wall will go. Drive stakes every 8-10 feet along your planned wall, then run mason’s line between them. This string line becomes your reference point for everything – from digging depth to keeping your first course straight. Take a step back and really visualize how this wall will look in your landscape.
Before you touch a shovel, call 811 for utility marking. This free service will mark underground lines within 2-3 business days. Yes, it feels like a delay when you’re excited to start, but hitting a gas line or fiber optic cable can turn your weekend project into a very expensive nightmare.
Local building codes vary dramatically across Massachusetts and New Hampshire. Most towns allow walls up to 36 inches without permits, but don’t assume – some are stricter. The rules get more complex when your wall supports additional weight like driveways or sits near property lines. A quick call to your building department can save major complications later.
Here’s where many people get surprised: walls over 3-4 feet often require professional engineering, especially in challenging soil conditions. If your building interlocking block retaining wall project will be taller than 4 feet, support extra loads, or deal with poor drainage, you’ll likely need an engineer’s stamp. When in doubt, ask – it’s much cheaper than rebuilding later.
Create simple sketches showing your wall from different angles. Include key dimensions, where drainage will go, and any curves or steps. This isn’t about artistic skill – it’s about helping you think through the project and catch potential issues before you’re knee-deep in construction.
Use our Retaining Wall Block Calculator to get accurate material estimates. The basic math is straightforward: wall length times height gives you square footage, then divide by each block’s coverage area (usually about 1 square foot for standard blocks).
Always follow the 10% overage rule when ordering materials. Blocks break, cuts don’t always work perfectly, and you’ll want extras for future repairs. If you need 100 blocks, order 110 minimum. It’s much easier to return a few extras than to halt your project waiting for more materials.
Your essential tool list includes basic items like shovels, 4-foot and torpedo levels, rubber mallet, and safety gear. You’ll need a circular saw with masonry blade for cutting blocks and should plan to rent a plate compactor for proper base preparation. Most homeowners already own half these tools.
Material planning goes beyond just blocks. You’ll need paver base or crushed gravel for the foundation, perforated drain pipe, landscape fabric, clean drainage stone, capstones, and construction adhesive. The geotextile fabric goes between your native soil and new gravel to prevent mixing and maintain drainage.
Soil type makes a huge difference in both construction and long-term performance. Clay soils hold water and create extra pressure behind walls, while sandy soils drain well but need more careful compaction. Dig a test hole and see how water behaves after a good rain – this tells you a lot about what you’re working with.
DIY costs for building interlocking block retaining wall projects typically range from $25-$150 per square foot based on internet research averages (these are not actual costs for Dube Property Maintenance & Hardscaping). Basic walls with standard blocks might hit the lower end, while premium materials with special features can reach the higher range. Professional installation generally doubles or triples the material cost.
Permit requirements kick in around 36 inches in most areas, but some municipalities are stricter. The permit process usually takes 2-4 weeks and costs $50-200 – not huge expenses, but they affect your timeline. Start this process early if you think you’ll need approval.
HOA rules can be tougher than local building codes. Many associations require approval for any structure visible from common areas or streets. Submit your plans to the architectural review committee well before you want to start construction.
Slope setbacks might require your wall to sit back from property lines. A common rule is setback distance equals wall height, but this varies widely. Check your local zoning requirements during the planning phase – it’s much easier to adjust your design on paper than after you’ve started digging.
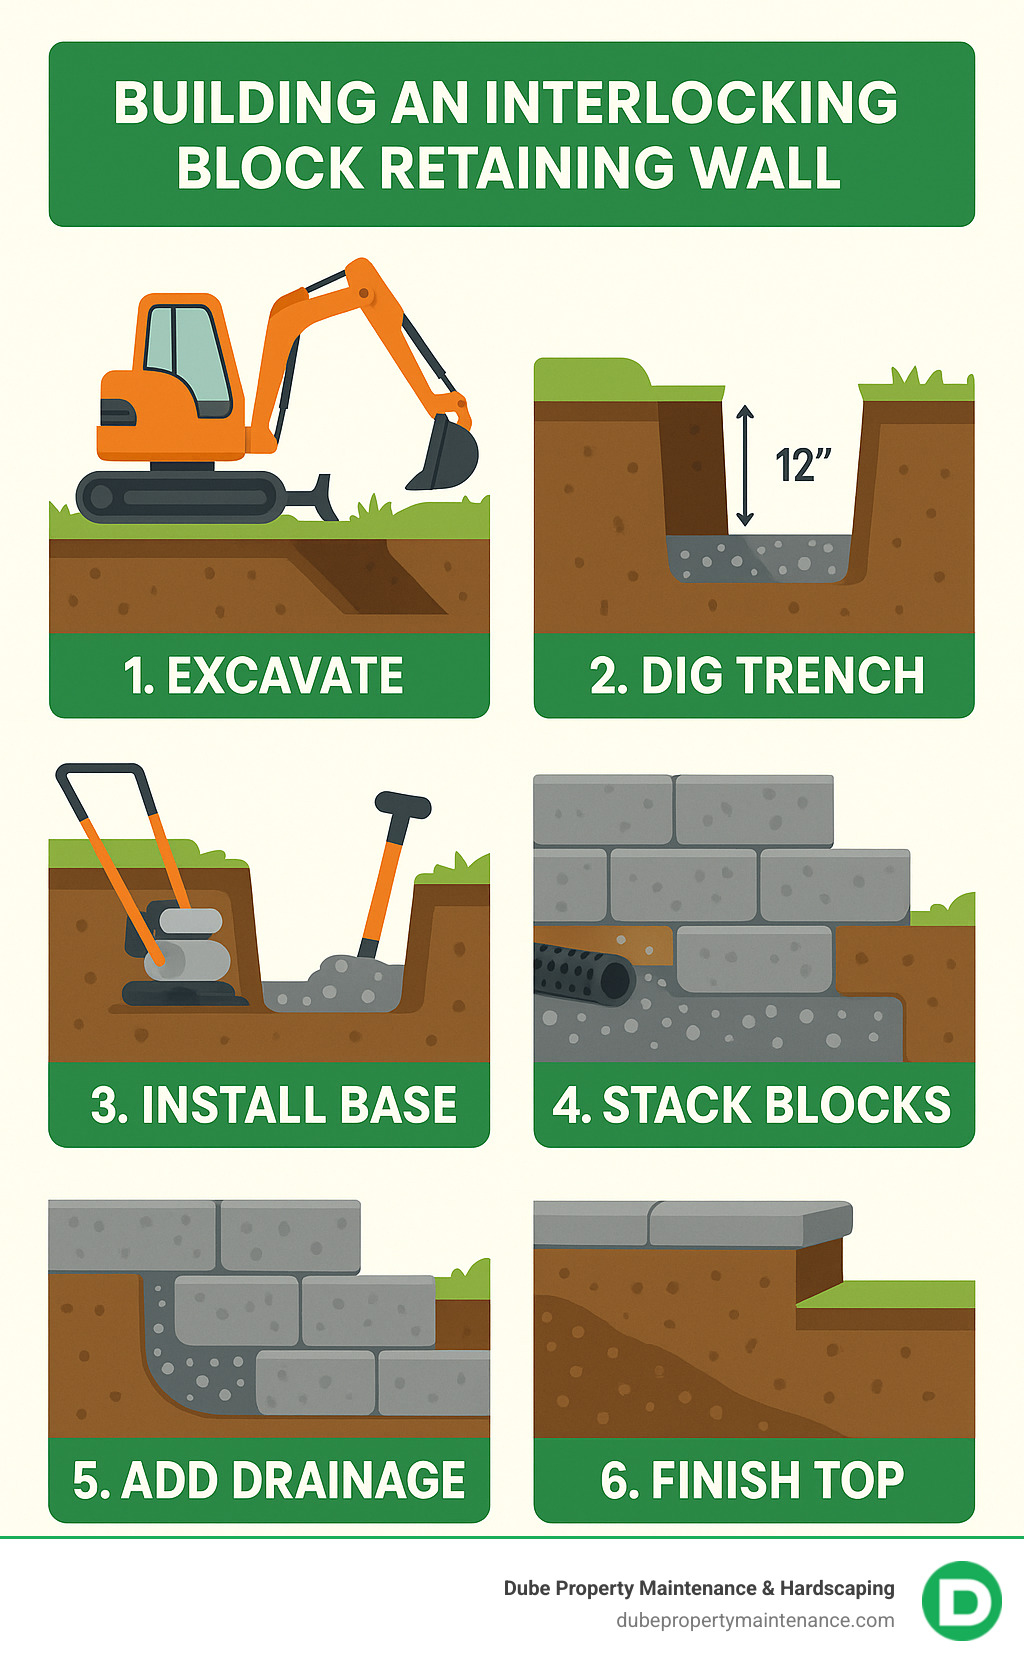
Ready to get your hands dirty? Building interlocking block retaining wall systems is like following a recipe – miss a step, and you’ll taste the difference later. We’ve guided hundreds of homeowners through this process, and the ones who succeed all have one thing in common: they take their time with the fundamentals.
Think of your wall as a house. Everything depends on that foundation, so we’ll start there and work our way up methodically.
Trench specifications aren’t suggestions – they’re requirements for a wall that lasts decades. Your trench needs to be twice the block depth, which typically means 12 inches wide for standard 6-inch blocks. The depth calculation is simple but critical: dig down 6 inches for your gravel base, plus 1 inch for every foot of wall height, plus enough depth to bury half your first block. For a 3-foot wall, that’s 6 + 3 + 4 = 13 inches total.
Base gravel is your wall’s best friend. Use ¾-inch minus crushed stone – not river rock, not sand, not whatever’s cheapest at the quarry. Install a full 6 inches minimum, compacting it in 2-3 inch lifts with a plate compactor. Yes, you need to rent the compactor. Hand-tamping doesn’t cut it for anything you want to last.
Your first course installation sets the tone for everything above it. Here’s where many DIYers stumble: you must remove the rear lip from every first-course block. That lip is designed to hook onto the block below, but since there’s no block below the first course, it prevents proper seating. Use a cold chisel and 3-pound hammer to knock it off cleanly.
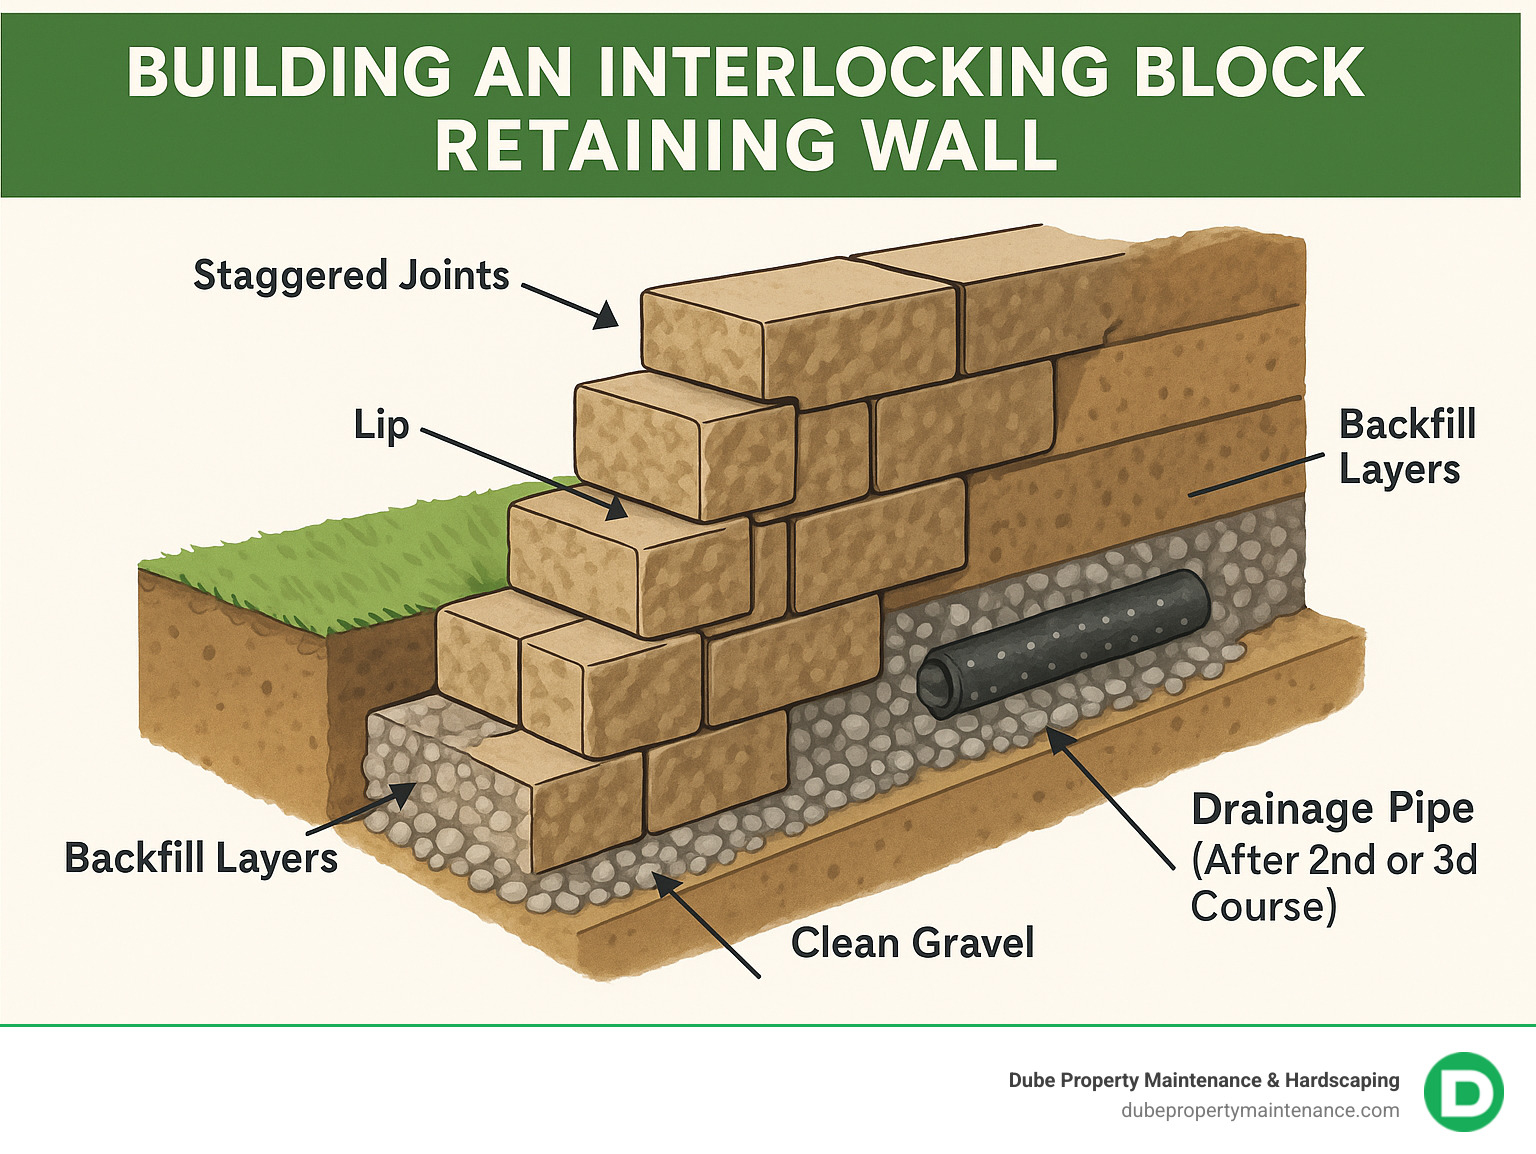
Stagger joints like you’re laying bricks – each block should span the joint between two blocks below it. This creates the strongest possible connection and prevents vertical crack lines that weaken the wall. Cut end blocks in half on every other course to maintain this running bond pattern.
Here’s where drainage becomes critical. Drainpipe installation happens after your second or third course, depending on wall height. Use 4-inch perforated pipe with holes facing down, surrounded by clean gravel. The pipe must slope at least 1% toward daylight – that’s 1 inch drop per 100 feet of run.
Backfill in layers as you build, never dumping more than 8 inches at once. Use clean gravel for the first 12 inches behind the wall, then approved backfill soil. Compact each lift to prevent settlement that could push your wall forward years later.
Capstones aren’t just decorative – they protect your wall’s top course from freeze-thaw damage. Secure them with construction adhesive rated for masonry. This final step makes the difference between a wall that looks professional and one that screams “weekend warrior.”
For detailed drainage system information, our guide on drainage pipe installation covers all the technical details.
The 12-inch width rule isn’t arbitrary – it gives you room to work and space for proper backfill. Narrower trenches make it nearly impossible to compact backfill properly, while wider trenches waste time and materials.
Your depth formula accounts for three things: base material, wall setback, and first block burial. Start with 6 inches for your gravel base – this is non-negotiable. Add 1 inch per foot of wall height to account for the natural setback angle. Finally, add enough depth to bury half your first block, typically 3-4 inches.
Soil compaction in the trench bottom prevents the settling that ruins walls years later. Strip away all organic material – topsoil, roots, leaves, everything down to solid mineral soil. If the bottom feels spongy when you walk on it, dig deeper or add more gravel base.
String-line leveling keeps your trench consistent from end to end. Set up a level string line along your planned wall face and measure down consistently. A $20 line level works fine for shorter walls, though a laser level makes longer runs easier.
Hand digging works for walls under 50 feet, averaging 3-5 linear feet per hour in normal soil. For longer walls or tough digging conditions, rent a mini-excavator. At 50-100 linear feet per hour, the $300-400 daily rental pays for itself quickly on bigger projects.
Lip removal separates successful walls from failures. Every manufacturer designs their blocks with rear lips for upper courses, but these same lips prevent first-course blocks from sitting flat on your gravel base. Some manufacturers add score lines to make removal easier, but most require careful chisel work.
Use a cold chisel and 3-pound hammer, working from both ends toward the center. Don’t rush this step – a cracked block is worthless, and replacements aren’t always available when you need them.
Front-to-back leveling ensures proper drainage through your wall system. Each block should slope slightly toward the back, about ¼ inch per foot. This directs water into your drainage system rather than out the face where it can stain or freeze.
Rubber mallet taps seat blocks without damage. Steel hammers chip faces and crack blocks – we’ve seen too many walls with battle scars from impatient builders. A dead-blow hammer works well too, as the sand filling absorbs impact energy.
Joint alignment between blocks should be snug but not forced. Blocks that won’t align properly usually indicate base problems – check your level and remove any debris from the joints before forcing anything.
Running bond pattern creates the strongest possible wall by distributing loads evenly. Each block spans the joint between two blocks below it, just like traditional brickwork. Start alternate courses with half blocks to maintain this pattern throughout the wall height.
Pin/lip engagement varies by manufacturer, but the principle stays the same – every block must connect securely to the one below. Some systems use molded lips, others use separate pins or clips. Whatever your system uses, check engagement on every single block.
Cutting blocks becomes necessary for proper fit and pattern maintenance. A masonry saw with diamond blade gives the cleanest cuts, but a circular saw with masonry blade handles occasional cuts fine. Always wear safety glasses and a dust mask – concrete dust is nasty stuff.
Shim options help level individual blocks when your base isn’t perfectly uniform. Cedar shingles work best because they resist rot naturally. Avoid using stones or random debris as shims – they shift over time and create weak spots.
For advanced techniques including steps and curves, our comprehensive guide on landscape wall construction covers the details.
Perforated pipe placement typically happens after your second or third course, depending on final wall height. The pipe should sit level with or slightly above the wall base to collect water effectively. Remember – water is your wall’s biggest enemy, so don’t skimp on drainage.
Gravel layers of 6-8 inches provide the drainage zone behind your wall. Use clean stone with no fines – material that won’t clog over time. Angular crushed stone compacts more densely than rounded river rock, making it the better choice for structural backfill.
Landscape fabric fold prevents soil contamination of your drainage system. Install the fabric vertically behind the wall before any backfilling, then fold it over the gravel before adding soil. This simple step prevents fine particles from clogging your carefully planned drainage.
Vent to daylight every 50 feet ensures your drainage system actually works. The pipe needs somewhere to discharge water – whether to a lower area, storm drain, or dry well. A drainage system that doesn’t daylight is just expensive gravel.
Construction adhesive secures capstones against frost heave and wind uplift that can shift loose stones. Use polyurethane-based adhesive that stays flexible when cured – rigid adhesives crack with seasonal movement. Apply a continuous bead along the top course before setting each capstone.
Coping styles range from simple flat caps to decorative profiles that complement your home’s architecture. Choose caps with adequate overhang to shed water away from the wall face. Water running down the wall face causes staining and potential freeze damage.
Soft-scape tie-ins integrate your new wall with existing landscaping. Plan planting areas both behind and in front of the wall, but soil behind the wall should slope away to direct surface water over the wall rather than behind it.
Lighting conduit installation during construction saves major headaches later. Run 12-gauge wire in PVC conduit through hollow block cores before backfilling. Planning lighting during construction costs almost nothing – retrofitting costs a fortune. Check out our retaining wall lighting ideas for inspiration.
Your wall is built, but the work isn’t quite done. Proper aftercare ensures decades of trouble-free performance, while smart design choices can transform a utilitarian structure into a landscape feature.
Settlement checks should happen after the first major rain and again after the first winter. Look for any blocks that have shifted or areas where backfill has settled. Minor adjustments are normal and easy to fix early.
Efflorescence wash removes the white mineral deposits that sometimes appear on new concrete blocks. This is purely cosmetic – a dilute muriatic acid solution (following manufacturer safety instructions) will remove it completely.
Re-grading runoff directs water away from the wall. The soil behind your wall should slope away at least 6 inches over the first 10 feet. This prevents water from pooling against the back of the wall.
Seasonal inspection catches problems early. Walk your wall each spring and fall, looking for:
– Loose or shifted blocks
– Clogged drainage outlets
– Erosion behind the wall
– Vegetation growing in joints
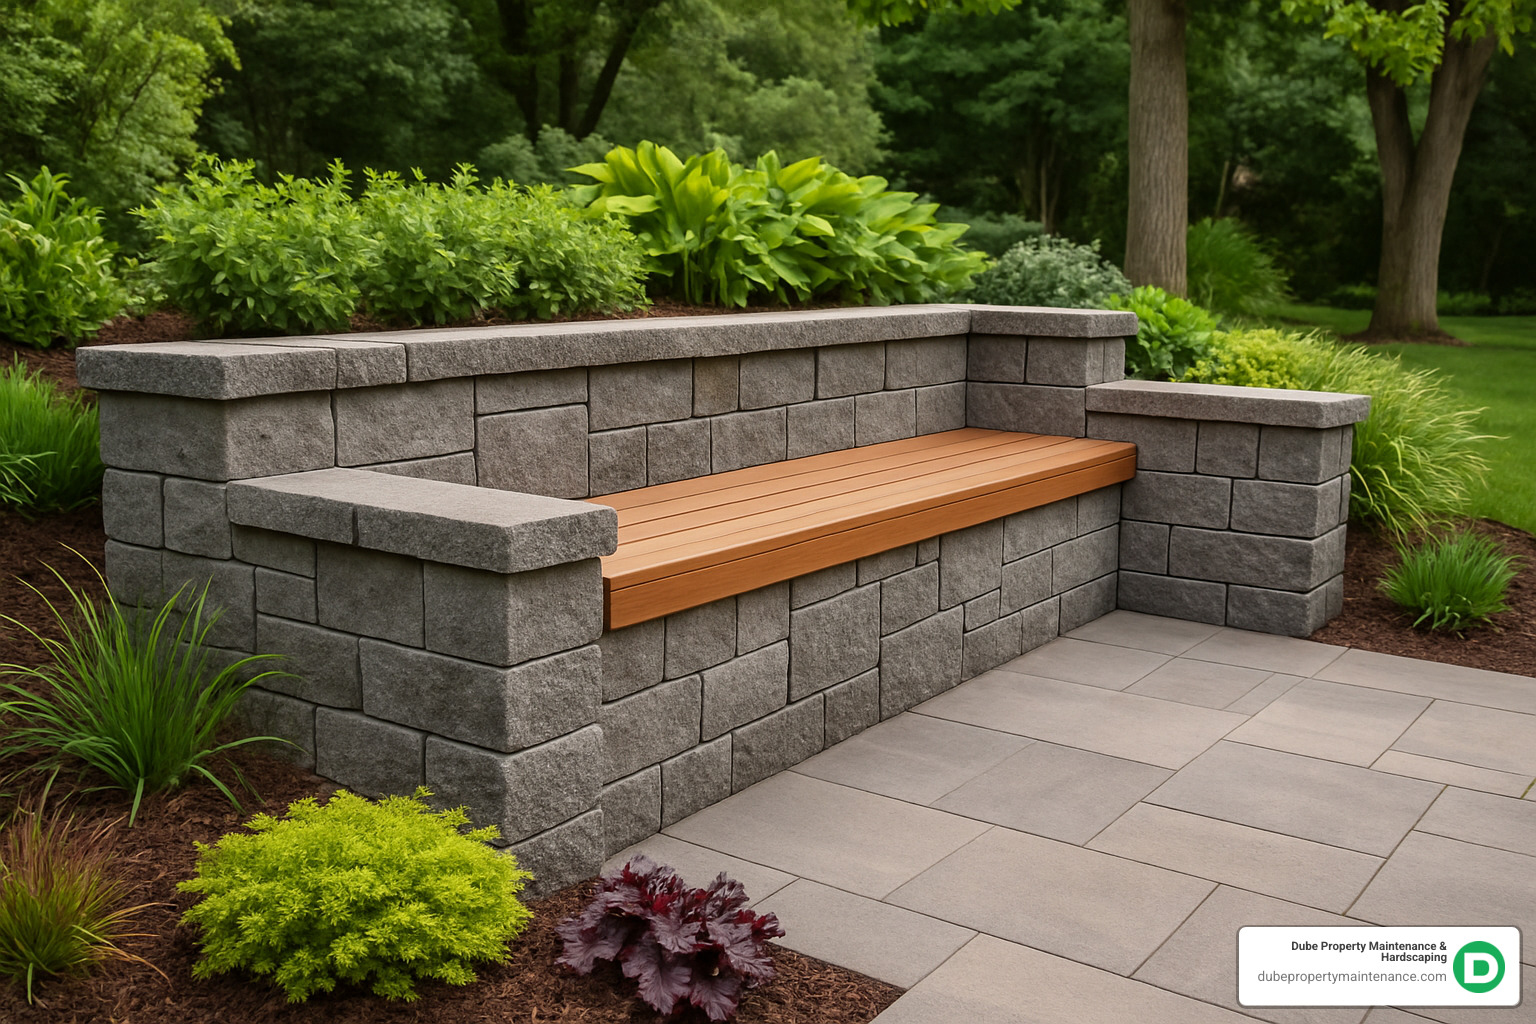
Retaining wall ideas can transform basic walls into landscape features. Consider integrated planters, seating areas, or water features. The hollow cores in blocks make it easy to add lighting, irrigation, or electrical features.
Common mistakes we see repeatedly:
– Skipping the base preparation (causes 90% of wall failures)
– Poor drainage planning (causes bulging and collapse)
– Ignoring local codes (expensive to fix later)
– Inadequate compaction (leads to settlement)
– Wrong block orientation (reduces strength)
For more creative applications, explore our collection of retaining wall ideas that go beyond basic slope retention.
1. How high can I build before I need an engineer?
Most areas allow walls up to 36 inches (3 feet) without engineering, but this varies by location and load conditions. Walls supporting driveways, buildings, or steep slopes may require engineering at lower heights. When in doubt, consult your local building department. The cost of engineering (typically $500-1500) is small compared to the cost of rebuilding a failed wall.
2. Do I really need a drainpipe behind every wall?
Not every wall requires a drainpipe, but most benefit from one. Install drainage for walls over 4 feet tall, walls in clay soil, walls with poor drainage above them, or walls supporting paved areas. The $3-5 per linear foot cost of drainage is excellent insurance against wall failure.
3. How do I repair a bulging section later?
Small bulges (less than 2 inches) can often be corrected by improving drainage and adding backfill. Larger bulges usually require partial reconstruction. Remove blocks above the problem area, improve the base and drainage, then rebuild. This is why proper initial construction is so important.

Building interlocking block retaining wall projects transforms from overwhelming to achievable when you understand the fundamentals. The beauty of these systems lies in their engineered simplicity – blocks that work with gravity and ground movement rather than fighting against them.
Your success hinges on getting the invisible parts right. While the blocks themselves practically stack themselves, it’s the foundation preparation, drainage planning, and proper backfill that separate walls lasting decades from those failing after the first hard winter.
Think of your wall as a system, not just stacked blocks. The gravel base distributes loads evenly. The drainage pipe prevents water from building pressure behind your wall. The compacted backfill becomes part of the structure itself. Skip any of these elements, and you’re building a future headache.
Your peace-of-mind checklist covers the critical success factors: base level and properly compacted, drainage system sloping to daylight, backfill compacted in lifts, first course properly embedded, joints staggered on every course, and local codes followed. Check these boxes, and you’ve built something that will outlast your mortgage.
Year-round durability matters especially here in New England. Our freeze-thaw cycles, clay soils, and heavy spring runoff challenge every outdoor structure. The flexible nature of interlocking systems handles these stresses beautifully – but only when the supporting systems work correctly.
At Dube Property Maintenance & Hardscaping, we’ve guided hundreds of retaining wall projects across Massachusetts and New Hampshire. Some are perfect weekend DIY trips. Others need professional engineering and installation from day one.
Here’s the honest truth: if your wall will exceed 4 feet in height, support driveways or structures, or deal with challenging soil conditions, call in the professionals. The peace of mind is worth every penny, and the long-term performance difference is dramatic.
We love seeing successful DIY projects, but we’re here when you need expertise beyond YouTube tutorials. Whether that’s engineering consultation, equipment rental, or complete turnkey installation, our team brings decades of real-world experience to every conversation.
For professional retaining wall services throughout our service area, learn more about our retaining wall construction services. We serve communities across Massachusetts and New Hampshire with the same attention to detail we’ve outlined throughout this guide.
Remember the goal: a well-built retaining wall should serve your property faithfully for 50-75 years with minimal fuss. Take your time with the planning phase. Don’t rush the foundation work. And never hesitate to ask for help when the project scope exceeds your comfort zone.
Your future self – the one enjoying a beautiful, functional landscape without settlement cracks or drainage problems – will thank you for doing it right the first time.
