Why Lift Your Outdoors? Understanding Raised Patios
Build raised paver patio projects are among the most transformative hardscaping upgrades, especially for homeowners with sloped yards or drainage issues. A raised paver patio sits above ground level, supported by a retaining wall. Unlike ground-level patios, they primarily require a trench for the perimeter wall, making them ideal for the uneven terrain common in areas like Andover and North Andover.
Quick Answer: How to Build a Raised Paver Patio
Plan & Design – Determine size, height, and check local building codes
Excavate – Dig trench for retaining wall and prepare site with proper slope
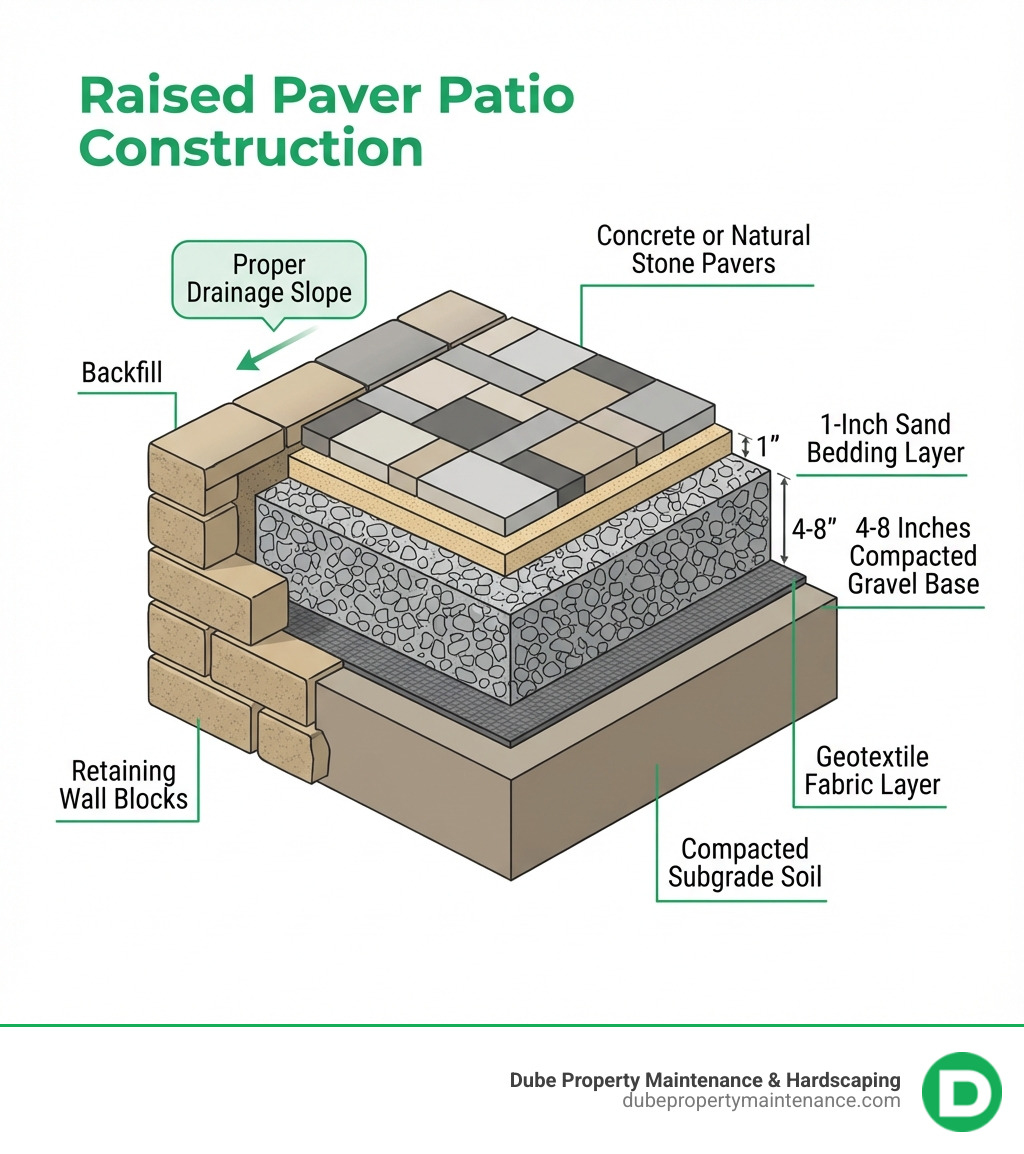
Build Foundation – Install geotextile fabric and 4-8 inches of compacted gravel
Construct Retaining Wall – Stack blocks with proper embedment and backfill
Lay Pavers – Screed 1-inch sand bed and install pavers in chosen pattern
Finish – Compact pavers, fill joints with polymeric sand, and activate with water
Raised patios solve drainage problems by elevating the surface, offer improved views, and create distinct outdoor rooms, adding significant curb appeal. When installed properly, their interlocking system and solid base offer incredible durability, often lasting for decades with minimal maintenance. This longevity and design flexibility make them a worthwhile investment for any Massachusetts home.
The key difference from a sunken patio is elevation. While sunken patios are recessed into the ground to create cozy, private spaces, raised patios do the opposite. They lift your entertainment area up, offering scenic vistas and easier accessibility.
Choosing the Right Materials for Durability and Style
The success of your raised paver patio depends on selecting quality materials. Here are the essentials we use for projects in our Massachusetts and New Hampshire service areas:
Pavers: The visible surface of your patio.
Concrete Pavers: Durable, cost-effective, and versatile in color, shape, and texture.
Brick Pavers: Offer a classic, timeless look with rich, earthy tones.
Natural Stone Pavers: Provide a luxurious, unique appearance with materials like bluestone or granite.
Retaining Wall Blocks: The structural support that lifts the patio and defines its perimeter. We use robust, engineered blocks for stability.
Dimensional wall stone: A heavier stone option for the raised portion that can provide a clean, finished edge without a separate capstone.
Geotextile Fabric: Laid between the soil and gravel base to prevent mixing, improve stability, and aid drainage.
Gravel Base: A 4-8 inch layer of crushed rock that provides the critical drainage and structural support for the entire patio.
Bedding Sand: A 1-inch layer of coarse concrete sand that creates a level setting bed for the pavers.
Polymeric Sand: A sand with polymers swept into joints. When activated with water, it hardens to lock pavers, inhibit weeds, and deter insects.
Edge Restraints: Installed along the perimeter to prevent pavers from shifting. Securely adhered capstones can also serve this purpose.
For more detailed information on structural elements, explore our masonry services.
Planning and Preparation: The Blueprint for Success
Meticulous planning is the blueprint for a lasting raised paver patio. We begin with a thoughtful design, considering how you’ll use the space to determine the ideal size and shape. Sketching the layout helps visualize the area and calculate materials. Height is also critical, as it influences the patio’s visual impact and structural needs. A raised patio can be anywhere from a few inches to over a foot above grade.
Navigating local building codes in Massachusetts and New Hampshire is essential. We check with your local municipality—whether in Andover, Methuen, or Salem, NH—for permit requirements. Patios exceeding 24-30 inches in height may require railings, and retaining walls over 36 inches often need an engineer’s design.
Before digging, we always call 811 to have underground utility lines marked. Finally, we calculate material quantities, including pavers, sand, and retaining wall blocks, adding 5-10% for cuts and waste to ensure we have enough for the job.
Essential Tools and Materials to Build a Raised Paver Patio
To successfully build raised paver patio projects, we rely on a combination of specialized tools and high-quality materials. Understanding the equipment involved gives insight into the precision required.
Here’s a list of essential tools:
Measuring Tape, Stakes, and String Line: For accurate layout and grading.
Carpenter’s Square: To ensure square corners.
Shovel and Wheelbarrow: For excavation and moving materials.
Level: To check individual blocks and the overall patio surface.
Plate Compactor: Critical for compacting the subgrade, gravel base, and final pavers.
Masonry Saw: For precise cuts on pavers and wall blocks.
Rubber Mallet: To set pavers into the sand bed.
Screed Board and 1-inch PVC Pipes: To create a level sand bedding layer.
Hard-bristle Broom: For sweeping polymeric sand into joints.
Utility Knife: For cutting geotextile fabric.
Adhesive Applicator: For applying construction adhesive to wall blocks and capstones.
Integrating a hot tub requires special planning due to its immense weight. Robust structural support is paramount.
For a hot tub, we increase the compacted gravel base depth to 8-12 inches to distribute the load and prevent settling. Depending on the patio height and design, a structural engineer may need to review the plans to ensure the retaining wall and base can safely support the load.
The hot tub itself must sit on a perfectly level surface, even though the surrounding patio is sloped for drainage. We design the area to guide splashed water away from the spa and your home’s foundation, preventing pooling and moisture issues.
How to Build a Raised Paver Patio: A Step-by-Step Guide
Building a raised paver patio is a multi-step process that requires precision and the right techniques. Let’s walk through how our expert team approaches this project.
Step 1: Site Excavation and Grading
Our journey begins with preparing the site for your new outdoor space.
Marking the Layout: We mark the patio’s perimeter using stakes, string lines, and marking paint, employing the 3-4-5 triangle method to ensure square corners.
Removing Sod and Topsoil: We remove all grass and organic topsoil within the marked area to prevent future settling.
Excavating the Trench: For a raised patio, we primarily excavate a trench for the retaining wall. The depth must accommodate the gravel base and at least one embedded course of wall blocks.
Establishing Proper Slope: The subgrade soil is graded with a slope away from the house foundation (typically 1/4 inch per foot) to ensure proper drainage.
Compacting the Subgrade Soil: We use a plate compactor to create a firm, stable foundation from the exposed subgrade soil, preventing future settling.
Step 2: Building the Foundation and Retaining Wall
This is where the “raised” aspect of your patio takes shape with a solid foundation and retaining wall.
Installing Geotextile Fabric: We lay geotextile fabric over the compacted subgrade to separate it from the gravel base, which improves stability and drainage.
Laying and Compacting the Gravel Base: We build the structural base with 4-8 inches of crushed rock, laid in 4-inch lifts. Each lift is thoroughly compacted. For colder climates or heavy loads, this base may be up to 12 inches deep.
Setting the First Course of the Retaining Wall: The first course of blocks is the most critical. We embed these blocks into the gravel base and level them perfectly, setting the stage for a stable wall.
Installing Subsequent Courses with Adhesive: We stack subsequent courses in an interlocking pattern, using construction adhesive between each layer to create a unified, durable structure.
Backfilling Behind the Wall: As we build the wall, we backfill behind it with gravel in compacted lifts. This adds stability and prevents hydrostatic pressure buildup.
With the foundation and wall in place, it’s time for the aesthetic highlight: laying the pavers.
Screeding the 1-inch Sand Bedding Layer: We spread a uniform 1-inch layer of washed concrete sand over the compacted gravel. Using a screed board and 1-inch pipes as guides, we create a perfectly smooth and sloped bedding layer.
Laying Pavers: Starting from a 90-degree corner or straight edge, we carefully place each paver onto the sand bed without dragging them.
Choosing a Paver Pattern: The pattern impacts both aesthetics and strength. Popular options include the strong herringbone pattern or the classic running bond. We help you select a pattern that complements your home.
Making Cuts with a Masonry Saw: We use a masonry saw for clean, precise cuts on pavers needed for edges and borders, always using appropriate safety gear.
Step 4: Finishing Touches
The final steps lock everything in place and ensure durability.
Installing Edge Restraints: We install edge restraints along the perimeter to prevent pavers from shifting. On a raised patio, the glued-down capstones of the retaining wall often serve this purpose.
Compacting the Pavers: We run a plate compactor over the entire surface to settle the pavers firmly into the sand bed, creating a solid, interlocked surface.
Sweeping Polymeric Sand into Joints: We sweep polymeric sand over the patio, filling all the joints between the pavers completely.
Misting with Water to Activate Sand: A light mist of water activates the polymers in the sand, causing it to harden and lock the pavers in place while resisting weeds.
Final Cleanup: After the sand has cured (24-48 hours), we perform a final cleanup, leaving you with a pristine new patio.
This meticulous process ensures your raised paver patio is beautiful, stable, and durable. To explore more about our hardscaping, visit our hardscaping services page.
Common Pitfalls and Long-Term Maintenance
Building a raised paver patio is a significant project, and avoiding common pitfalls is key to its longevity. With proper care, your new patio will be a source of joy for decades.
Common Mistakes to Avoid When You Build a Raised Paver Patio
Our experience across Massachusetts and New Hampshire has shown us that certain mistakes can severely compromise a patio’s performance.
Improper Base Compaction: Failing to thoroughly compact the subgrade and gravel base in layers is the most common mistake, leading to uneven settling and instability.
Incorrect Slope/Drainage: A patio must have a proper slope (1/4 inch per foot) away from the house. Poor drainage behind the retaining wall can compromise the entire structure.
Forgetting an Air Gap Against the House: A raised patio built against a house needs an air gap and proper flashing to prevent moisture from damaging your home’s foundation and sheathing.
Using Inadequate Retaining Wall Materials: Never use materials like wood siding for structural support. Always use proper, engineered retaining wall blocks.
Ignoring Local Building Codes: Failing to get permits or follow codes in towns like Lowell or Haverhill can lead to fines or forced removal of the patio.
When to Hire a Professional or Structural Engineer: We recommend hiring a professional for any raised patio. An engineer is essential if the wall is over 36 inches high, supports a heavy load like a hot tub, or is built on a steep slope.
Maintaining Your Raised Paver Patio
A well-maintained patio will improve your home for decades. Here are our tips for long-term care:
Seasonal Cleaning: Sweep regularly. For a deeper clean, use a stiff brush with mild detergent or a pressure washer on a low setting.
Topping Off Joint Sand: Periodically inspect joints and sweep in new polymeric sand where needed, then mist with water to activate.
Sealing the Pavers (Optional): Applying a sealer every few years can protect pavers from stains, improve color, and add protection against New England weather.
Weed and Moss Prevention: While polymeric sand helps, remove any occasional weeds by hand. Good drainage also prevents moss growth.
Winter Care in New England Climates: Use plastic-bladed snow blowers to avoid scratching pavers. For ice, use 100% Magnesium Chloride ice melt, as rock salt can damage pavers.
Frequently Asked Questions about Building a Raised Paver Patio
We get many questions from homeowners in Methuen, Andover, and surrounding towns about raised paver patios. Here are some of the most common ones:
How high can a raised paver patio be without a permit?
This varies by town in Massachusetts and New Hampshire. Generally, retaining walls over 3-4 feet high or patios raised more than 30 inches above grade require a building permit and often professional engineering. Patios over 24 inches may also require a safety railing. We always check with your local building department in towns like Andover or Salem, NH, and handle the permitting process for our clients to ensure compliance.
How do you ensure proper drainage on a raised patio next to a house?
Proper drainage is a top priority. We ensure this through three key methods:
Minimum Slope: The patio surface is built with a minimum slope of 1/4 inch per foot leading away from the house foundation.
Internal Drainage: We install a drain pipe behind the base of the retaining wall, surrounded by gravel, to collect and redirect subsurface water, preventing pressure buildup.
Air Gap and Flashing: We maintain an air gap and use proper flashing between the patio and your home to prevent moisture intrusion.
Can I build a raised paver patio on a steep slope?
Yes, creating usable, level space on sloped properties is a primary reason to build raised paver patio projects. However, building on a steep slope increases the complexity and requires:
Significant Excavation: To create a stable base for the wall.
Engineered Retaining Walls: Taller walls on steep slopes often require geogrid reinforcement and professional engineering for safety and stability.
Professional Expertise: Due to the higher stakes, we strongly recommend entrusting steep-slope projects to experienced professionals to guarantee a safe and durable outcome.
Bring Your Dream Patio to Life
Building a raised paver patio is a complex project that, when executed correctly, adds significant value and beauty to your home. It requires careful planning, proper materials, and precise execution, especially in the variable climate of Massachusetts and New Hampshire. From ensuring proper base compaction to navigating local building codes and planning for drainage, every step is crucial for a lasting result.
For a flawless, durable, and professionally engineered outdoor space, it’s best to trust experienced experts. The team at Dube Property Maintenance & Hardscaping has the skills, equipment, and local knowledge to construct the perfect raised patio for your home in Methuen, Andover, North Andover, Salem, NH, and surrounding areas. We pride ourselves on providing high-quality, comprehensive outdoor solutions with a professional team dedicated to bringing your vision to life.
For 25+ years Dube Property Maintenance & Hardscaping has provided top-rated residential and commercial landscape design, installations, hardscaping, irrigation systems and commercial snow and ice management. Our hardscaping division proudly serves the Merrimack Valley, Middlesex and Essex County and Southern, NH regions, transforming outdoor spaces into stunning works of art.