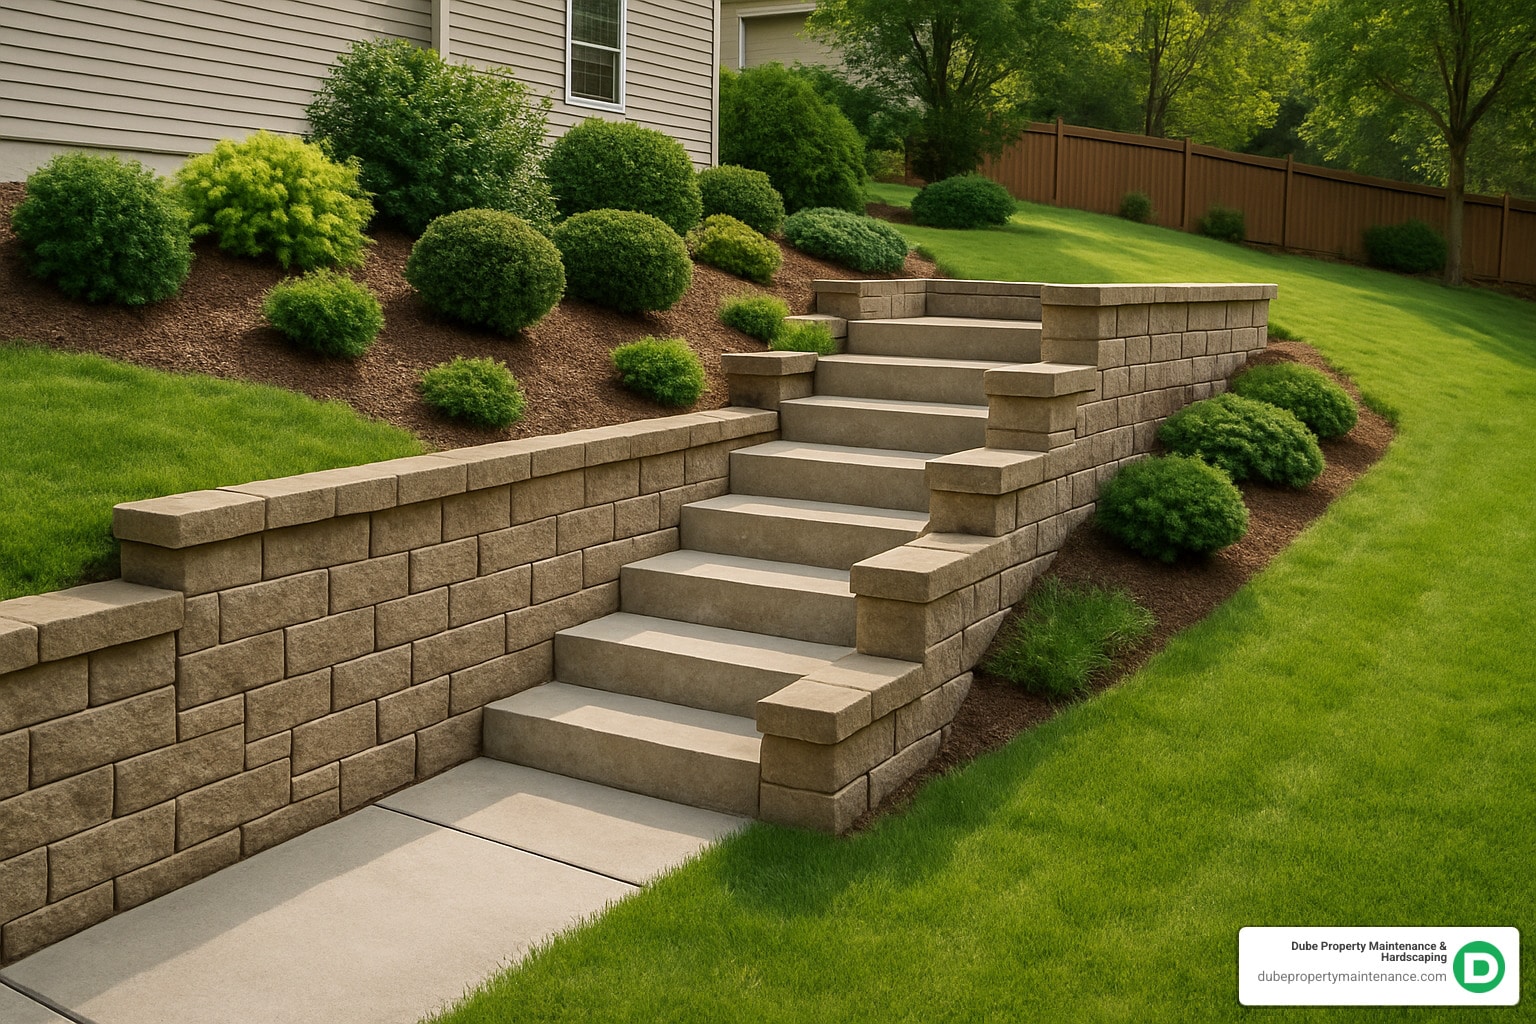
A block retaining wall with steps combines soil retention with safe access, creating both functional terracing and an attractive landscape feature. These integrated systems solve the dual challenge of slope stabilization while providing comfortable passage between different yard levels.
Key components of a block retaining wall with steps:
As one experienced installer notes from the research: “The vast majority of time was measuring, re-measuring, leveling, and measuring again.” This highlights how precision in planning and layout determines the success of your project.
Block retaining walls with steps offer several advantages over separate wall and stair systems. The integrated design ensures courses align seamlessly, creates stronger structural connections, and often costs less than building components separately.
Handy block retaining wall with steps terms:
– backyard designs with retaining walls
– stone wall builders near me
– gabion wall builders near me
Getting your block retaining wall with steps project off to a solid start means doing your homework first. Rushing into excavation without proper planning leads to headaches, extra costs, and sometimes having to start over completely.
Your site evaluation begins with measuring the total rise of your slope from bottom to top. Look for signs of existing drainage issues, underground utilities, or obstacles that might affect construction.
Call 811 before you break ground. This free service marks underground utilities and could save you from a very expensive mistake. Most areas require 48-72 hours notice.
The rise-run math follows a simple formula: measure your total slope rise in inches, then divide by 8 inches (standard concrete block height). If you get 54 inches of total rise, you’ll need 7 steps (54 ÷ 8 = 6.75, always round up). Each step gets an 8-inch rise and 12-inch run.
Building codes vary by location, but walls over 4 feet typically need permits and engineered plans. Many communities also require handrails when steps exceed three risers or 24 inches in height. Check with your local building department before starting.
Layout stakes and mason’s line transform your vision into reality. Set stakes at each end of your planned wall and stretch a level line between them for excavation guidance.
Your materials checklist should include interlocking concrete blocks (buy 10% extra), capstones, paver base, crushed gravel, landscape fabric, perforated drainage pipe, and essential tools including trenching shovel, tamper, levels, rubber mallet, and safety gear.
For detailed specifications on block selection, check out our comprehensive Block Retaining Wall guide.
A block retaining wall with steps solves multiple landscape challenges in one solution. Erosion control prevents soil washout during heavy rains, protecting foundations and existing landscaping. Usable terraces transform unusable slopes into functional outdoor areas for gardens, seating, or lawn space. The integrated pathway eliminates awkward transitions between separate walls and stairs, creating smooth visual lines and structural continuity.
Getting step calculations right saves materials, time, and frustration. Use 8-inch rises (matching standard block height) with 12-inch treads for comfortable, code-compliant stepping.
Measure your total rise from bottom to top, then divide by 8 inches to determine step count. Always round up – a 48-inch rise needs 6 steps, but a 52-inch rise needs 7 steps (52 ÷ 8 = 6.5, rounded up).
Tread options can extend beyond basic 12-inch depth by adding pavers or flagstone for deeper treads. Landing placement every 6-8 steps provides comfort and visual appeal.
Getting the right materials and tools makes the difference between a block retaining wall with steps that lasts decades and one that starts failing after the first winter.
Interlocking concrete blocks form the backbone of your project. These specially designed blocks have lips and connection systems that lock together as you stack them. Most residential projects use blocks that are 6 to 8 inches high and 12 to 18 inches long.
Capstones give your wall that finished, professional look. Standard 12-inch caps should overhang your step units by about 1.5 inches on each side.
The foundation materials are critical. Paver base needs to be coarse sand or stone dust – never fine sand. Plan for 2 to 3 inches in your trench depth calculations. Crushed gravel does triple duty: base material, backfill, and core fill. Clean 3/4-inch crushed stone works best.
Your tool list includes trenching shovel, plate compactor, good levels, rubber mallet, and chisel for cutting blocks. Safety gear – glasses, gloves, dust mask, and hearing protection – keeps you working safely.
Geogrid reinforcement might be needed for walls over 4 feet high. Drainage pipe – use 4-inch perforated pipe wrapped in filter fabric, placed at the base and sloped toward drainage outlet.
Finish textures and color choices let you match your home’s style. Blocks come in everything from smooth faces to split-face textures that look like natural stone.
For step-by-step construction guidance, check out our How to Build a Landscape Block Retaining Wall resource. For premium block options, Belgard’s Diamond Pro series offers excellent choices.
Freestanding walls sit on flat ground and divide spaces with minimal digging. Retaining walls constantly fight soil pressure, water, and freeze-thaw cycles, requiring deeper footings, serious drainage systems, and often reinforcement.
The load direction tells the story. Freestanding walls deal with vertical loads (gravity), while retaining walls fight horizontal loads (soil pressure). Footing depth reflects this: freestanding walls need 2-4 inches of base material, but retaining walls require 6+ inches plus buried blocks.
| Feature | Freestanding Wall | Retaining Wall |
|---|---|---|
| Load Direction | Vertical (gravity) | Horizontal (soil pressure) |
| Footing Depth | 2-4 inches | 6+ inches plus buried blocks |
| Drainage Required | No | Yes, with pipe and gravel |
| Height Limits | 36+ inches without permits | 48 inches in most areas |
| Base Width | Single block width | Double block width minimum |
For detailed construction principles, visit our Block Retaining Wall Construction guide.
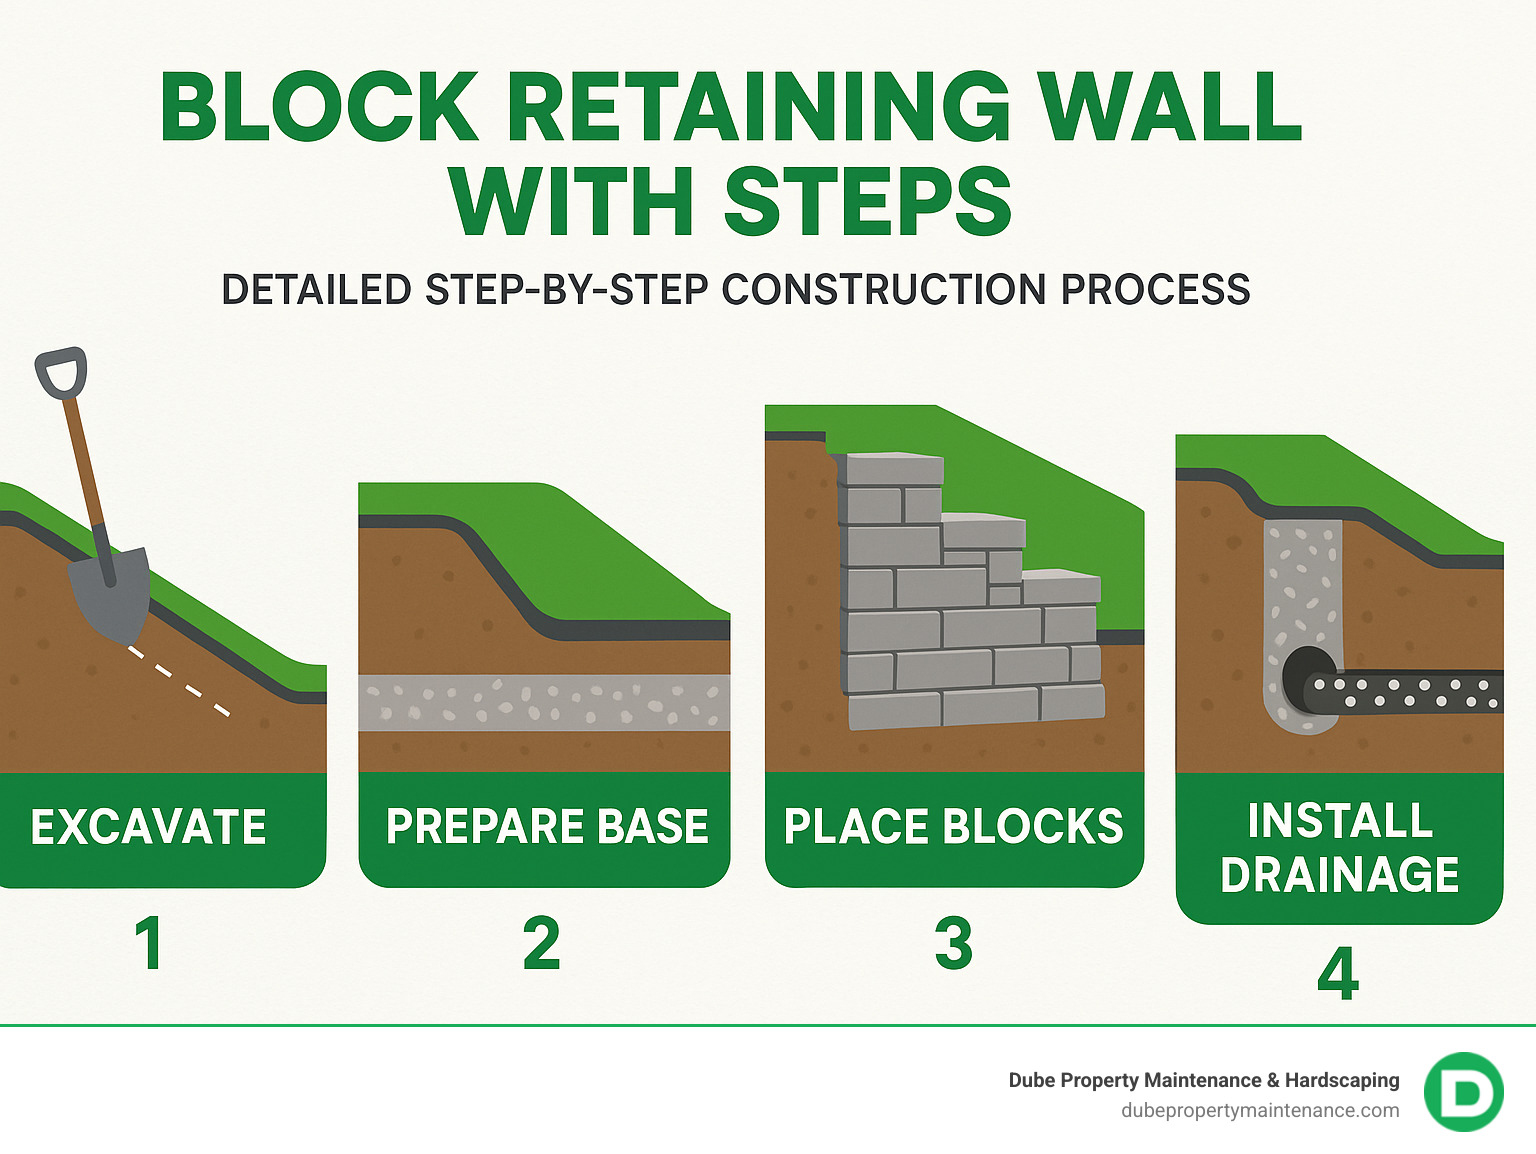
Building a block retaining wall with steps requires taking your time with each phase – rushing through any step creates problems later.
Start excavation at the lowest point and work up the slope. You’ll need a base trench that’s 4-6 inches deep and about 12 inches wide. You’re creating a series of level platforms at different heights.
The base compaction phase separates successful walls from future headaches. Strip out organic material, loose soil, and debris. Add 2-3 inches of paver base and run the plate compactor over it at least twice.
Installing the first course of blocks sets the stage for everything. Remove back lips from first-course blocks for easier leveling. Start at your lowest elevation and work methodically, checking each block with your level in both directions.
Stair risers get integrated into wall construction as you build, not added afterward. Each step riser consists of blocks placed exactly where calculations determined. Maintain perfect rise and run dimensions while keeping everything level.
Backfill each course with gravel before moving to the next level. Use clean 3/4-inch crushed stone, filling hollow block cores and extending about 12 inches behind the wall. Compact in 4-inch lifts.
Block cutting might be necessary for final adjustments. Score blocks with chisel and hammer, then break along the scored line. Always use safety equipment when cutting.
Capstone installation puts the finishing touch on your project. Clean block surfaces before applying construction adhesive. Place capstones with consistent overhangs.
Proper drainage installation prevents the most common cause of retaining wall failure. Place perforated pipe at your wall’s base, sloped toward outlet. For detailed drainage guidance, check out our Retaining Wall Drainage Pipe resource.
For additional technical guidance, the Proper Stair Construction for Retaining Walls manual provides excellent reference material.
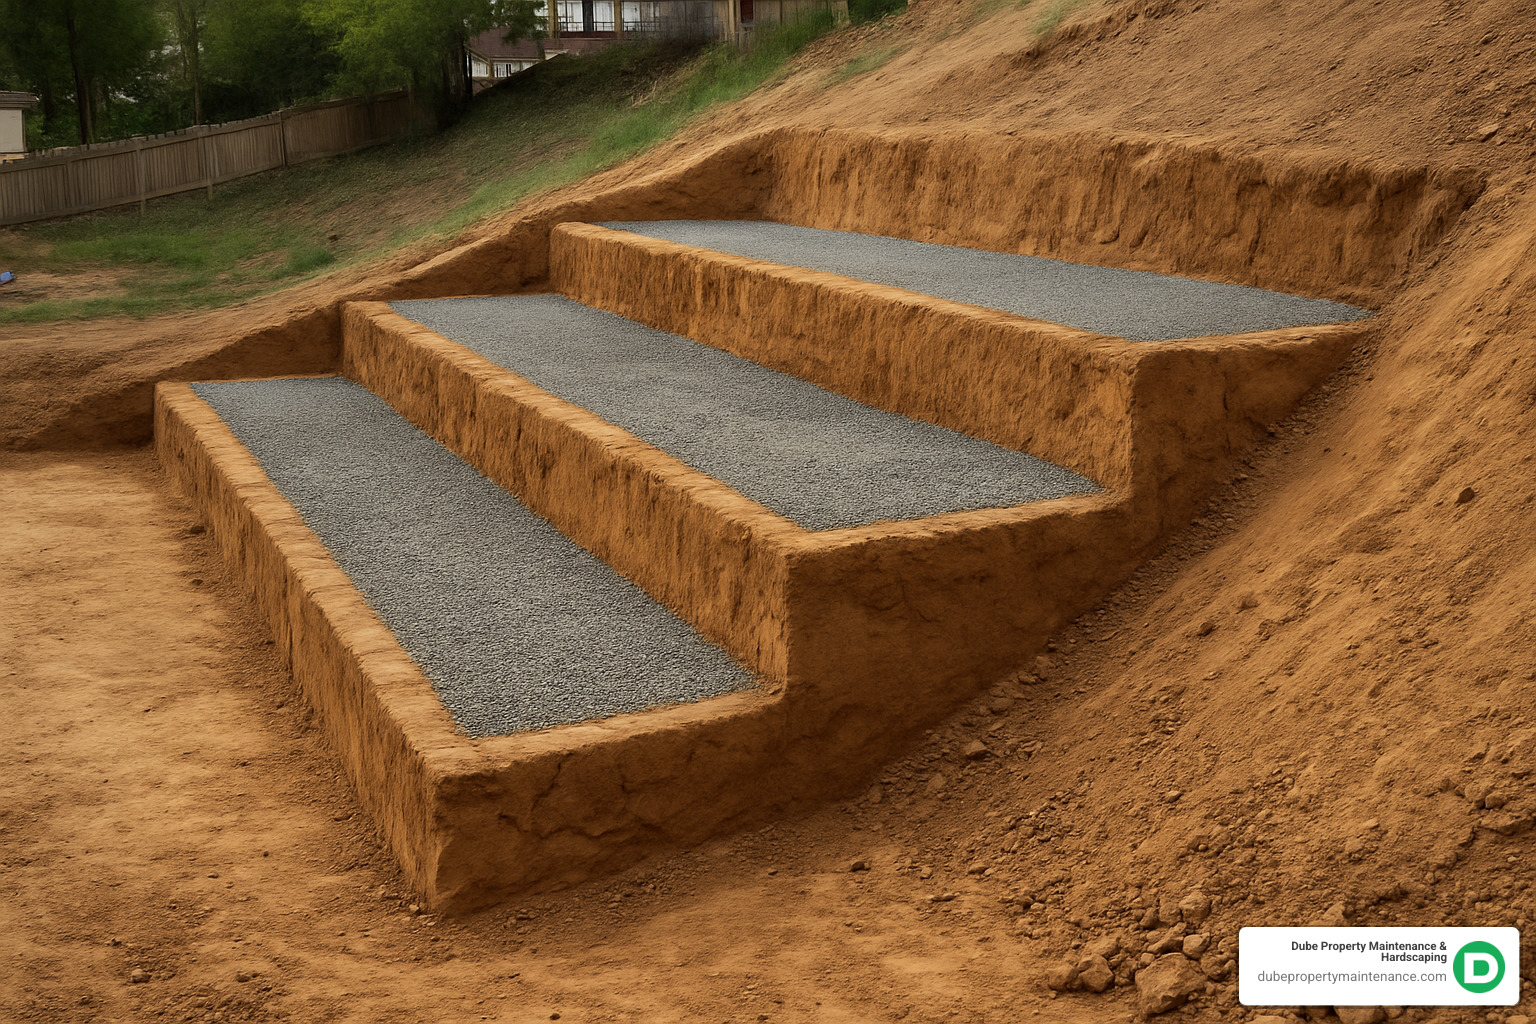
Building on sloped ground means creating multiple short walls that work together. Begin base excavation at the lowest point and work upward. Each step-up needs its own level platform with thorough base preparation.
Those buried blocks at each step-up must be fully below grade to prevent erosion. This means excavating back into the slope far enough to accommodate the entire block plus backfill material.
Flat ground construction simplifies the building process. Use stakes and mason’s line to establish wall alignment. Uniform risers require careful attention to measurements – each step should have identical rise and run dimensions.
Precise step calculations use standard 8-inch riser and 12-inch tread dimensions. Mark the centerline for each step riser according to calculations. Each step riser requires its own level platform with adequate base material. Consistent measurements throughout construction prevent accumulation of errors.
The difference between a block retaining wall with steps that lasts decades and one that fails within years comes down to proper drainage, structural stability, and safety features.
Water is your wall’s biggest enemy. Gravel backfill creates the drainage foundation – clean 3/4-inch crushed stone works best. Fill hollow block cores completely and extend gravel at least 12 inches behind the wall.
Perforated pipe at the base collects water before it builds pressure. Install 4-inch pipe wrapped in filter fabric, sloping at least 1% toward drainage outlet. This pipe runs the full wall length.
Landscape fabric acts like a filter between soil and gravel backfill, letting water pass while keeping soil particles from clogging your drainage system.
In Massachusetts and New Hampshire, frost line considerations aren’t optional. Our frost line reaches 48 inches deep, and frost heave can destroy walls. Your base needs to extend below this line.
Handrails might be required by local building codes for taller step sections. Lighting transforms your wall into an evening focal point while improving safety. For inspiration, check out our Retaining Wall Lighting Ideas guide.
Adhesive caps provide the finishing touch. Clean block surfaces thoroughly and apply construction adhesive evenly with consistent overhangs.
Poor compaction destroys more retaining walls than any other factor. Base material and backfill must be compacted in layers. Missing drainage creates water buildup that exerts tremendous pressure. Uneven step rises create safety hazards – maintain consistent 8-inch rises throughout.
Skipping permits for walls over 4 feet can cost thousands in removal fees. Overloading walls beyond design capacity leads to failures. Other project killers include using clay soil instead of gravel for backfill, making your base too narrow, and rushing through construction.

The final phase transforms functional construction into an attractive landscape feature.
Caps and treads create the finished walking surface while protecting your wall from weather. Standard concrete caps work beautifully, but natural stone or specialty caps can improve the look. Maintain consistent overhangs – typically 1.5 inches on each side.
Color blends offer customization possibilities. Many manufacturers provide multiple color options that can be mixed for natural-looking variation.
Based on internet research data (not actual Dube Property Maintenance & Hardscaping pricing), DIY block retaining wall with steps projects typically range from $1,000 to $6,000 for most residential applications. Professional installation averages $4,000 to $25,000, with complex projects potentially reaching higher costs depending on site conditions and design complexity.

Seasonal inspection becomes your wall’s best friend for long-term performance. Walk your wall twice yearly, checking for settling, cracking, or drainage issues. Vegetation care around your wall affects both beauty and structural integrity. Choose plants that won’t damage the wall with aggressive root systems.
Snow and ice management protects your investment. Use sand instead of salt for ice control, as salt can deteriorate concrete surfaces.
For creative integration ideas, check out our Gardens with Steps guide.
Your block retaining wall with steps can become the stunning centerpiece of your landscape design.
Curved lines create a softer, more natural appearance that flows with landscape contours. Mixed textures add visual depth through combining different block styles or accent elements. Integrated planters built into the wall design provide opportunities for seasonal color displays.
Accent lighting transforms your wall into an evening focal point while improving safety. LED strip lights under cap overhangs create subtle illumination, while step-edge lighting is particularly effective.
Consider additional elements like water features, built-in seating areas, or multi-level terracing with connecting stairways for dramatic landscape changes.
Calculating blocks for your block retaining wall with steps starts with measuring total face area. Multiply length by height for square footage, then divide by your chosen block’s face area.
Example: A 40-foot long, 3-foot high wall gives 120 square feet. Using standard 12×8-inch blocks (0.67 square feet each), you’d need about 180 blocks (120 ÷ 0.67 = 179).
Step risers add complexity – each counts as additional wall area. Always purchase 10% extra blocks for cutting waste and future repairs.
Most communities don’t require permits for retaining walls under 4 feet high, but adding steps can change requirements. The step component may trigger additional rules about stair construction regardless of wall height.
Setback requirements from property lines can also affect permit needs. Call your building department during planning – most officials appreciate homeowners who check first.
A well-built block retaining wall with steps requires surprisingly little maintenance. Seasonal inspections twice yearly catch problems early. Look for settlement, cracks, drainage problems, and vegetation growth in joints.
Annual cleaning with stiff brush and garden hose handles most needs. Vegetation management prevents bigger problems – remove weeds from joints promptly. Drainage maintenance keeps outlets clear of debris.
Joint maintenance involves replacing deteriorated materials every 5-10 years. Most homeowners find these walls require less maintenance than many other landscape features.
A well-built block retaining wall with steps becomes one of those landscape improvements that makes you smile every time you see it. You’re creating functional outdoor space where there might have been unusable slope, adding safe passage between yard levels, and building a feature that will look great for decades.
DIY confidence comes from understanding this is careful, methodical work that rewards attention to detail. For walls under 4 feet high on straightforward sites, most homeowners can tackle this successfully. The secret is in the planning and measuring phase.
Don’t let DIY enthusiasm override common sense about safety and local codes. Always check permit requirements before starting, and don’t hesitate to consult professionals for complex sites or tall walls.
The investment in proper planning, quality materials, and careful construction pays off in lasting performance. Take your time with drainage installation, base preparation, and compaction – these details determine whether your wall thrives or fails.
For our neighbors throughout Massachusetts and New Hampshire, Dube Property Maintenance & Hardscaping brings decades of experience with local soil conditions, climate challenges, and building requirements. Our team understands how New England weather affects retaining walls.
Whether you’re tackling this as a DIY project or prefer professional installation, a block retaining wall with steps transforms problem slopes into attractive, functional landscape features. The combination of practical problem-solving and visual appeal makes these systems some of the most satisfying improvements you can make.
Ready to explore professional installation options? Connect with our experienced team through Retaining Wall Builders Near Me. We’re your local experts for comprehensive hardscape solutions that combine functionality, durability, and craftsmanship that makes neighbors ask who did the work.