Base for pavers is crucial to the foundation of any outdoor project like patios, walkways, or driveways. Choosing the right base determines not only the appearance but also the longevity of your outdoor space. Here’s what you need to know in a nutshell:
A well-constructed base prevents pavers from shifting and cracking, ensuring your outdoor space remains stunning for years.
The stability and lifespan of your paver project hinge on a well-installed base. A proper foundation supports heavy loads and mitigates issues like shifting or weed growth. It’s not just about looks; it’s about enduring performance.
For Dube Property Maintenance & Hardscaping clients in Methuen, MA, and surrounding areas, selecting a base is key to withstand regional weather conditions. Whether you’re dealing with snowy winters or managing drainage, the right foundation makes a world of difference.
Common base for pavers vocab:
– install paver stone walkway
– paver walkway installation
– paver patio installation
When it comes to building a solid base for pavers, you have several options. Each type of base material offers unique benefits and challenges, and choosing the right one can make all the difference in the durability and appearance of your project. Let’s explore the details of gravel, sand, and synthetic bases.
A gravel base, often made of crushed stone, is a popular choice for its excellent drainage properties. This base type consists of various sizes of crushed stone, typically ranging from 3/8 inch to 1 inch in diameter. The gaps between the stones allow water to flow through, preventing water pooling and reducing the risk of frost heave in colder climates.
Sand is another common choice for a base for pavers, particularly for smaller projects like patios and walkways. Concrete sand is often used due to its coarse texture, which aids in compaction and provides a sturdy bedding layer.
Synthetic bases, made from recycled materials, offer a modern alternative to traditional bases. Products like Gator Base and Paverbase are popular for their ease of installation and excellent drainage efficiency.

Choosing the right base for pavers depends on your project’s specific needs, local climate, and soil conditions. Each base type has its own advantages, so weigh these factors carefully to ensure a long-lasting and beautiful outdoor space.
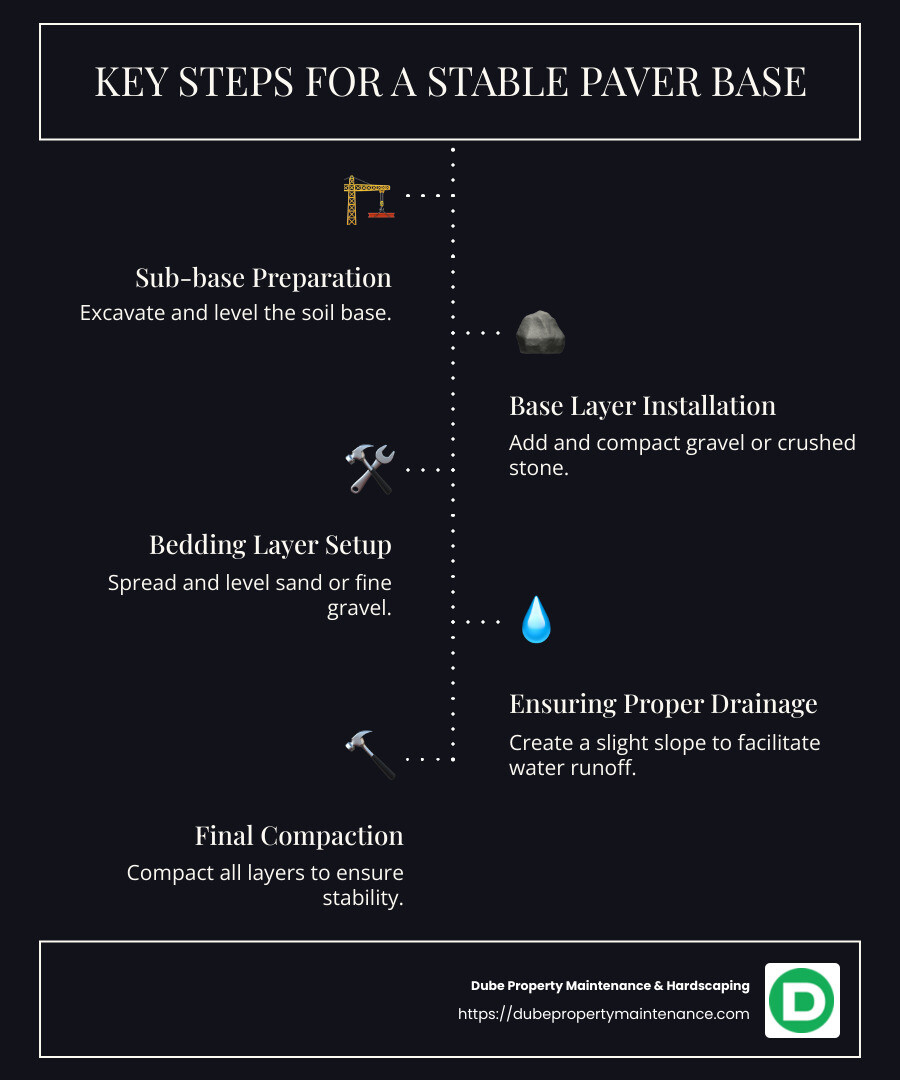
Before laying pavers, preparing the ground is crucial for a durable and stable surface. A well-prepared ground ensures your pavers last longer and look great. Let’s break down the steps involved in this process.
The first step in preparing your ground is excavation. This involves removing the existing soil to make room for your base for pavers. Don’t cut corners during this step. Over-excavate the perimeter to ensure the base extends beyond the finished edge, which stabilizes the pavers and prevents shifting. For instance, if your patio is 10 feet by 20 feet and you plan to use a 6-inch base, excavate an area of 11 feet by 21 feet.
Once you’ve excavated the area, it’s time to prepare the sub-base. This layer is vital for drainage and stability. If you’re dealing with clay or poorly draining soil, laying down a geo-textile fabric can prevent the sub-base material from mixing with the soil. This mechanical barrier also stabilizes the ground, providing a solid foundation for the layers above.
Proper compaction is essential for a stable paver installation. Avoid the mistake of dumping all your base material at once. Instead, compact in layers of 3 to 4 inches. Most plate compactors won’t compact more than 4 inches of material at a time, so ensure each layer is thoroughly compacted before adding more. If the material is dry, lightly mist it with water to reduce dust and aid compaction.
Moisture control is a crucial aspect of ground preparation. While compaction benefits from a bit of moisture, too much can lead to problems. Avoid placing plastic under your pavers, as it traps water and can cause issues. Instead, use a good polymeric sand to fill joints, which helps prevent weed growth and stabilizes the pavers.
By following these steps, you’ll create a solid and reliable foundation for your paver project. This groundwork lays the path for a successful installation, ensuring your outdoor space remains beautiful and functional for years to come.
Next, we’ll explore the optimal depth and material calculations for your paver base.
When it comes to laying a base for pavers, getting the depth and materials right is crucial. This ensures stability and longevity for your patio, walkway, or driveway. Let’s explore the specifics of how to calculate these elements effectively.
The required depth of your base depends on the type of project you’re working on. Here’s a simple guide:
Once you’ve determined the depth, it’s time to calculate the materials required. Here’s how to approach it for different base types:

Understanding the coverage area is key to ensuring you have enough materials. For instance, a 10×20-foot patio with a 6-inch gravel base requires about 3.7 cubic yards of gravel. Always round up to account for compaction and potential waste.
By accurately calculating the depth and materials, you’ll set the stage for a successful paver installation. Next, we’ll explore installation techniques and tips to ensure your project goes smoothly.
Installing a base for pavers is a critical step in ensuring your project stands the test of time. Let’s explore the best practices for installing gravel, sand, and synthetic base materials.
Layering Technique: Start by spreading the gravel evenly across the excavated area. It’s essential to layer the gravel in stages, typically 3 to 4 inches at a time. This helps with even compaction and prevents future settling.
Compaction Tips: Use a plate compactor to compact each layer thoroughly before adding the next. Compacting more than 4 inches at once can lead to uneven settling. If the gravel is dry, lightly spray it with water to aid compaction and reduce dust.
Slope for Drainage: Ensure the gravel base has a slight slope (about 1% to 2%) to facilitate water drainage. This prevents water pooling, which can damage the pavers over time.
Spreading and Leveling: Spread a 1 to 2-inch layer of coarse bedding sand over the compacted gravel base. Use a screed board to level the sand, ensuring an even surface for laying pavers.
Moisture Management: Avoid compacting the sand layer. Instead, let the weight of the pavers and subsequent tamping push the sand into place. This allows for minor adjustments and helps create a stable surface.
Panel Placement: Synthetic base panels, often made from recycled materials, are laid directly over the prepared ground. Start at one corner and work your way across the area, ensuring each panel is placed snugly against the next.
Interlocking: Many synthetic panels feature interlocking edges, which provide added stability. Ensure these edges are securely connected to prevent shifting.
Ground Leveling: Before laying the panels, make sure the ground is level and free of debris. This ensures a smooth surface for the panels and prevents any unevenness in the final paver installation.
By following these techniques, you’ll create a solid foundation that supports your pavers for years to come. Up next, we’ll discuss common mistakes to avoid during paver base installation.
When setting up a base for pavers, it’s easy to make mistakes that can lead to costly repairs down the line. Here are some common pitfalls and how to avoid them:
Every successful paver project starts with understanding the soil type beneath your base. Different soils have different drainage and stability properties. For instance, clay soils hold water and can cause the paver base to shift or sink over time.
Tip: Conduct a soil test before starting your project. If you have clay or other poor-draining soil, consider adding a layer of geotextile fabric before laying your base. This fabric acts as a barrier, preventing the clay from mixing with your base materials.
Compaction is crucial for a stable paver base. Many DIYers skimp on this step, leading to uneven settling and shifting pavers.
Tip: Use a plate compactor for each layer of base material. Compact in layers no more than 3 to 4 inches thick. If your base is thicker, compact it in stages. Adding a little water can also help achieve better compaction and reduce dust.
Ignoring drainage can lead to water pooling, which damages the paver installation. Without proper drainage, water can seep into the base, causing it to become unstable.
Tip: Always incorporate a slight slope (1% to 2%) in your base to facilitate water runoff. Keep the slope free of obstructions to ensure smooth drainage. As Tim O’Shea from The Build Pros highlights, “A uniformly compacted base and proper drainage solutions are essential for long-term stability.”
By avoiding these common mistakes, you’ll ensure your paver project remains level and durable. Next, we’ll guide you on choosing the right base for your specific project with Dube Property Maintenance & Hardscaping.
Selecting the right base for pavers is crucial for the success of your project. The choice depends on several factors, including the type of project, local climate, and soil conditions. Let’s explore how these elements influence your decision.
Different projects have different demands. For example, a walkway needs a different base than a driveway. Walkways can often use a shallower base due to lighter foot traffic, while driveways require a deeper, more robust base to support vehicle weight.
The climate in your area plays a significant role in choosing the paver base. In regions with heavy rainfall, like parts of Massachusetts and New Hampshire, drainage is a key concern. An open-graded base using crushed stone can be beneficial, as it allows water to flow through easily, reducing hydrostatic pressure.
Soil type affects how well your paver base will perform over time. For instance, areas with clay soil, common in parts of New England, may require additional measures to ensure stability.
By considering these factors, you can tailor your paver base to meet the specific needs of your project. Dube Property Maintenance & Hardscaping is here to guide you through the process, ensuring your outdoor space is both beautiful and built to last.
Next, we’ll explore installation techniques and tips to ensure your paver base is set up for success.
In conclusion, choosing the right base for pavers is fundamental to the success and longevity of your outdoor project. Whether it’s a patio, walkway, or driveway, the base you select will directly impact the durability and appearance of your finished space.
Review: We’ve explored various base options, from gravel and sand to synthetic materials. Each has its unique strengths, whether it’s the excellent drainage of an open-graded gravel base or the ease of installation offered by synthetic panels. The key is to match the base to your project’s demands, local climate, and soil conditions.
Importance of Choosing the Right Base: The right base ensures your pavers remain stable and attractive over time. An improperly chosen base can lead to issues like cracking, shifting, and even water damage. By investing in the right foundation, you safeguard your investment and improve the functionality and beauty of your outdoor space.
Contact Dube Property Maintenance & Hardscaping: Ready to start your project but unsure which base is right for you? Our team at Dube Property Maintenance & Hardscaping is here to help. We offer expert guidance and professional installation services to ensure your project is completed to the highest standards. With locations across Massachusetts and New Hampshire, we’re ready to assist with all your landscaping and hardscaping needs.
Contact us today to discuss your project and find how we can transform your outdoor space into a durable and beautiful haven.
